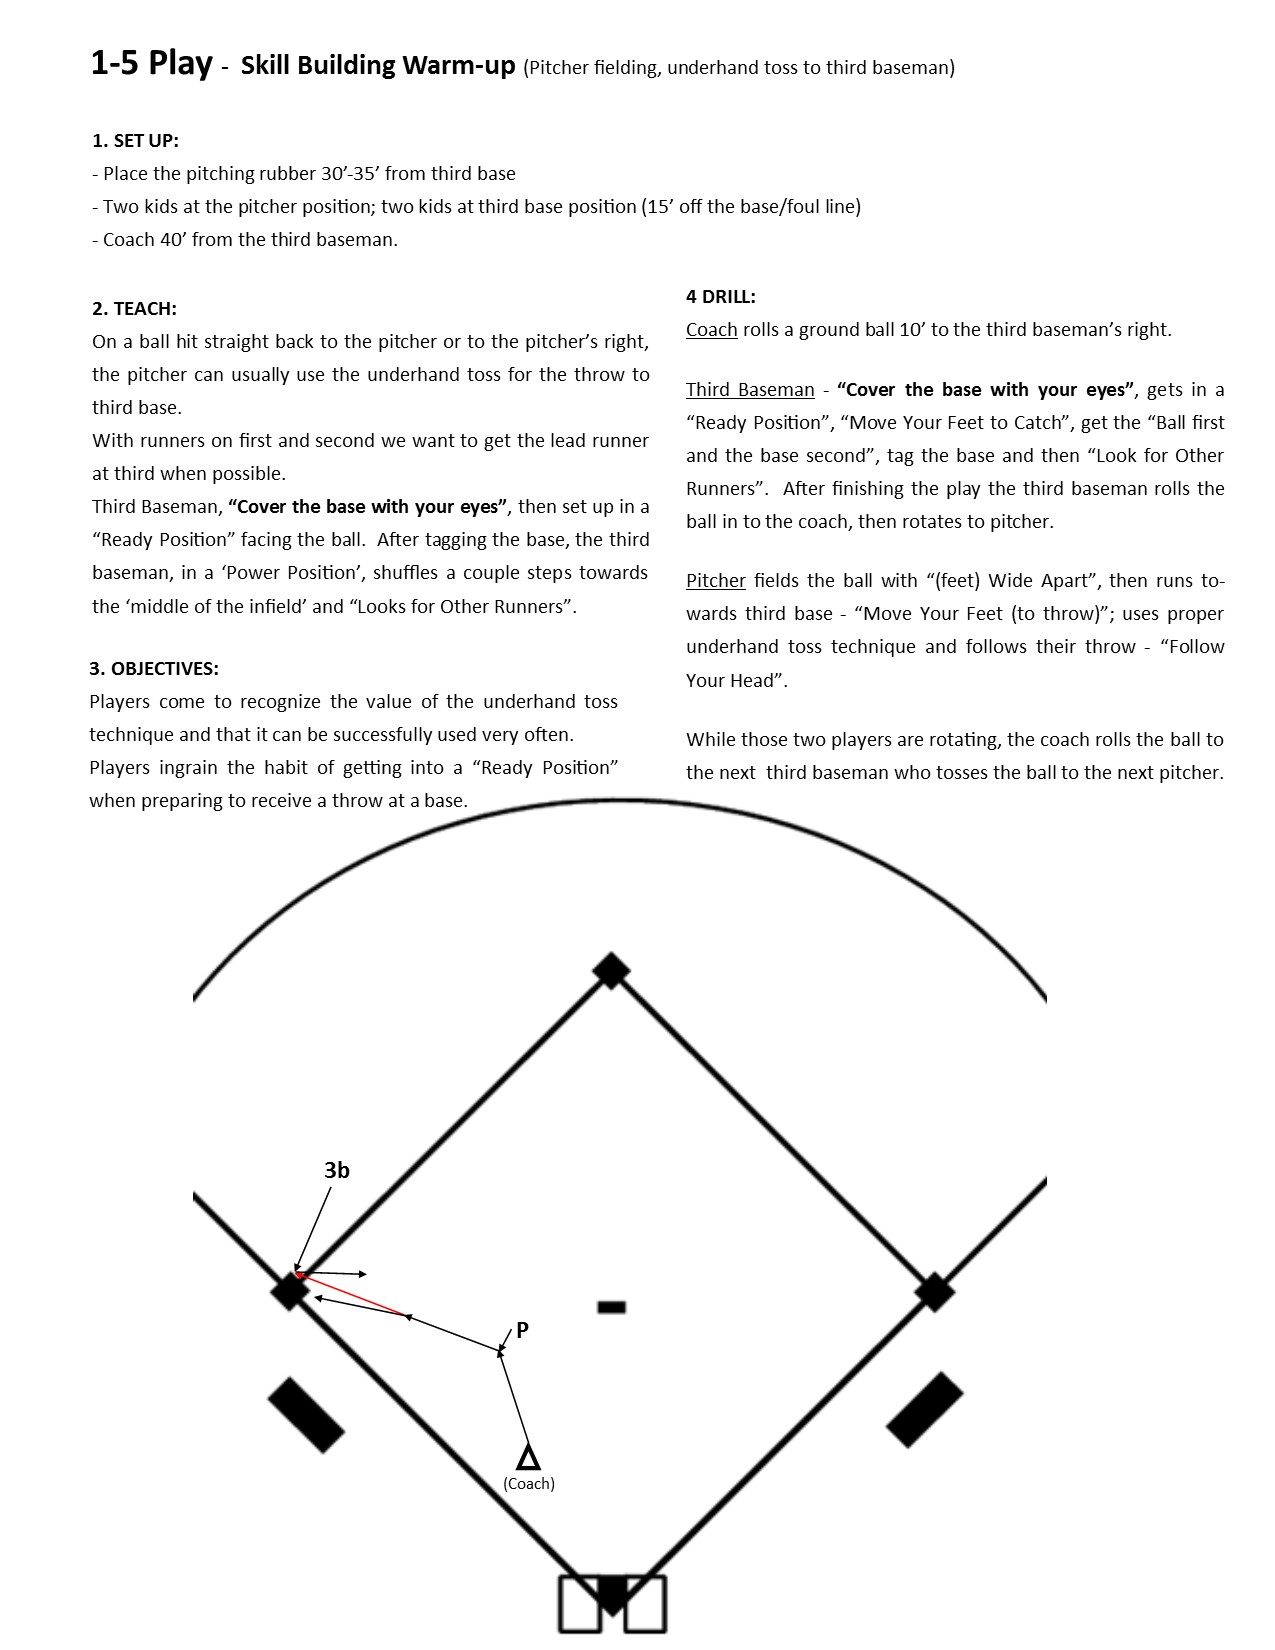
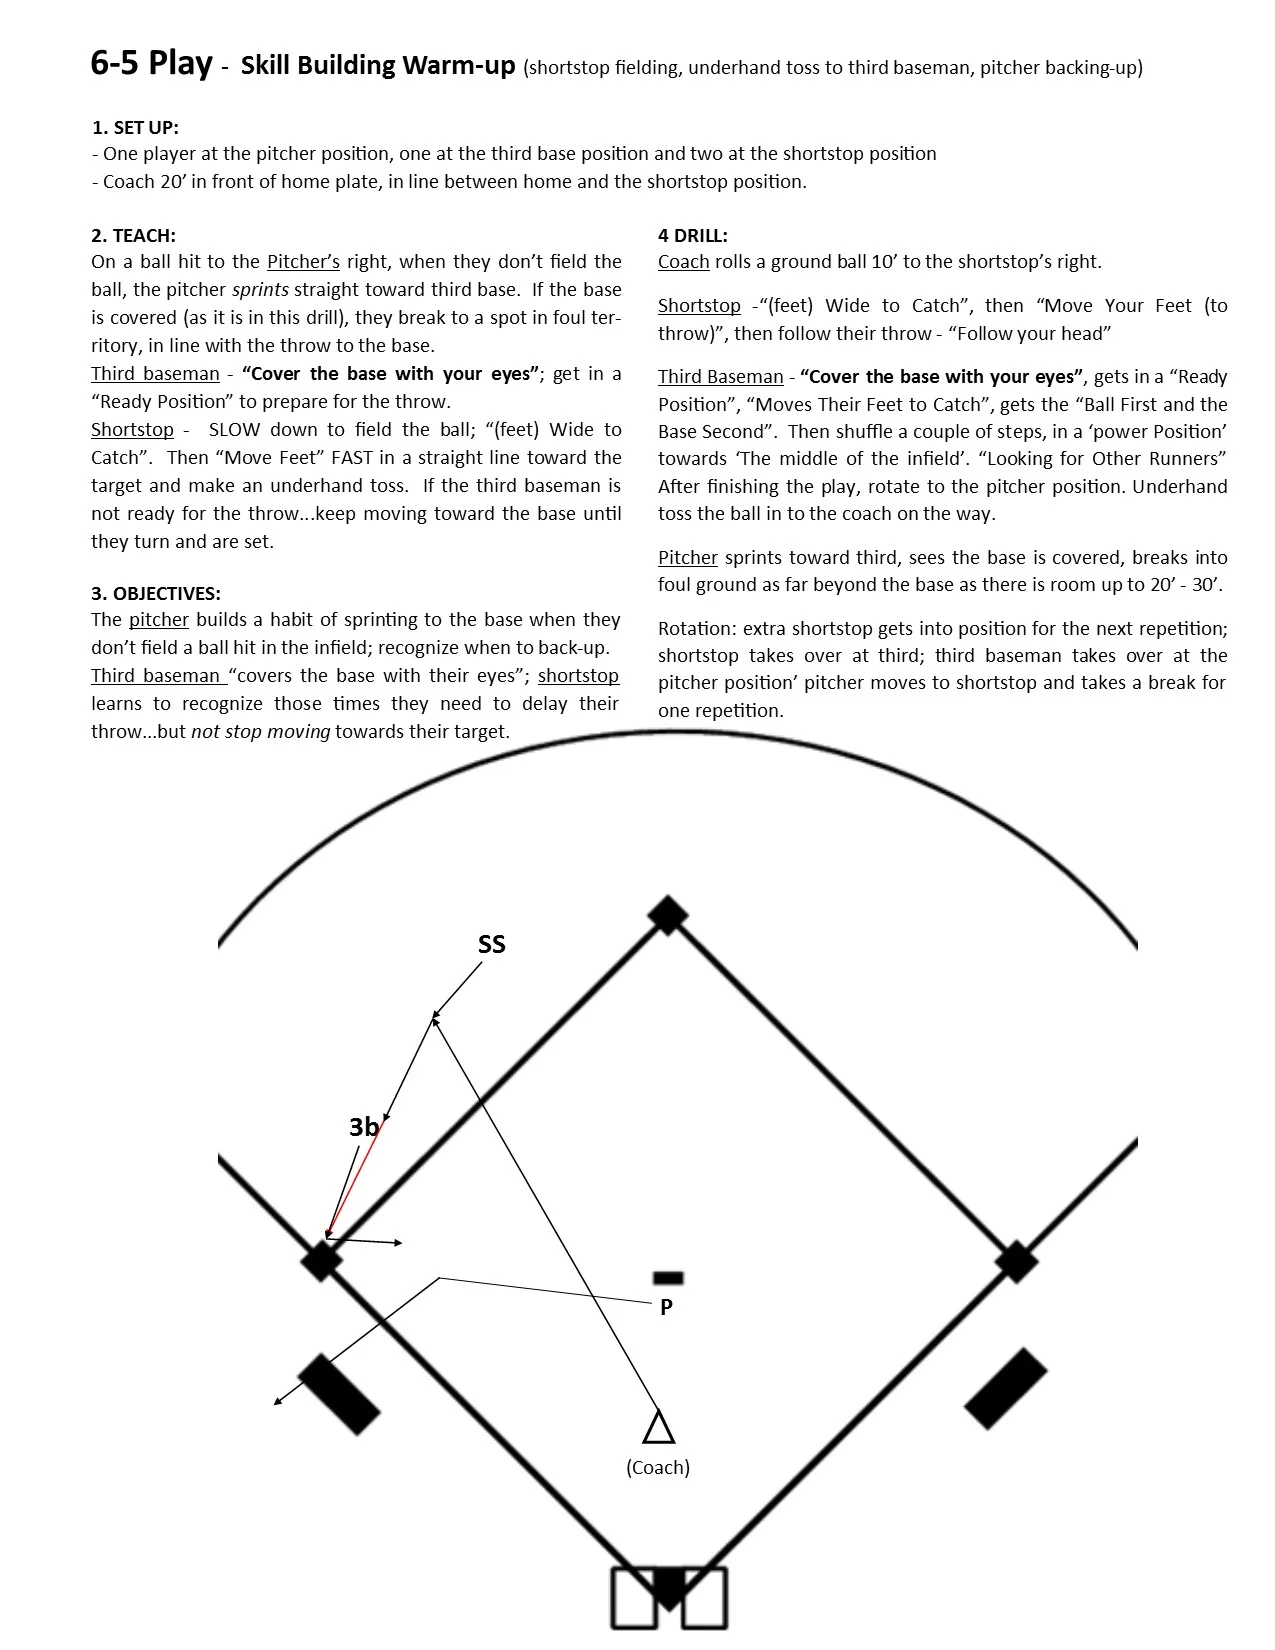
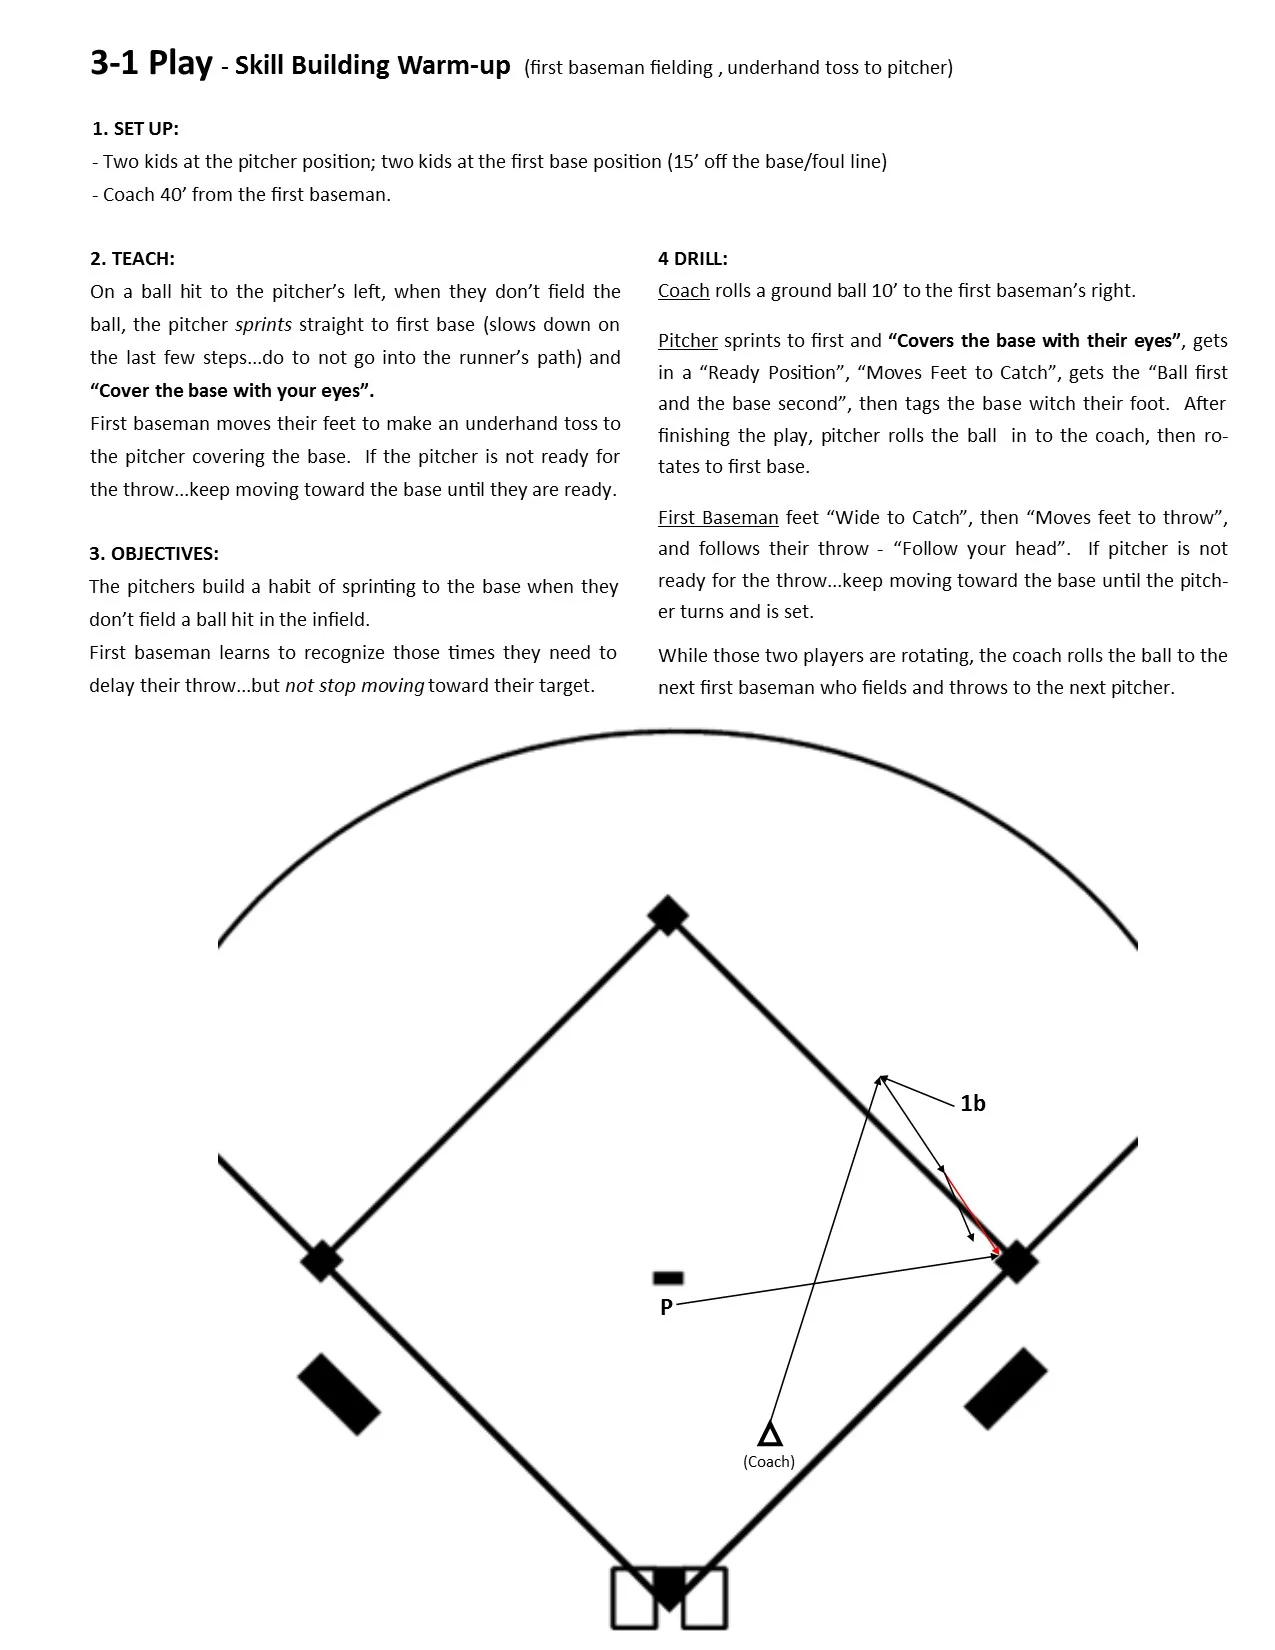
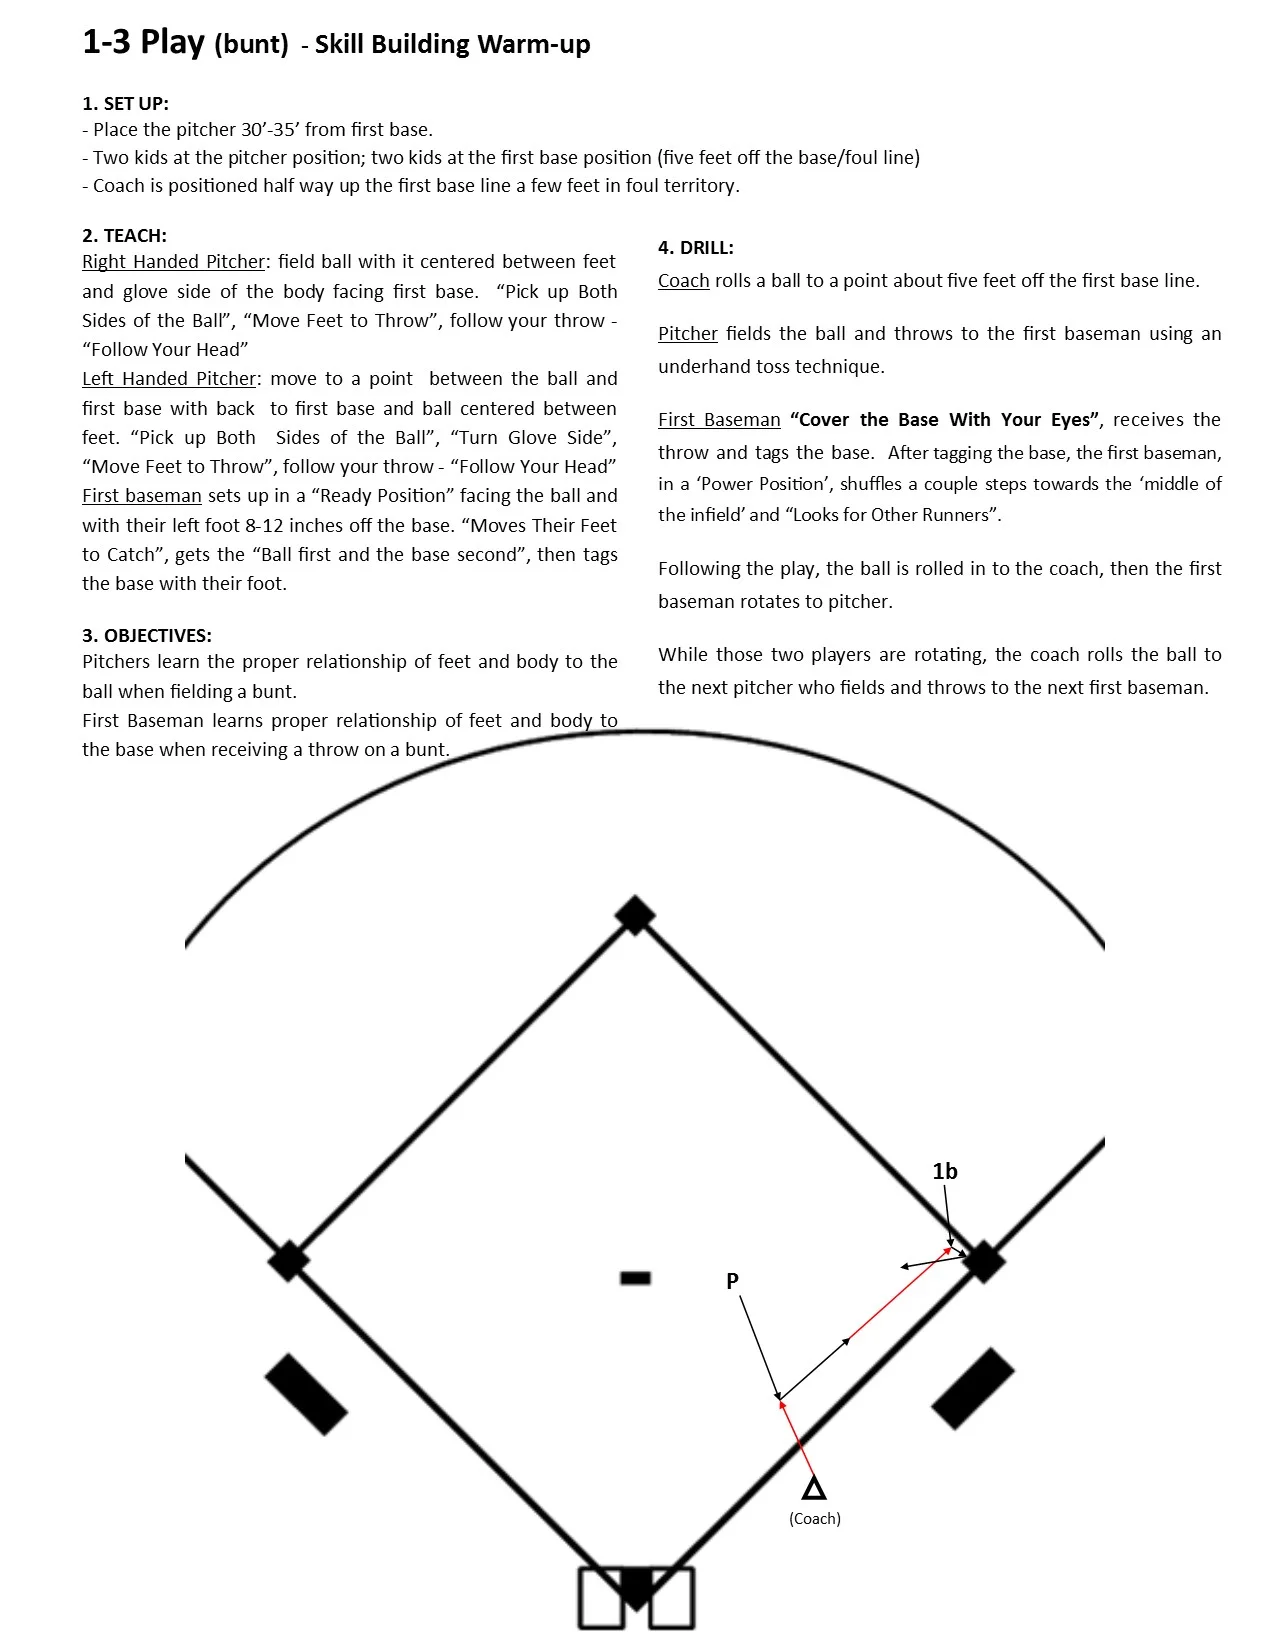
- Baseball is a Game of Movement -
Skill Building Warm-up
Dynamic drills for the team prior to playing catch. Maximize limited practice time. Build skills, starting with the first minute of practice, while warming up players’ bodies.
Most of the drills in this section are applicable to other parts of practice, most specifically as part of 'Three Groups Drills' in the TEAM DRILLS segment of a practice. The unique feature of all these drills is the player's arm does not need to be warm to execute these drills. All throws made in these drills are an underhand toss. Many of the drills do not involve throwing, but focus on footwork and receiving throws.
Players who need to improve a part of their game can have drills in this section suggested to them by their coach and work on them at home with a parent, sibling or friend. Alert all your players and parents of this page of the site.
Many if not all drills found on the Skill Building Warm-up page can be used on days where the weather (or league field scheduler) keeps you from getting on a diamond. These drills can be run on any level patch of grass, on a concrete school yard, in an empty parking lot, in a gym, etc. They are also great activities for getting a club ready to go prior to a game - we can run a pre-game 'practice' before every game.
Table of Contents
MINI DIAMOND
BASE RUNNING
DEFENSIVE RESPONSIBILITIES
FIELDING
GROUND BALLS
FLY BALLS
PITCHERS FIELDING
Third Base Side
First Base Side
RECEIVING A THROW AT A BASE
Additional Drills
Base Running
Fielding Ground Balls
Pitcher Defensive Plays
MINI DIAMOND - Super Tool
One of the most valuable tools a coach can use is the Mini Diamond. Any drill in which the focus of the teaching is something other than working on full on overhand throwing technique can be run on a Mini Diamond. Use of the Mini Diamond is referenced throughout the Coaching Guide.
A Mini Diamond is 20’-25' square, but can be modified larger or smaller depending on the activity. It is constructed using cones, throw down bases, ball caps, extra shirts that are laying around, a leaf, anything. Anytime we compact the teaching/learning environment we reduce distractions, improve communication and the players get many more repetitions during a drill.
Examples of drills that can be run using a Mini Diamond include relays, backing-up and base coverage responsibilities, and first and third defense. Keep in mind that for most activities the throwing and catching aspect is the last skill that needs to be mastered (and we take care of that during 'Playing Catch Practice'). Proper movement, positioning and communication need to be understood and mastered to some extent before be add the throwing aspect to cement the execution of the activity.
The Mini Diamond is also useful for teaching how a drill is supposed to run before going to the full size diamond.
BASE RUNNING
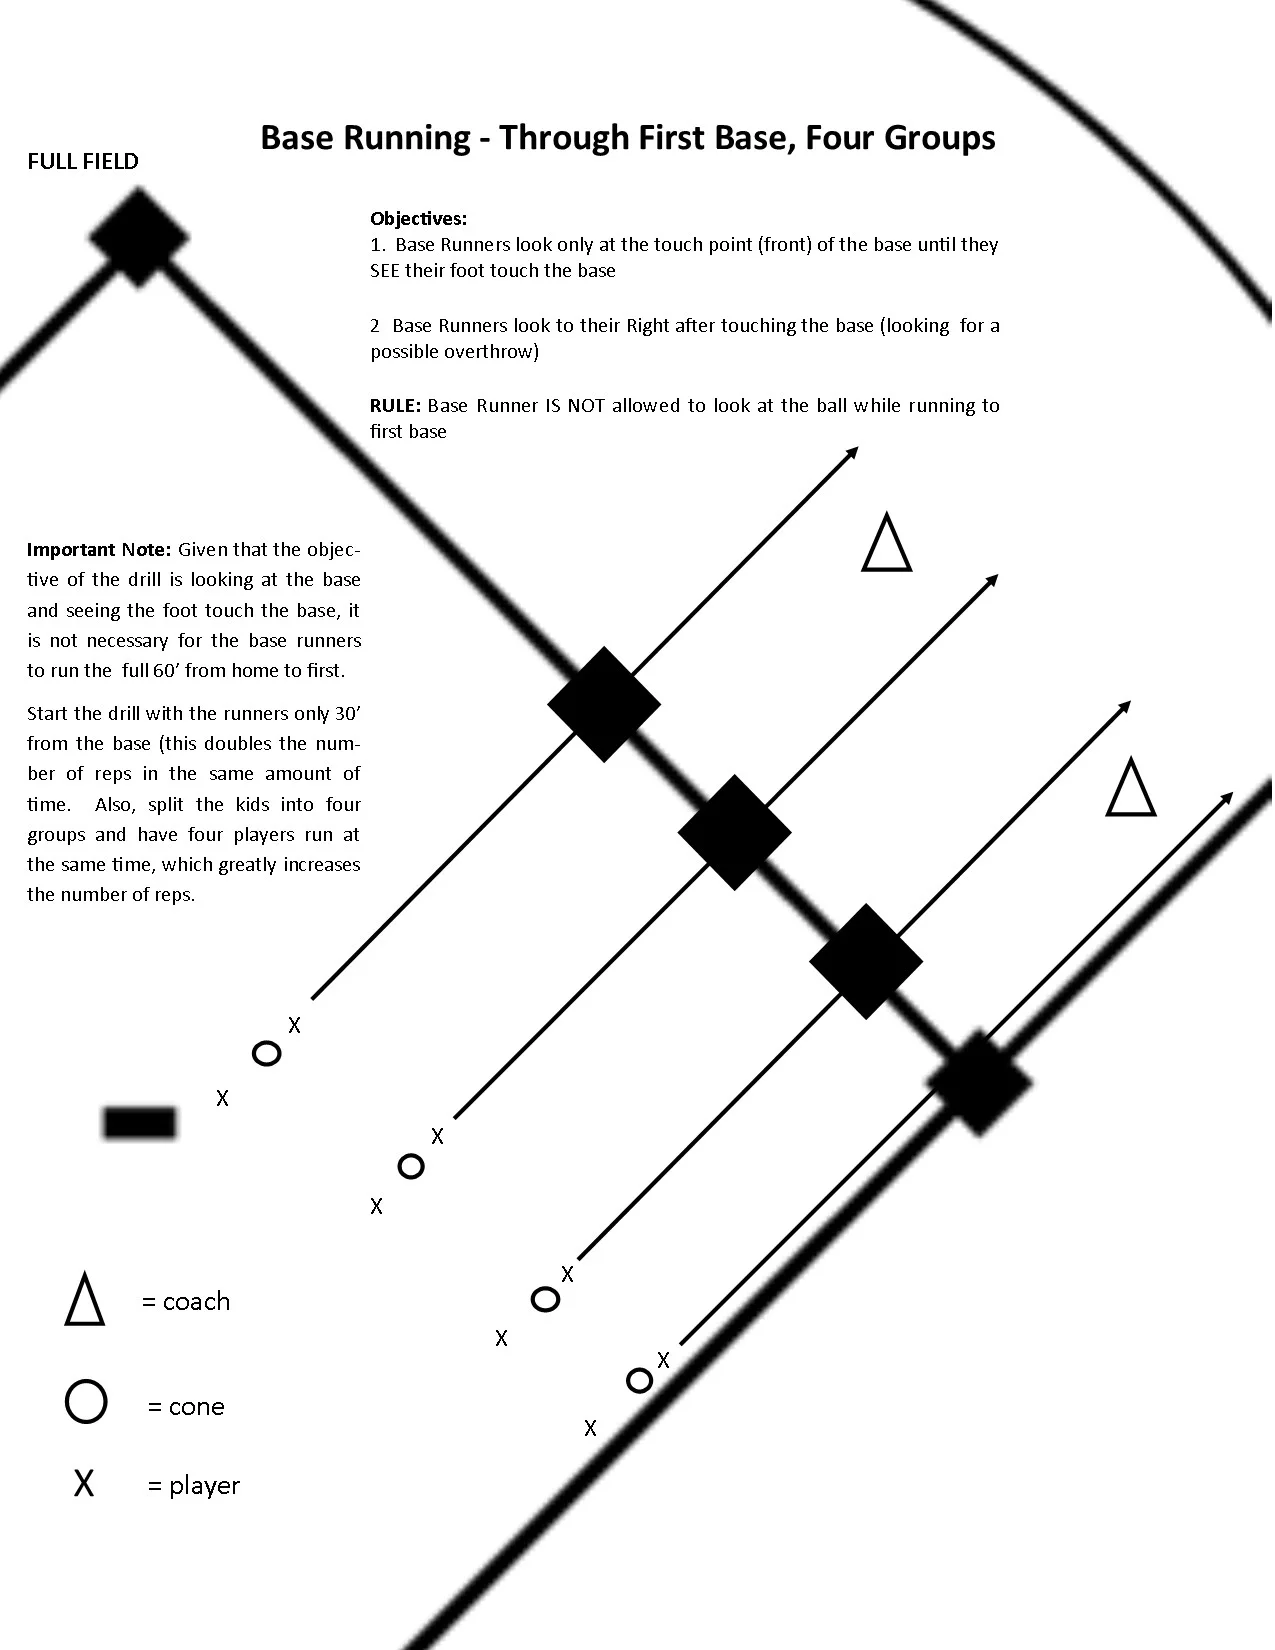
Turns & Touches - Base Running
The drill diagram below illustrates running the drill with the entire team (12 players). When running the drill during the Skill Building warm-up, we have 3-5 players. In the SBW we run the drill with one group using just one base. Which base should we choose. My suggestion is Second Base. The impact on the defense when a runner can go from first to third on a ball hit to the outfield is significant. The result is a First & Third Situation, which is difficult to defend.
The other drills on a given day’s SBW set-up may force us to run this group at first base or third base, which is fine.
Also, given the current needs of the team, practicing this drill at first or third base may be preferable on the day this drill is incorporated into the SBW.

SET UP
Lay down three throw down bases on the perimeter of the infield, If you have a deep infield and don't mind chewing up the dirt at the back end of the infield the ideal scenario is to have the first to third group running on the dirt. The other option is to place the base just beyond infield dirt.
Get the players in three groups of four. One group at home plate, one group at second base and one group at first base of the throw down bases.
Have coaches at first base, third base and at second base of the throw down bases.
TEACH
1. Anytime a ball is hit in the outfield each base runner (including the batter) has a mindset that they are going to advance 'two bases'. Only when the defense forces them to stop do they only go one base.
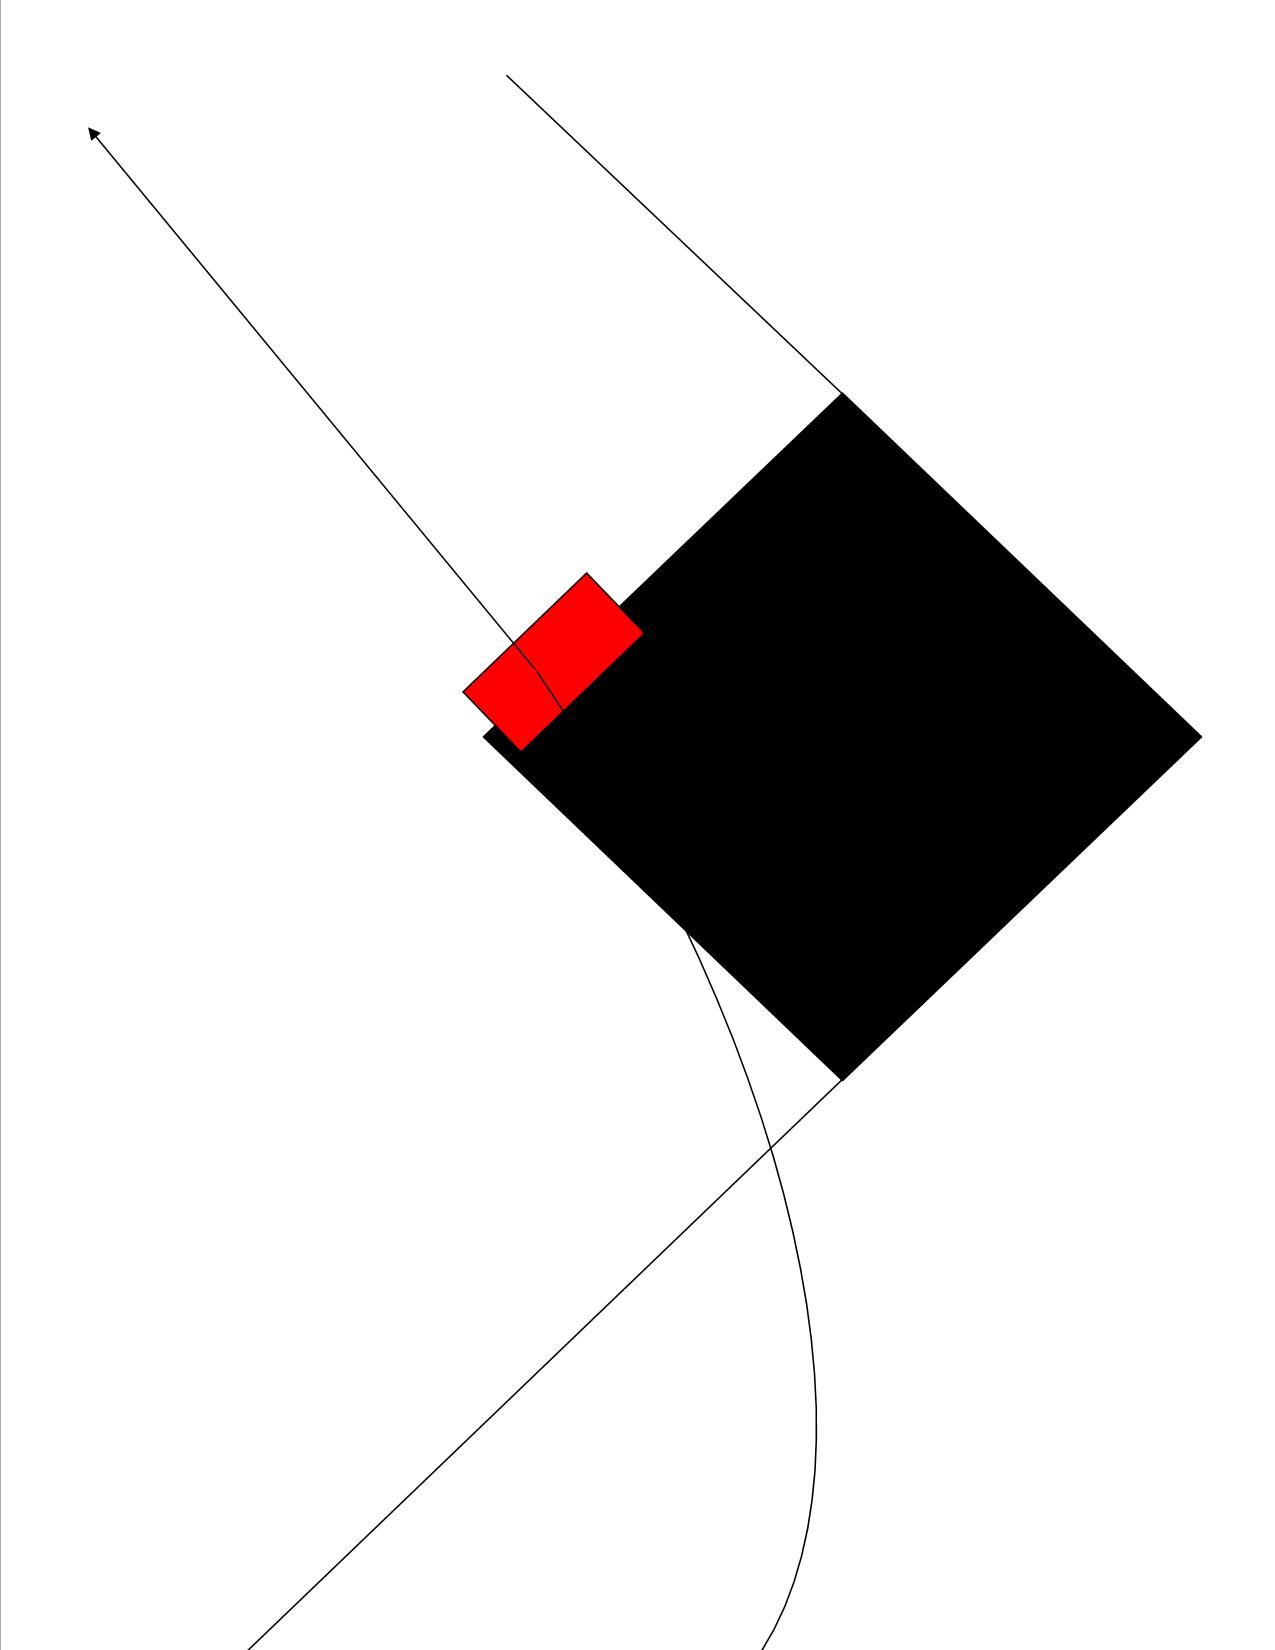
2. As soon as the base runner(s) recognize the ball is going to the outfield they want to immediately run, in a straight line to a point six feet outside the baseline and ten feet in front of the base. When they get to that point they lower their inside shoulder to help them start their turn toward the base.
The runner wants to step over the inside corner of the base and touch the far side o the inside corner (this is the spot on the base the coach is pointing at (touching) during the drill. The base runner has their eyes locked on that spot on the base until they see their foot touch the base. When the runner touches this spot on the base they use the base to pushes off and drive their body in a straight line towards the next base.
Note: In a game, when rounding second or third base, just prior to getting to the point where they begin the turn the runner wants to look to the third base coach for instruction as to whether they want to continue on to the next base or to stop at the base. If the runner sees they are not in immediate danger to be tagged out if they come off the base they want to make a turn at the base and go an additional 5' - 15' (depending on how close the ball is to the base) while keeping an eye on the ball and be ready to advance to the next base if the defense makes a mistake or throws the ball to a point on the field where that runner has a good chance of advancing to the next base
DRILL
A coach hollers for one group to, "Go!" When the first group is about to round their base holler for the next group to go, etc
Ideally the three coaches at the bases where the players are making their turns and touches are on a knee and are touching the point on the base where the players are to make their touch.
OBJECTIVES
1. Learn to, when approaching the base, run in a straight line to a point 6' outside the base line and 10' prior to the base.
2. Learn to lean their inside shoulder in toward the base prior to making the touch.
3. Recognize there is a specific spot on the base they want to touch with their foot and to actually see their foot touch that spot and to use the base to push off of to assist them in accelerating to in a straight line to the next base.
Touch Point on the Base
DEFENSIVE RESPONSIBILITIES
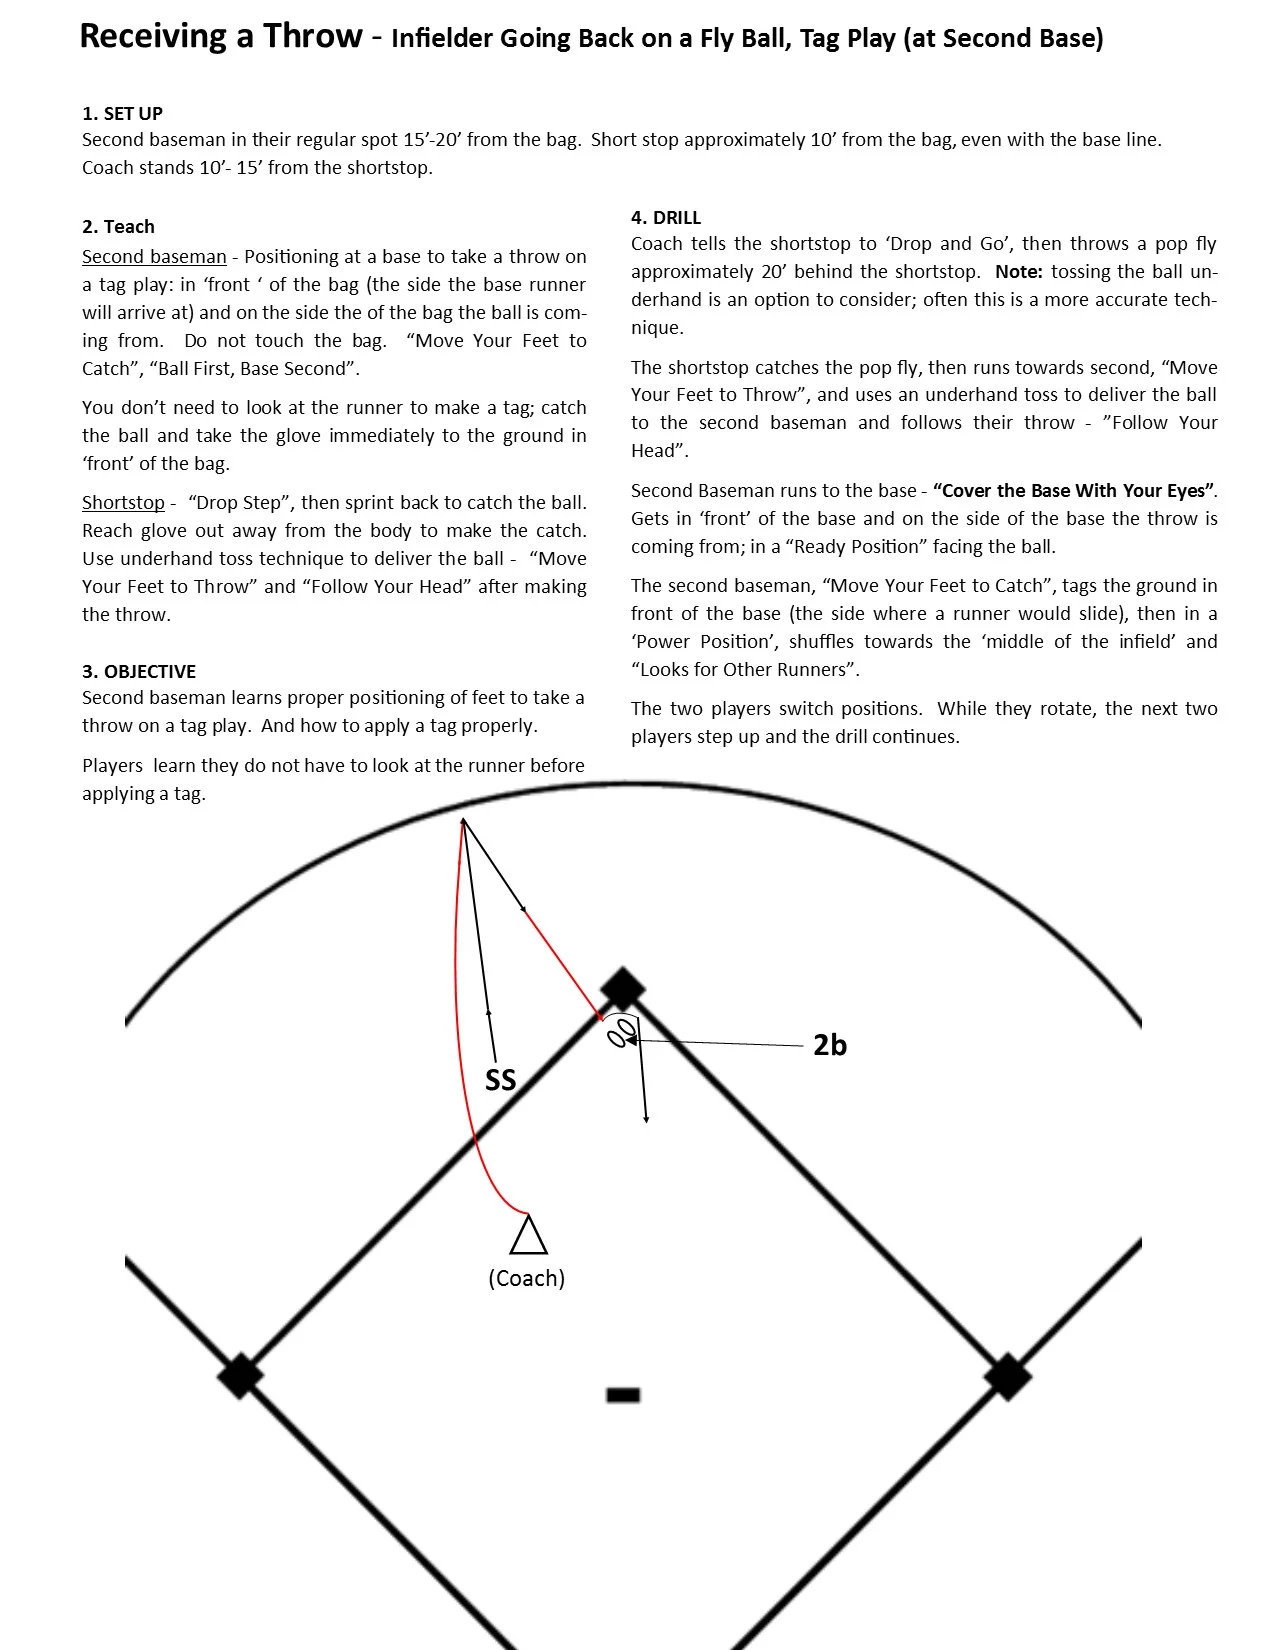
Infield Base Coverage


Backing-Up Bases (P & OF) - Ball Hit to the Infield

Middle Infielders & P Movement - Balls Hit to the Outfield

FIELDING
Ground Balls


This drill requires an infield surface to run well, so we need to be sure we (in the north) have good weather leading up to the day we plan to include this drill in a practice. However, if it a wet day and we are working out on a concrete school yard or in a gym this drill can be used in our practice.
This is a good drill to incorporate into a 'Three Groups Drills' plan. - see the Team Drills page, "Three Groups Drills'.
Backhand Technique: simple instructions: 1. point the thumb of the glove down, 2. “Reach Forward to Catch” (we want the glove in front of the ‘line’ along which the fielder is running. We want the glove ‘between their eyes and the ball’.
Younger kids, ages 8 and younger: while we would like them to back hand the balls, some are not familiar with this technique, are uncomfortable with trying it and many will not (want to) do it even as we continue to insist. The primary objective of this drill is for the kids to get exposed to catching the ball while running fast, laterally. With the younger kids, allow them to field the ball using the hand position they are most comfortable. At age 9 most will be comfortable putting their glove into a backhand position.
Fly Balls

PITCHERS FIELDING
Third Base Side

First Base Side


RECEIVING THROWS AT A BASE
Receiving a Throw at a Base - Positioning and Footwork
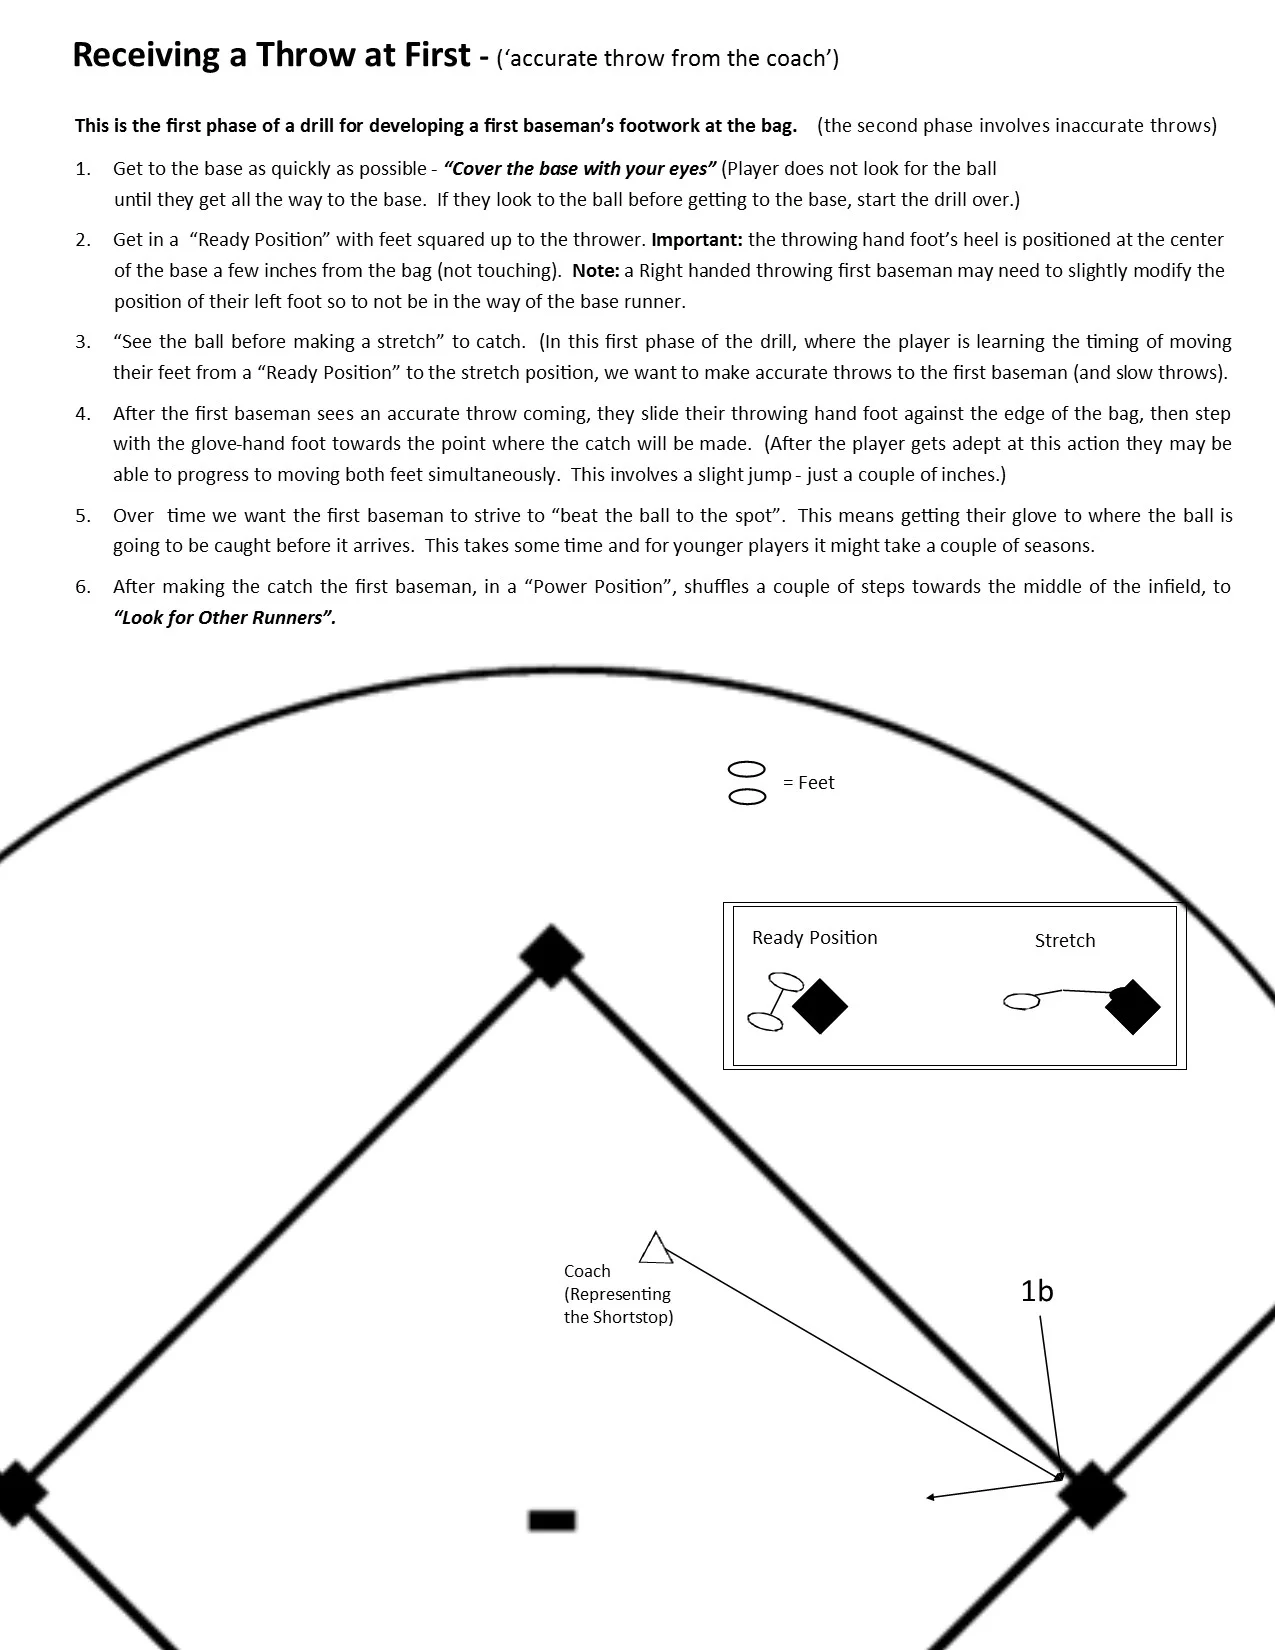
Throws to a base at the 12u level (especially with kids ten and under) are off the mark quite often. In order for kids to consistently catch throws at a base, they will need to leave the base a fair amount of the time in order to catch the ball.
Before we can teach kids how to receive a throw at a base we need to understand what is going on in their minds. Young players' exposure to this play is dominated by seeing the game at high-levels and seeing most plays being made at first base.
The result is kids develop two misconceptions about what is involved in receiving a throw at a base:
1. One foot is anchored to the base before their teammate makes a throw.
2. The other foot is extended out towards their teammate making the throw. They think the player at the base is supposed to stand in a 'Stretch' position (even on tag plays).
These invariably lead to kids not being able to adjust to, and catch, off-line throws. The info below address reprogramming our kids perception of what is going on in preparing to take a throw at a base and how to properly prepare to receive a throw at a base.
We do not want players at the 12u level to straddle the base. Given their misconception of what is going on in this situation kids often (subconsciously or consciously) place a higher priority on being at/on the base than on catching the ball. They see the game played at higher levels and come to believe that all thrown balls will be on target at the base. The fact is that in many instances throws are not on target, which requires the player at the base to leave the bag to get to the ball.
The problem is the base serves as a ',magnet' and kids are resistant to moving away from the base ("How am I supposed to get 'em out if I'm not on the base?").
Solution
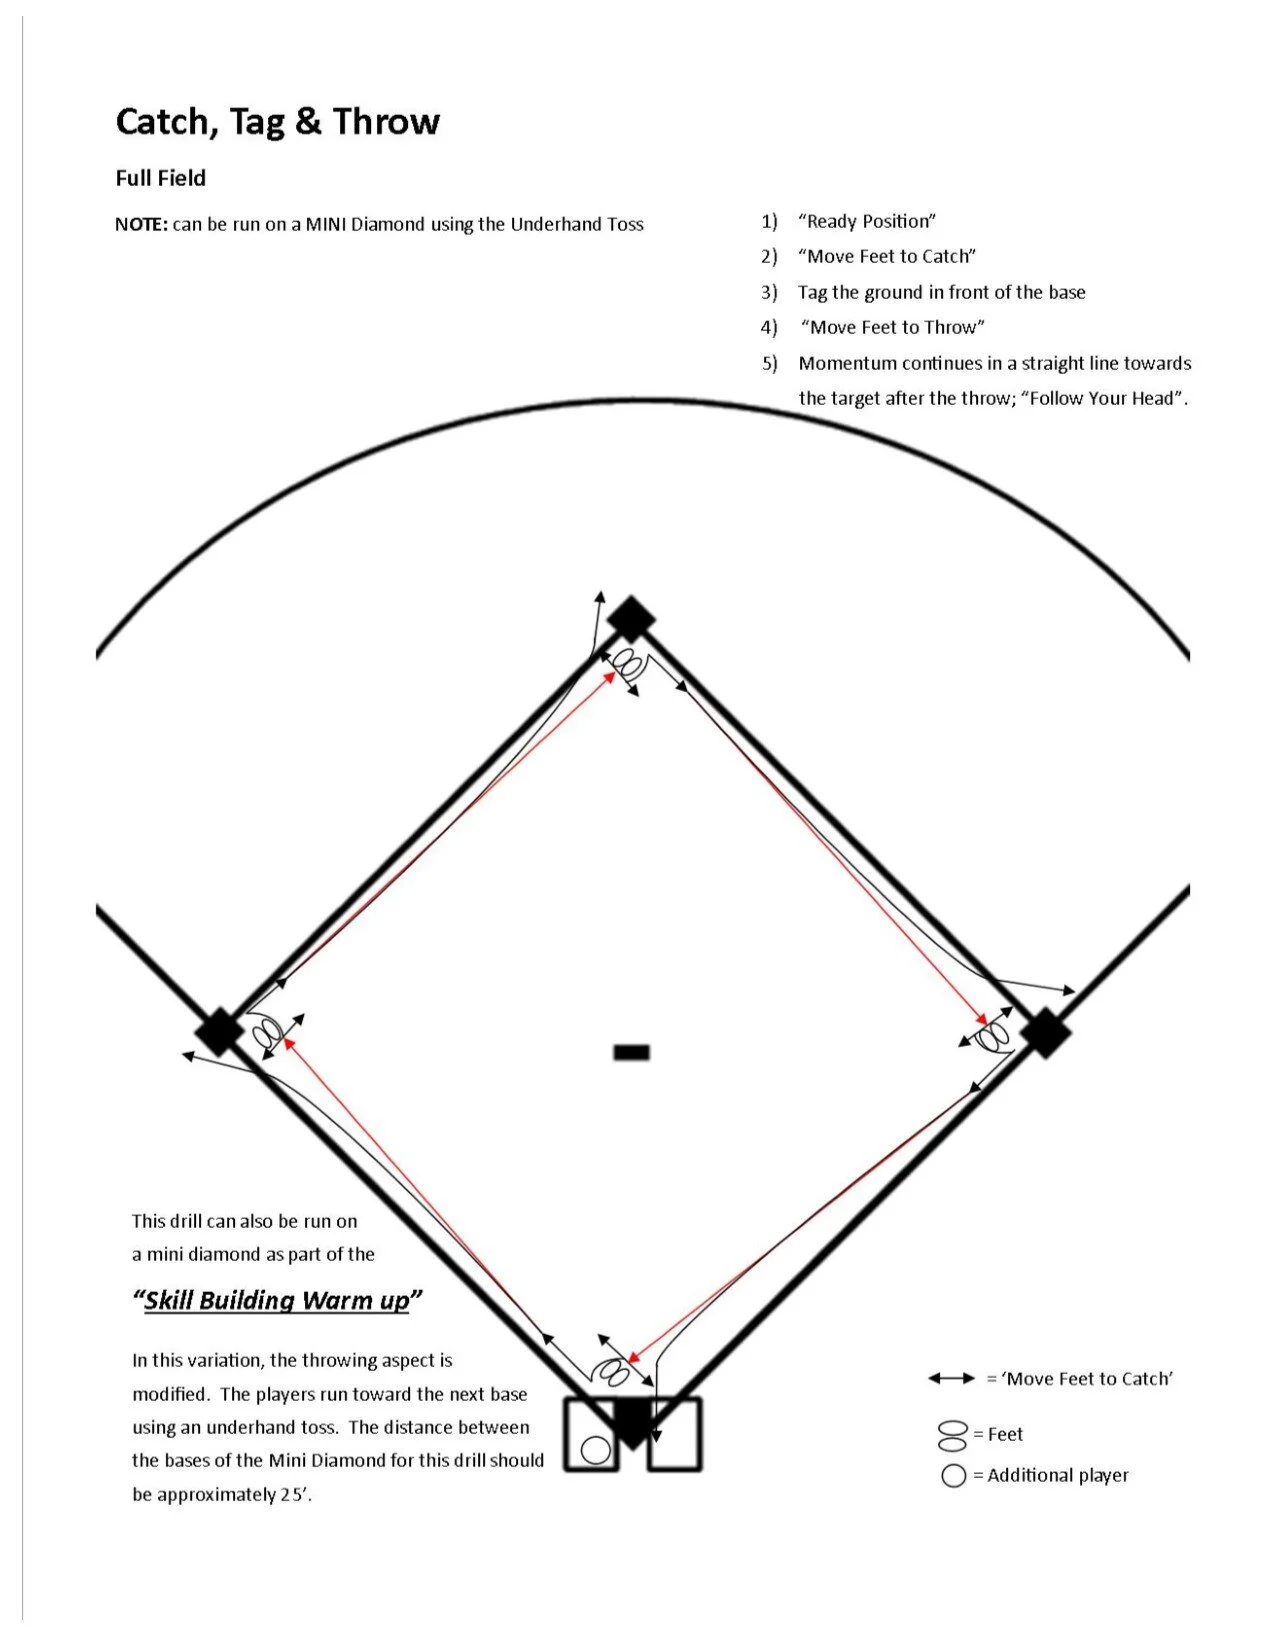
At this level of play we instruct our players to stand on the side of the base the ball is coming from (if the balls is coming straight to the base in line with the base line they stand on the side of the base that places their glove between them and the base). We teach: "The Base is for the Runner, The Ball is for the Defense"
One they understand where to position their feet they follow this sequence when receiving a throw:
1. "Move Your Feet to Catch"
2. "Ball First, Base Second"
3. After making the play at the base -move feet towards the middle of the infield in a 'Power Position',
prepared to throw and they "Look for Other Runners". (see the diagram below in 'Receiving a Throw -
Tag Play'
Prior to running this drill the players must:
1. Be clear on the infield defensive rule: "If you are not playing the ball you cover a base." (click: Rules for Defensive Responsibilities, then scroll down to: Three Defensive Responsibilities > Infield.
2. Understand proper positioning of their feet to receive a throw (see the info above the drill diagram)
Objectives (in order of priority):
1. Players develop the discipline to make the base their only concern while approaching the bag (as opposed to concerning themselves with the ball.
2. Players recognize they must concern themselves with catching the thrown ball before they can worry about getting the runner out at the base.
3. Players make a habit to immediately "Look for other runners" after making the tag (introduce this objective at the next practice that this drill is run)
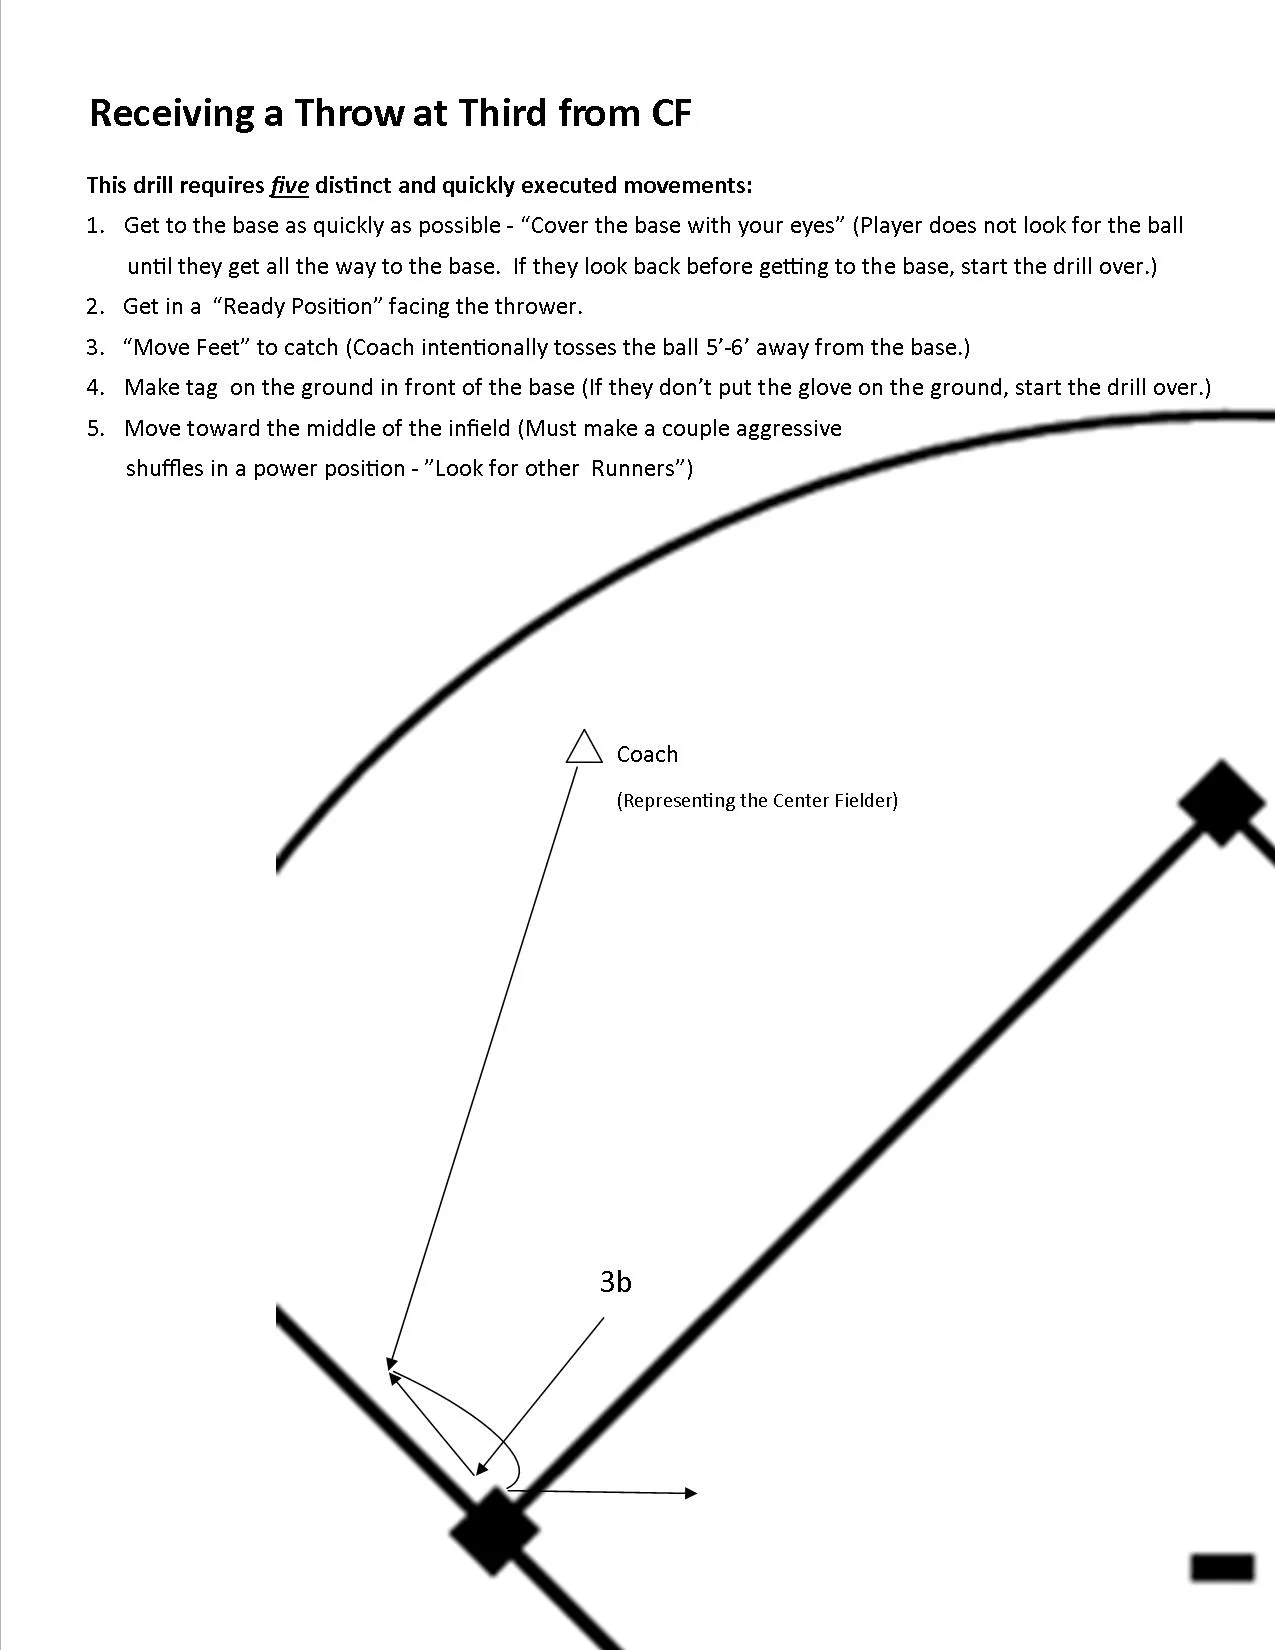
Set up:
One player at the third base position (15' from the bag)
Three players (never more than 4 in a group when running this drill or else they will be standing around too much) on the inside of the base line (away from the player involved in the drill, away from the base and out of the way of the throw fromthe coach).
Coach stands in line with the center field position approximately 30'-40' from the bag.
Running the Drill
Coach calls out, "Ball hit to center field; cover the base."
1. Player looks to the outfield (recognizes the ball is someone else's responsibility)
2. Player runs to the base - "Cover the Base With Your Eyes". the player looks at the base, and the base only, until they arrive at the base.
3. Player gets in a "Ready Position" in preparation for the throw
4. The coach throw the ball, at pace that the player can catch, approximately 5' to one side of the base or the other requiring the ball to "Move their feet to catch" the ball.
5. After the player catches the ball, the move back to the base and tags the ground in front of the base where the base runner would be sliding. (IMPORTANT: kids will try to simply wave the glove towards the base to 'make the tag'. Making sure they actually squat down and put their glove on the ground is critical. 'If you don't touch the ground with your glove, you are not getting the runner out - what was the point of throwing the ball to the base in the first place...?')
6. After the player, "Covers the base with their eyes", "Moves their feet to catch" the "Ball First" and tags the ground in front of the base the player comes up shuffles their feet a step or two towards the middle of the feet in preparation to make another throw if necessary and "Looks for other runners."
A common occurrence in 12u baseball and softball games is the player makes a play at the base then turns to the umpire to see what the call is and/or strikes up a conversation with the base runner who often is their classmate at school. In the mean time the other runner(s) are advancing to the next base(s).
Through a few weeks of training, our young players will develop the habit to immediately "Look for other runners" after making a play at a base
Teaching Phrases:
1. "Cover the base with your eyes" (the player's only concern is the base, until they arrive)
2. "Ready Position" (...prior to any throw in any situation)
3. Concept (not used while a player is in motion) "The base is for the runner; the ball is for the defense" (most young defenders do not understand the base is not theirs)
4. "Move your feet to catch" (the feet take the hands to the off-line throws that occur often)
5. Concept (not used while a player is in motion)"Ball first; base second" (the defensive player needs the ball before they can record an out at the base)
6. "Look for other runners" (immediately following the play at the base the play needs to look for what else is going on - 'what are the other runners doing?'
Note: after this drill is run a few times the verbal instruction by the coach will evolve to, following the initial call of "Ball hit to center field", "Ball!, Tag!, Runners!" as the player is progressing through the actions of catching, tagging and looking for other runners.
Note: This drill can also be run with the coach standing in line with right field, which requires the third baseman to position themselves on the right field side of third base prior to the throw.
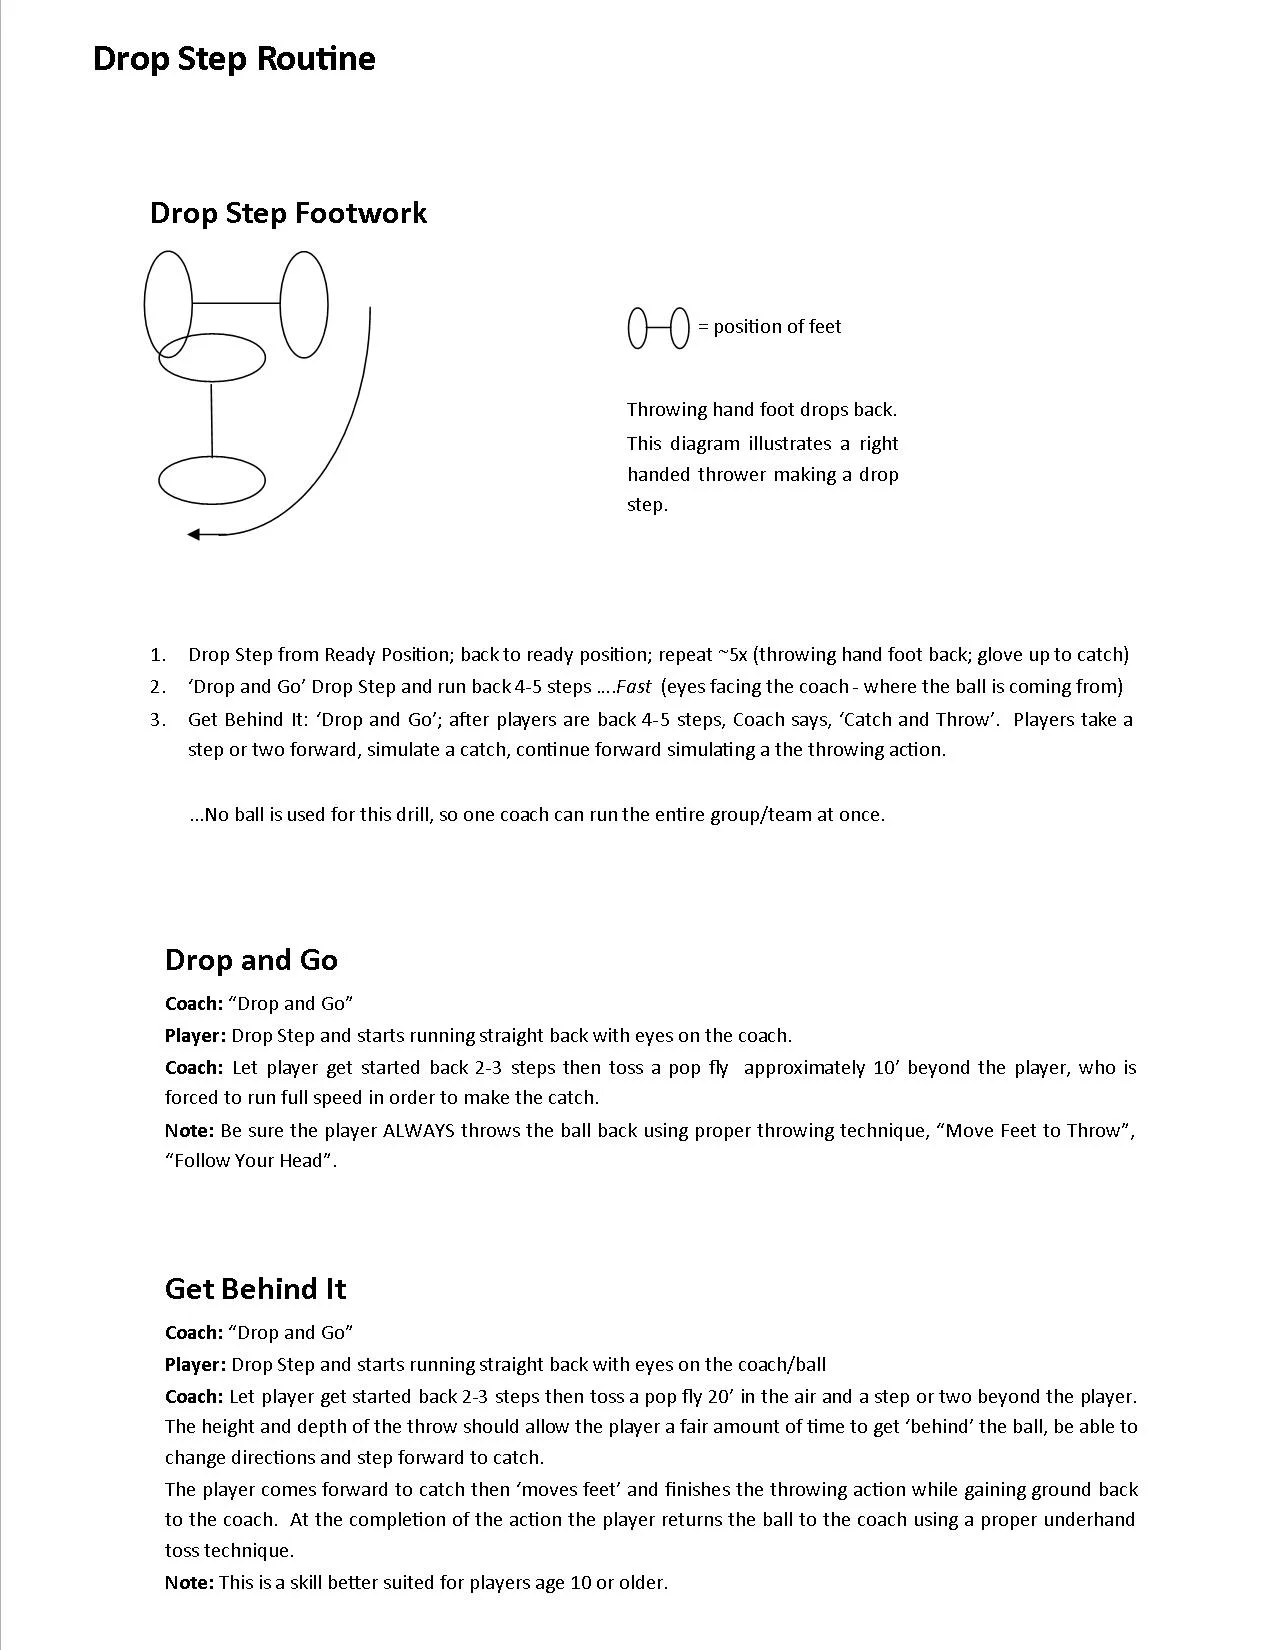
Wild Pitch / Passed Ball Communication Drill
It is important to maintain discipline in the kids' actions when running this drill. There is a correct way to position the feet and body in relation to the ball. There is a specific technique in picking up the ball and when it comes to the throwing aspect of the drill and, as with all throws, the feet must be moved properly.
This drill deals with the situation of a runner trying to score from third base on a ball that gets past the catcher. However the actions of the catcher in this drill are the same they would use when a runner is attempting to advance to second base or third base on a wild pitch or passed ball.
When a catcher veers away from using proper technique in picking up the ball and proper footwork throughout the action, remind them that while they are not making the longer throw to the other bases in this drill, the good habits they are reinforcing will enable them to make a strong throw to any point on the diamond following a wild pitch or passed ball.


Additional Drills
Base Running
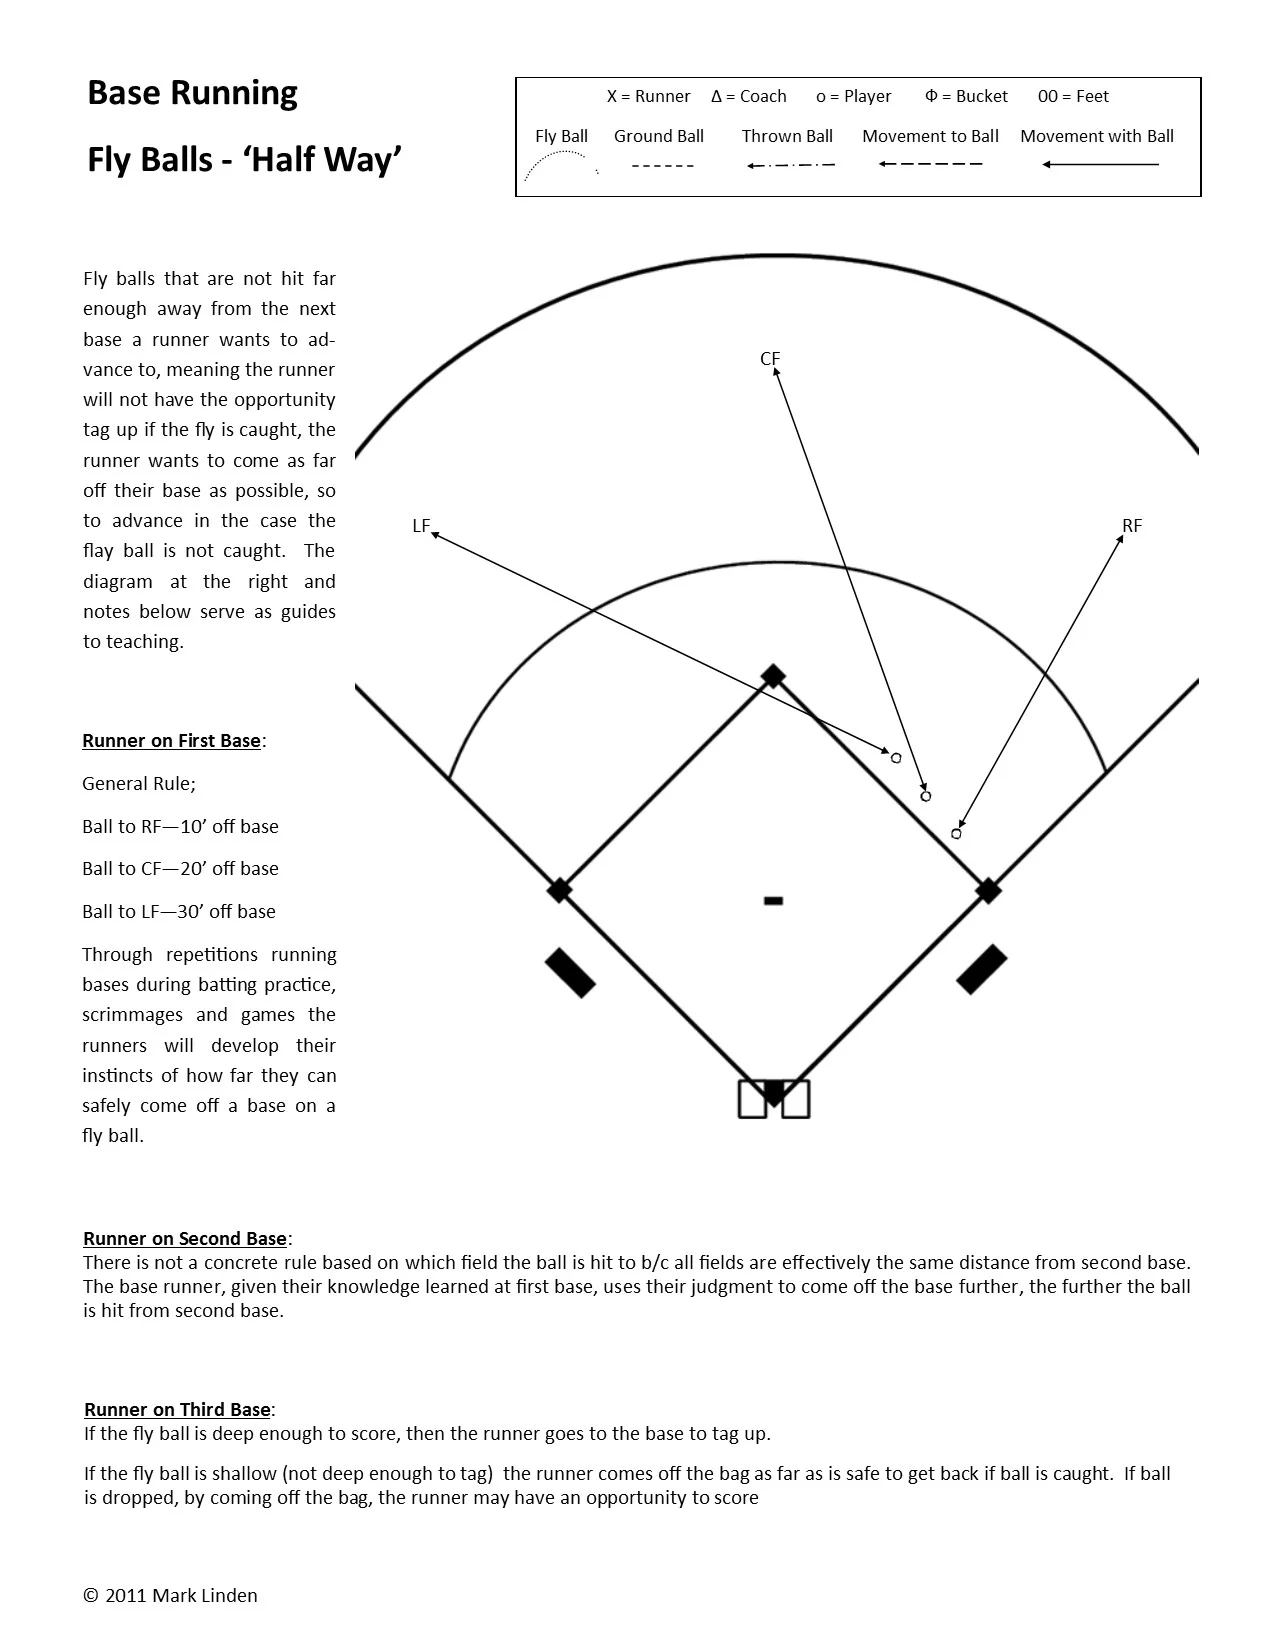
This is an advanced drill. It won’t be until around age 9 or 10 that balls are getting hit deep enough in the outfield for this drill to be applicable. When working with kids ages 10-12 it is still important for them to gain mastery of the more fundamental base running skills before introducing this drill.
DRILL:
Coach tosses a pop fly to one of the three outfield positions relative to the smaller space in which the drill is being run. Balls to ‘Right Field’ will simply drop to the ground. Balls to ‘Center Field’ and ‘Left Field’ go to the kids filling those positions. (Catching the fly balls makes the drill fun for those kids.) The base runners come off ‘First Base’ the appropriate distance per the RULES above.
Allow the Base Runners to get 3-4 reps, then switch them with the two kids serving as outfielders.
Note: The balls should be tossed high enough to give the Base Runners time to get off the base the proper distance and get their bodies in correct position in relationship to the ball.
Note 2: The first time or two this drill is run, the fact that live balls are involved AND with ‘Base Runners’ hanging out ‘off the base’ the kids can get off task b/c of the temptation to ‘get the base runner out’. Also the ‘Center Fielder’ will be tempted to chase balls tossed to ‘Right Field’.
Explain to the center fielder that they can’t go chasing balls tossed to right field b/c it will slow the pace of the drill. We need them to stay put, so they are available for us to toss a ball to them as soon as the base runners are ready for the next toss. (We should be able to complete 3-4 reps, before having the base runners switch with the kids playing the outfield positions, in about 30 seconds.
Fielding - Ground Balls

OBJECTIVE:
Players reinforce the habit of moving their feet to catch a ground ball and to reach forward to catch.
Specifically in this drill the added element to move quickly, but under control and to catch the ball in a balanced and stable position.
SET UP:
One coach and 3-4 players. Use a cone or marker to indicate a starting point for the players. The coach stands approximately 18’-20’ away directly in front to the player that is going to receive the throw.
DRILL:
This drill requires a hard surface. In the south a hard dirt surface is generally not difficult to come by. In the north this drill will be hard to run much before mid-April, however a gym floor or concrete school yard can be used any time of the year (this is a great drill to run on a rainy or wet day when your team is practicing in a school yard).
The coach bounces the ball to the side of the player on one hop, so that the ball reaches the player at height approximately even with the belt to belly-button. The ball is directed to a point a foot or two beyond the reach of their glove to the side the ball will be bounced. The bouncing point will be roughly half way between the coach and the catching point. Like many of the other drills, it will take some time and repetition for coaches to develop the ability to consistently deliver the ball well to each player.
The players are always told in advance what side the ball is going to; trickery is not the objective, the objective is to get multiply quality repetitions in a short period of time.
After the first player goes they toss the ball back to the coach using a technically sound underhand toss, then get back in line. As soon as the coach gets the ball back from the first player (the second player should already be in a “Ready Position” and prepared to move) they bounce a ball to the next player. There shouldn’t be a delay of more than a second or two between players.
KEY ACTIONS:
Players are taking short quick steps to move.
The players are getting to a point where they are catching the ball with their hands centered between their shoulders with their arms close to fully extended in front of them (“Reach Forward to Catch”)
Ideally the players are getting to the receiving point quick enough, so that when they catch the ball they have their lateral movement under such control that their momentum does not continue laterally after the catch. We want the player receiving the ball to be able to immediately move towards the coach, after catching the one-hop throw, and deliver an underhand toss
VARIATION:
After players have mastered the drill, meaning they are consistently getting into proper position to catch the throw and have their movements under control throughout, we can bounce the balls further to the side of the players so the players to extending their glove arm laterally to reach the ball. In this version of the drill the players’ momentum will force them to run a couple more steps laterally after making the catch before they can get under control to throw the ball back to the coach. IMPORTANT: still require that 100% of the throws to the coach are made using technically sound mechanics. Kids, if allowed, will turn this into a circus of crazy throwing actions.
FINAL NOTE:
In most cases the quickness and athleticism of our players will vary quite a bit. As coaches we must adjust the speed and firmness of our throws so that each player is challenged, but also can successfully execute the actions we are working to develop.
Pitchers Defensive Plays
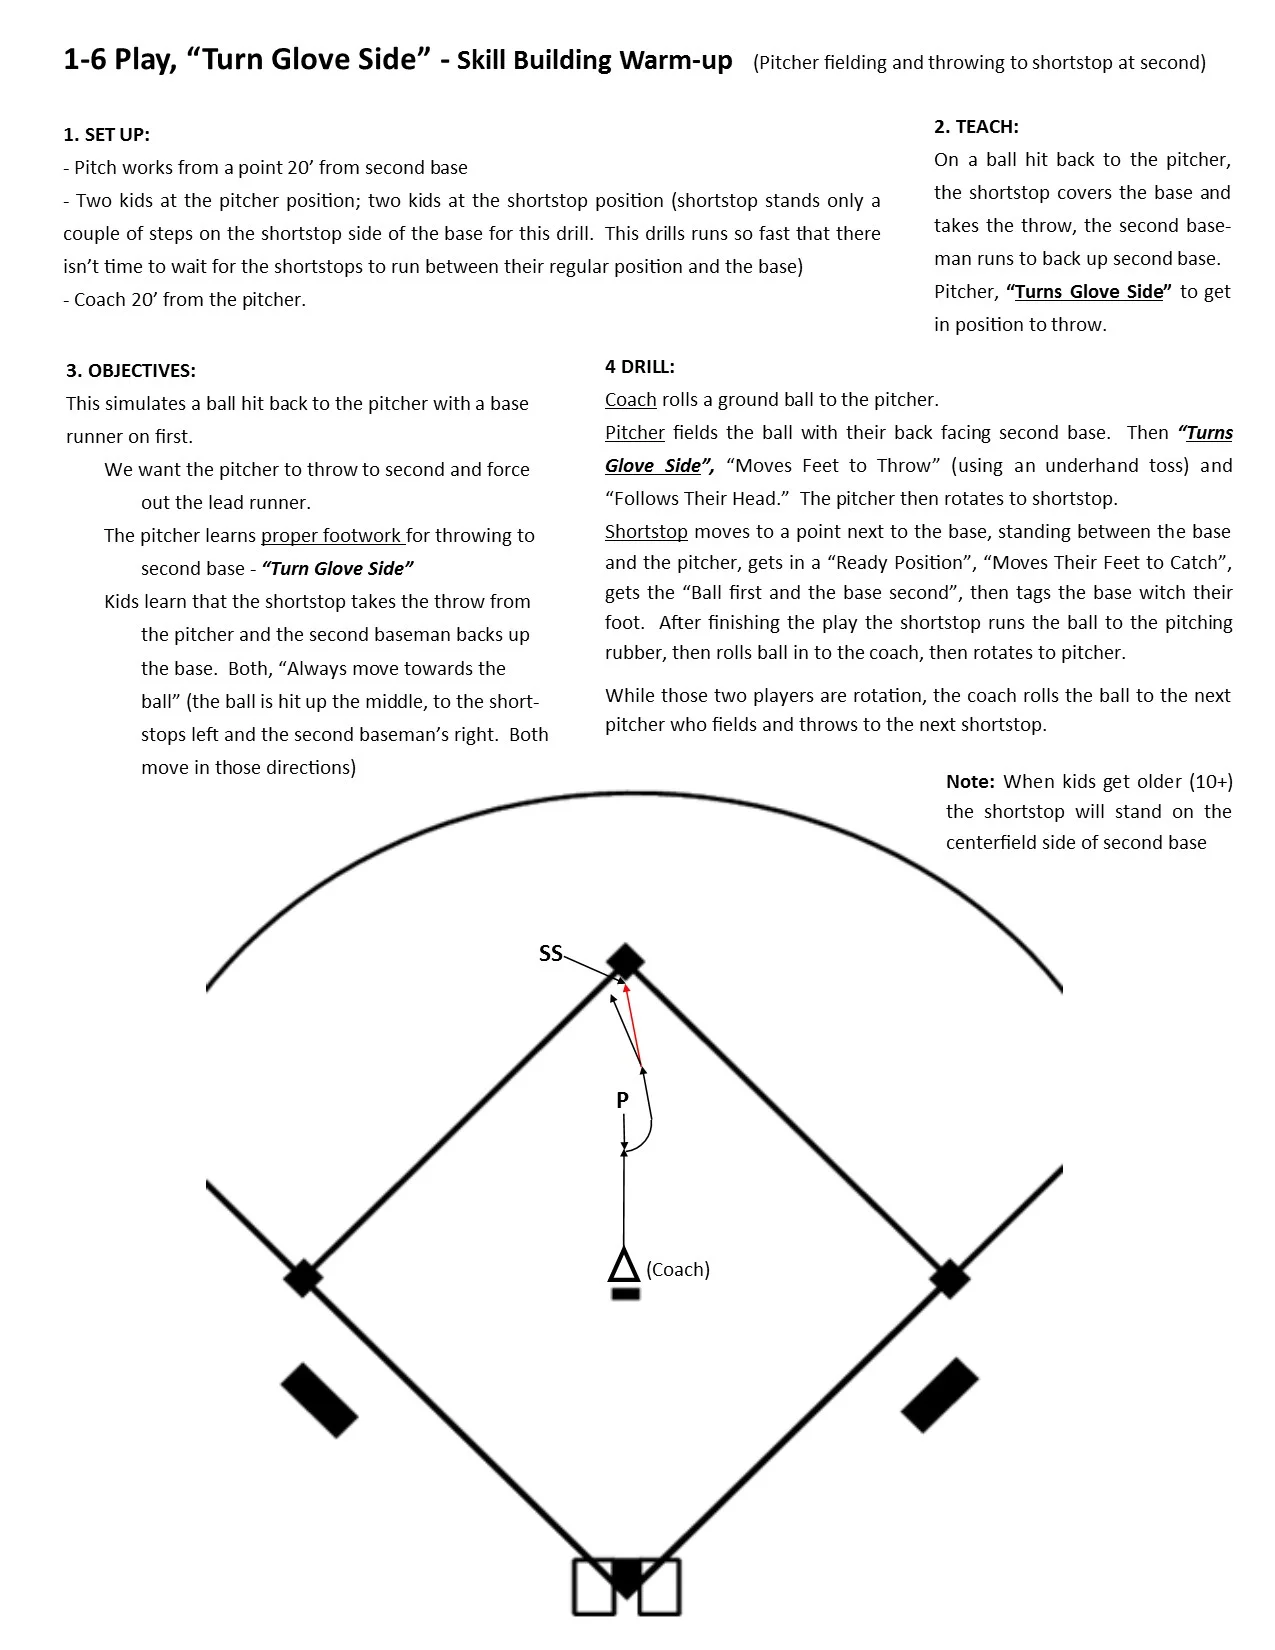
This is a play that would never utilize the Underhand Toss in a full Size Field (60’ Diamond) setting. However in the skill building warm-up version, the players do use and underhand toss (because the sbw is run prior to playing catch).
however, The players gain two benefits from using the underhand toss in this version of practicing the play.
1. The critical action of ‘Turn Glove Side’, is fully executed.. When throwing overhand, a common mistake players (at all levels) make, is to begin throwing before they have completed the 180 degree turn.. In the mini diamond environment, they are required to run towards their target to execute the Underhand Toss, …………They develop the Habit of Completing the full 180 turn.
2. In order to complete the overhand throw consistently well on this play, when throwing overhand, a player must create momentum, in a straight linE, towards second base. The requirement to run towards second base to execute the underhand toss, here in the Skill Building Warm-up Version …………the players develop this critical habit..


hhh - TEMP
hhh - TEMP