- Baseball is a Game of Movement -
Tee-Ball
Contents
.
First base: 3-4 Play
Second base: 4-6 Play
Third base: 5-6 Play
Home plate: 1-2 Play
.
.

Perspective of the Players
Before we start working with Tee-Ballers we need to understand their perspective of the game.
Batting, as far as their logic goes, is done with the arms. We face the challenge of helping them understand that their legs do most of the work when swinging the bat.
Running the bases and while on defense, Tee-Ball is just another version of tag. Playing tag is almost a daily rite at recess for kids ages 5-7. The central thought for these kids is the runner being safe at a base or being tagged out. Throwing skills, fielding skills, catching a throw at a base for a force out and even batting skills are secondary to the concept of 'safe' versus 'tagged out'. As we get into teaching skills and the basics to our kids, we must keep in mind that elements of 'tag' and being 'safe' will drive much of how the kids respond to activities on the field. (see the Coaches page – ‘Aren’t We Playing Tag?’)
On offense, when the ball is in play, the kids' experience is a mad dash of anxiety in hopes of getting to the next base safely. They are not particularly conscious of the times when they are going to get to the next base without a play being made on them.
Some kids, because of the fact that when they are running between bases they are not 'safe', will be reluctant to leave a base even when play forces them to the next base, especially when it is clear they are vulnerable to being tagged out (or put out at the next base).
The defensive side of the ball is where the majority of our teaching challenges lie. For our kids this game of tag is a little more complicated because throwing and catching that darn ball doesn't always work out real well. Then, to make matters worse, we add the concept of tagging a base as an option for getting a runner out.
And we are trying to teach these concepts in an environment where simply being the one who comes up from the bottom of the pile with the ball is plenty to call it a successful day.
Realities of Tee-Ball
It’s not baseball
Kids can’t catch
Kids will find interests other than baseball during practice (and games)
Please do not view these statements as negatives. Accepting these points as the realities that they are, and being prepared to deal with them, will enable us to better enjoy the time we spend on the field with our kids.
It’s Not Baseball
If, as a Tee-Ball coach, we go into the season thinking we are going to experience baseball we are setting ourselves up for a lot of frustration and disappointment. If we approach the season for what it is, spending time with our child and their friends, watching them run around, laugh while they work to develop skills to catch, throw and hit that little ball, then we can have a great time as coaches.
As adults we are going to the park thinking ‘baseball’, while the kids are going to the park thinking ‘I get to see my friends and run around a lot’. We want to see the activity from a kid’s perspective and teach and manage them within their perspective and recognize that the activities at the park are not always going to look like baseball.
However, given the information in this section, over time, we can be help our kids begin to learn the basics of baseball and develop some baseball skills.
Kids Can’t Catch
Scientific research has determined that the human brain, on average, does not develop the capability to coordinate both eyes in what is called ‘binocular vision’ until around age 7 or 8. Until both eyes learn to work together we humans lack a keen sense of depth perception, which plays a big role in catching a flying baseball. It is important recognize that, short of a few exceptions, the brains in kids this age have not developed to the point where they can catch a flying ball with much proficiency. Missing a thrown ball at this age has little to do with a lack of athletic talent.
In addition to the lack of brain development needed to track and catch a flying ball; the fact is that most have very little experience or practice in this skill. As the spring progresses the kids hey will improve and they will begin to catch the ball more often. The most important that we go into our tenure as Tee-Ball coaches with an understanding of the developmental limitations of kids in this age group.
Kids Will Find Interests Other Than Baseball While On the Field
We can give our kids a glove, a ball and a bat, take them to a ball field and talk about baseball until we are blue in the face, but this is no guarantee that our kids will be thinking baseball the whole time they are at the park.
Other things they will find of interest include: other kids to poke, grab, talk to, and chase; bugs, dirt, birds, airplanes, fire trucks, etc. These all can and will trump baseball in importance at times during a practice or game.
Adults who recognize these realities, accept them and work baseball in along the way will enjoy their time with the kids much more. Coaches who resist accepting the reality of the Tee-Ball world will experience high levels of frustration, bewilderment and blood pressure.
Three Goals for the Season
The kids learn that their legs power their bodies; that moving their feet is the key to playing in the field and that controlling head movement is a big factor in successfully hitting and throwing a ball.
They come to recognize that “Baseball is a Game of Movement”. On defense when they are not playing the ball they have to cover a base. They always move somewhere the moment the ball is put into play.
They remain active and having fun at all times that they are on the field (especially during practices, which always conclude with them scrimmaging). We want them to leave the field each day having had a blast. And at the end of the season express a desire to play again next season.
In the end, our primary purpose as Tee-Ball coaches is to help the kids develop a love of the game and create an environment that leads to them wanting to continue playing the game. We need to get the kids to stick around until age 8-9. At that time the game begins to resemble something like ‘baseball’. Kids who make it to this age are likely to continue on with the game to age 12 ...and hopefully beyond.
Skills: Areas of Focus - Table of Contents
Batting
Fielding
Receiving Throws & Throwing
Receiving Throws at a Base
Defensive Positioning
Defensive Responsibilities
Batting
The first statement we want to make to Tee-Ball kids (not to mention most other kids age 12 and under) is, “You don’t swing the bat with your arms”. Why?” …because you don’t. Nearly 100% of kids think (and many adults too) that the arms power the movement of the bat.
(This statement is made, initially, to get their attention and wake them up to the concept of utilizing their leg strength to power their swing. We come back later and acknowledge that the arms ARE part of the swing, but the use of the legs is a bigger part of the action being successful.)
The fact is, the majority of the effort in moving the bat comes from the legs. Watch the baseball highlights on TV tonight. Only look at the batters from the waist down …you’ll see that there is a lot happening there.
The first and most basic teaching point to convey to a young batter is that “Your legs swing the bat”. We teach them to think of their legs as a spring. They want to turn their front knee back towards the ‘catcher’ a few inches (like they are compressing a spring) and then turn their legs and feet as fast as they can to start the swing. They “Turn back, then TURN FAST!” ...then they snap the bat with their wrists to finish the swing*.
While turning their legs and feet fast, the second aspect of a successful swing is to “Keep Your Head in Place”. When watching the batters on the TV baseball highlights tonight notice that when they are in their stance their head is centered between their feet and at the completion of the swing their head is still centered between their feet.
Note: the phrase ‘keep your eye on the ball’ is incomplete; we must also include (or replace with) the teaching phrase, “Keep Your Head in Place”. Watch their swings and note how much their heads move. Once they learn to “Keep Your Head in Place” it becomes difficult to swing poorly.
Stance - A very important point, which will positively impact the distance a player can hit the ball, is where a batter stands child stands in relation to the Tee stem and the ball. A batter in baseball contacts a live pitch pretty much when the ball is even with their front foot. We want our little ball players’ front foot even with the tee stem and ball when they are in their stance. Also they need their feet to be wider than shoulder width apart. Finally, we should be able to draw a straight line from their back toe to their front toe to the pitching rubber. See the article 'Herding Cats' at the bottom of this page. In the article you will find a diagram of the proper relationship of the players’ stance to the Tee.
Fielding
Watch the baseball highlights on TV tonight and take note of the players fielding and throwing the ball …watch their feet. You will notice they “Move Their Feet” to get into a fielding position, they get their “Feet Wide (apart) to Catch” the ball and they “Move Their Feet (shuffle) to Throw” the ball. Fielding and throwing is all about footwork and “Moving the Feet”. (Occasionally the pro players, in situations where they need to make short, quick throws, will not move their feet to throw, but they are generating most of the power for their throws in their legs using a subtle weight shift.)
When working with kids on their fielding skills we want to be using the word ‘Feet’ and the phrases “Move Your Feet” and “Feet Wide” constantly, all day, every day, all season long.
The cadence in fielding and throwing is ‘Fast, Slow, Fast’. We want the kids to run (move their feet) ‘Fast’ to the ball, ‘Slow’ down (and get their “Feet Wide”) to catch the ball, and then move their feet ‘Fast’ (shuffle) to throw the ball.
Note: when delivering ground balls in practice, don’t use a bat; instead throw or roll the ball. It is difficult to consistently hit a baseball accurately and at the correct speed when using a bat. When throwing or rolling we can consistently place the ball where we want it and deliver it at an appropriate speed.
This technique is used in college practices around the country and in pro training drills for the reasons mentioned above. If throwing/rolling a ground ball is appropriate at the college and pro level it surely is OK at the Tee-Ball level. We can make it through the entire Tee-Ball season and never hit a ball with a bat …and we will be hugely successful in getting kids the repetitions they need to develop their skills.
Receiving Throws & Throwing
As noted above, kids this age are going to struggle with catching a thrown ball …so how do we deal with this issue? First, when teaching and providing feedback we keep our remarks focused on the actions leading up to a catch. If we focus on the result we very rarely will have the opportunity to give the kids praise. When we focus on actions we can praise their efforts most every time.
Quality of Gloves Used By Your Players
It is likely that a few of your kids will have ‘toy’ baseball gloves that are made of a ‘plastic’ type material and possibly have a picture of Spiderman on them. Their parents likely had the best of intentions when buying the glove and were not aware of the fact that some baseball gloves are not designed to really be used to play organized baseball on a team.
It is tough to suggest a parent to go out and spend more money on a new glove. However, for the sake of the child it is something to consider discussing.
There are a lot of good quality ‘leather’ gloves on the market for under $40 and many in the $20-$25 range. Here is a link < https://www.google.com/?gws_rd=ssl#q=youth+baseball+gloves+big+5&tbm=shop > showing some affordable gloves of pretty good quality. It is not suggested that gloves be purchased from this site; the link is shared to show pictures and brands of some gloves and to use as a reference prior to making a purchase.
Most sporting goods store that cater primarily to teams sports (football, baseball, basketball, soccer, etc.) will have a supply of ‘real’ baseball gloves that are affordable. Purchasing a glove at Target, Toys R Us, etc. is not the best way to go.
Receiving (catching) a throw has three key action points:
“Ready Position” (moving from a standing position to a Ready Position is an action)
”Move Your Feet to Catch”
”Reach Forward to Catch
Any child on your team can perform these three fundamental skills every time, though they will not likely catch the ball very often. When they perform these actions in their attempt to catch, we can praise those actions and they will remain eager to keep trying ...and will progress faster in their skill development.
“Ready Position”
Instruct players to stand with their feet wider than shoulder width and with their hands (and elbows) held out in front of their body. The ideal position of the hands is 3 o’clock and 9 o’clock with the palms facing in. This stance is difficult for a young child however, because of their lack of leg and shoulder strength.
The interpretation of these instructions commonly result with their hands close together at the center of their chest with their elbows pointing straight out or with their elbows close to their body or their hands above their elbows like little football referees signaling ‘Touchdown’. Keep working with them to get in a proper position even though some many will not master it at this age. When we see them standing in the positions described, at least we know they are trying.
A fun and effective way to train this concept is to tell the kids to pretend they are frogs. Tell them that when you call out "Ready Position" they jump up and land with their feet wide and hands and arms extended in front of them (in a Ready Position) and holler out loudly, 'Ribbit!". Doing this along with them makes it more fun and engaging.
“Move Your Feet to Catch”
We want to remind our kids that the ball does not always come straight to them. They will need to “Move Their Feet” in order to take their hands to the ball to catch it. We “Move Our Feet to Catch”; we “Catch the Ball with Our Feet”.
“Reach Forward to Catch”

When a player (at any age) extends their arms and hands out in front of them; not necessarily ‘in front of their face’, but in front of the space occupied by their body. The result is they have both the ball and their glove in their line of sight. This positioning of the glove, within the player’s line of sight, and gives the brain a better chance of coordinating the glove with the ball. Most young children, because of the lack of shoulder strength to support the weight of their arms (and the glove), hold their glove (and elbows) close to their body when preparing for, and attempting to make, a catch.
Important: We will often see the kids position their glove outside their shoulders when attempting to catch. They recognize they will often miss the ball and are smart enough to not stand directly in the flight of the ball. However, a child can still extend their glove out ‘in front’ of where their standing and not have their glove directly in front of them.
Note 1: Given the fact that this age group has great difficulty catching the ball, a most efficient playing catch scenario involves each player with an adult (mom or dad) as their throwing partner. Yes, you read correctly; we should strive to have a 1:1 adult-player ratio at Tee-Ball practice. Parents, how long will our kids be this small and cute? We can make 60 minutes a day, a couple days a week, to spend time with our own child.
It is important to understand that Little League International specifically states that any time player is throwing a ball that another player is to be catching the ball. The above suggestion is contrary to LL rules. The rule is well intended, but given that scientific research supports the idea that asking a 5-6 year old human to catch a flying baseball contrary to our knowledge of human brain development.
An adult throwing partner can make more accurate throws increasing the chance to the player catching the ball. The adult will catch throws more often. In this scenario the kids get many more repetitions resulting in quicker skill development.
If we find that each child does not have an adult to play catch with it is critical that we immediately establish this very important rule with the kids, “NO CHASING MISSED THROWS!!!” If we allow kids to chase missed throws our practices turn into kids chasing balls instead of developing skills.
The solution is to have an adult or two behind each row of kids playing catch. These adults have a few balls in hand and when the kids miss the throw, those adults roll another ball to them. - We don’t throw the ball to them, because they can’t catch ;)
If we do not have extra adults available to back up the throws, place 3-4 balls a couple feet behind each player. When they miss a throw they can immediately pick up another ball and keep the skill building process going.
'Palm-up' Catchers
Most Tee-Ball teams will have a player or two who, when attempting to catch a thrown ball, regardless of how high the throw is, will hold their glove with the palm facing up, as if they are balancing a tray of food or drinks. When a ball is being caught above chest level we want the kids to 'point their fingers up' so the palm of the glove is facing the ball.
Fixing this is simple, but not easy:
First, explain and demonstrate to the player that the glove hand fingers point UP on balls that are coming to them above chest level. Second, help them learn the proper muscle movements to get their hands/fingers in the proper position to receive a high throw. The drill is simple...face the player with both of you in a 'Ready Position' with the hands at 3 o'clock and 9 o'clock. Move your hands from the Ready Position to 12 o'clock, so your thumbs are touching and your fingers are pointing up. Have the player mirror that action, move your hands back to 3 o'clock and 9 o'clock, then repeat these actions,, with the player mimicking your movements, over and over 5-10 times.
note: when the hands get to '12 o'clock', don't have them directly in front of the face; have the hands slightly to one side of the face or the other. Tell the player which side of the face the two of you will complete the 'fingers up' action, prior to doing the drill. Repeat the actions a few time with the hands completing the movement on each side of the face. We don't wan to imply to the kids that they want their hands directly in front of their face when they catch....one, they are blocking their view of the ball; two, we really don't want kids trying to catch the ball right in front of their face.......just in case they miss ;)
Throwing at this age is not going to look pretty early on for most kids. Not much at this age will look pretty :) but it's all cute and fun if we adults see the game of Tee-Ball from the proper perspective.
Before teaching throwing we need to clarify a misconception that most every kid (and many adults too) has; they think the ball is thrown with their arm. We need to state emphatically to the kids, “You don’t throw the ball with your arm!” (This is done, initially, to get their attention and wake them up to the concept of utilizing their leg strength to power their throws. We come back and acknowledge that the arm IS part of the throw, but the use of the legs is a bigger part of the action being successful), you throw the ball by “Moving Your Feet”.
First, explain to the kids that when they are preparing to throw they want the glove side of their body pointing at their target - NOT their chest.
Next, they want to lift their elbows up to shoulder height and point their glove elbow at their target (or, if it’s easier, have them point their glove). They are now in a "Power Position".
Now they are ready to 'throw'…
We instruct our players to 'Shuffle' towards their target (“Move Your Feet”) twice, with their head pointing at their target ('Your head is your steering wheel'). After two* shuffle steps they 'Pull' their glove elbow back and 'Snap' their throwing arm and hand down.
* Many kids will shuffle more than twice; some will shuffle many times. Not to worry. Moving their feet to throw is a new concept and action; it will take them some time and repetition to coordinate the transition from the shuffle action to the upper body (arms) action.
The teaching phrase we use is, “Shuffle, Shuffle, Pull, Snap”.
It will take a couple days for the kids to do two things at once: shuffle their feet and throw the ball ('walking and chewing gum'), but they will get it and the result will be stronger and more accurate throws. (We will need to stretch out the distance between the kids playing catch with each other once they learn to move their feet, because the distance they are able to throw may double in a few days).
Most players will struggle with using their glove elbow to pull back when throwing. First, it won’t compute that the arm with the glove helps the throwing motion. Second, it takes practice and coordination to execute this pulling action. Third it takes a fair amount of strength to use and control the action of the glove arm.
Even with instruction many players will not learn to utilize their glove arm in the throwing action over the course of the season. We want to keep teaching it however, so that the concept is in their head and in subsequent years they’ll be better prepared to incorporate this into their throwing action.
Some kids have a tendency to throw the ball in a high arc. This is a habit we want to nip in the bud right away and eliminate. A simple and fun approach to the kids playing catch, in order to break this habit, is to instruct them to throw the ball to their partner on a bounce (which may turn into several bounces).
Instruct the kids when throwing to that the ball needs to be thrown ‘level with the ground’. This discourages the high arcing Moon Toss. On the receiving end there are many benefits. The players have a better chance of catching (or stopping) the ball and they get experience with the ball taking a bounce in front of them…they will see this a lot over the season and their baseball careers
Receiving Throws at a Base
First, we need to explain a couple things to the kids (and continue teaching these points throughout the season):
1. The Base Belongs to the Runner
Kids on defense (‘Fielders’) think if they are the first, second, or third baseman that that base is theirs. One of the first things they do when they go out to the field is stand on ‘their’ base.
A quick way to educate the kids is to take them over to a base (third works well). We stand at the third baseman’s position (approximately 10’ away from the base). We tell them “I am the third baseman”, and then we point at the base and ask, “Who does that base belong to?” Their response will be “The third baseman’s!!!” (kids love to show us how much they know).
Then we go stand on the base and ask them, “I am the third baseman. When I stand on the base, am I safe?” They will give you a silent and bewildered look. Then ask them again, “Who does the base belong too?” Hesitantly, and likely in a much softer voice, one or two will say, “The base belongs to the runner?” – BINGO! …the base belongs to the RUNNER, NOT the fielder.
We then tell them they are not allowed to touch the base unless they have the ball…
2. Ball First, Base Second
Ask the players, ‘Does the ball come straight to you every time?’ The response we will hear is a loud and clear, ‘No!’
The ball rarely comes straight to us when we are at a base. And if the defensive player doesn’t have the ball they can’t get the base runner out. The defensive player’s sequence of actions is “Ball First, Base Second”.
To solidify the rule that a defensive player must first have the ball in order to touch the base tell them that the ball is the ‘Key to the Base’. In order to touch the base they must first have the key.
An important thing to note is that in youth baseball the base works like a magnet. Once the defensive player touches the base with their foot they have a hard time removing their foot from the base, even if a throw is off line. Keep in mind kids see older players (HS, college, and pros on TV) catching accurately thrown balls while having their foot on the base. What the kids don’t understand is that they are playing baseball on a completely different level…and the game of baseball is played completely different by little kids.
Knowing the base is a magnet and that most throws will not be accurate, having the rule that the defensive player is not allowed to touch the base before they get the ball frees them from the powerful magnetic force of the base.
3. “Ready Position”
We teach the players that they need to be in a “Ready Position” anytime they might be required to catch the ball (when standing at a base, when the batter is getting ready to hit the ball off the tee, when a ball is being hurled in from the outfield).
4. Don’t Look at the Runner
Kids recognize that the ball needs to get to the base before the runner in order to get the runner out. Understandably they are curious of where the runner is in relation to the base prior to them getting the ball. Unfortunately this curiosity often dominates their attention and they take their eyes off the ball.
We want to constantly tell our kids to not look at the runner and keep their eyes on the ball. They need to catch the ball first if there is any chance of getting the runner out. They can’t catch the ball if they are not looking at it.
After a few scrimmages we ask our kids, “Is the runner safe more often, or out?” The obvious answer is the runner is safe most of the time. We can now emphasize the fact that the runner is safe a lot, so getting an out on each play is not a big concern. We want to teach our kids to put all their attention on the ball and catch it first. With that accomplished they have a chance of getting an out.
Another question is, “Can you catch the ball when looking at the runner?” This question helps them recognize that they need to keep their attention on the ball if they are going to have any chance to get the runner out.
Finally, we must be patient with the reality of the distraction the runner poses. The issue will not go away during the course of the season; it will remain an issue until the players reach, at least, the age of 9 or 10. At the Tee-Ball level we begin the discussion and it will continue over the next few years.
5. Stomp the Base
Safety (and fun) Point: When the kids tag a base we tell them to ‘stomp’ on the base. They think this is a lot of fun, but more importantly it has a safety component. A player cannot run and stomp the base at the same time. In order to stomp on the base they must slow down.
Over the course of a Tee Ball season there are times when a defensive player who is 15’-20’ from a base with the ball in their hand will race the base runner to the bag. In most cases the kids are running perpendicular to each other with the result of the kids reaching the base at the same time, while running fast, and a potentially dangerous collision occurs.
Positioning at the Base
First Base - stand between the base and the ball; right next to the base (but not touching).
Second and Third Bases - stand on the side of the base the ball is coming from; right next to the base (but not touching).
Home Plate - stand on the pitcher’s side of the plate; right next to the plate (but not touching).
These are the most basic teaching points for positioning at a base. As simple as they may seem, it will take the most of the season for most kids to get it; don’t be surprised if some still don’t. But just because they don’t get it exactly right doesn’t mean they are not benefiting. Much of the information we are giving them now will be incubating during the off-season and be ready to bloom when they get this information in the next season.
These basics do not put them in the correct position in all situations. Following these simple rules will result, at times, with the infielder in the way of a runner rounding second or third base. However, these situations don’t come up often…and kids (base runners) are pretty alert to avoid collisions.
We have two primary goals when teaching kids how to position themselves at a base:
Keep the defensive player from standing right on top of the base
Breaking the misconception that a player stands in a ‘Stretch Position’ to take a throw…
…oh, you didn’t know that a player at a base doesn’t initially stand in a Stretch Position to take a throw?!
I am not meaning to pop off to my readers. Actually I am chuckling a bit when I write this because many adults misunderstand how a player - including first basemen – stands at a base to get ready to take a throw.
Next time you go to a pro game, or college (many HS first basemen have not been properly taught how to take a throw), when a ground ball is hit to an infielder, instead of following the ball, shift your eyes to the first baseman.
A first baseman runs to the base and gets in a “Ready Position”! It is not until After the ball has been thrown and the first baseman sees that the throw is accurate that they Then move into a ‘stretch’ position to catch the ball.
PLEASE, do not allow the kids to stand in a stretch position when taking a throw at a base, or when playing catch (many stand in this incorrect position when playing catch). You will be saving them, as well as their future coaches and teammates a lot of grief. Breaking older kids of this improper habit is very difficult.
With that clarified we can move on to teach the kids where the defensive players’ positions are, and their basic defensive responsibilities.
Note: Early in the season do not invest too much time and energy in teaching kids specifically where they need to stand at a base. Simply put, there are more important things for them to learn. Also, it takes more time and effort than we really want to invest to get the kids disciplined in standing correctly in relation to the base. This is another teaching point that we will address during the season, but not with high expectations for mastery. While some learning and application with take place, our fruits of our labors will pay off in subsequent seasons as the kids become more familiar with the game of baseball.
Defensive Positioning
Infielders - The first and third baseman stand 10’ from the base. Do not tell them a distance (they will start doing a heel to toe measurement from the base to their position), tell them to stand “Four Giant Steps” away from the base when the batter is getting ready to hit.
Have the shortstop and second baseman stand half way between the corner base and second base. This is not 'regular' baseball positioning (remember: this is not regular baseball). The reason we position them exactly between the bases becomes clear when we start teaching ‘Infield Base Coverage Responsibilities’.
Catcher - Strapping a 5 or 6 year old into ill-fitting catchers gear when they are not catching pitches is a bit illogical. Consider having the catcher wear only a helmet with a face mask (to protect them if they get hit by a bat). When I run camps for kids this age I use a 3’ x 3’ garden gate as a protective barrier. This is placed 10 feet behind home plate. The catcher squats behind the screen. After the batter drops the bat the catcher runs out to their position…
The catcher’s Defensive position is just in Front of home plate; where they need to be standing in order to take a throw and make a play at home.
Defensive Responsibilities
“Baseball is a Game of Movement”
Young kids’ idea of moving in the game of baseball is usually in relation to fielding the ball. When working with older kids a common coaching statement is ‘Know what you are going to do with the ball when it is hit to you’. While this is very important it doesn’t address the fact that the kids who don’t have the ball hit to them also have responsibilities on defense. And those responsibilities involve the need to move around the field.
At the Tee Ball level our objective for the season is for the infielders to learn that when the ball is not hit to them they run and cover a base. The teaching phrase we will use over and over is, “Ball or Base” …if you don’t get the ball, you cover a base. And you run fast to the base to cover it!
The first few days we work with the kids on this concept, they will struggle. However, after a while most will get the idea. While they will get the concept, it will take longer for them to execute it well. Expect it to take at least half the season before some of the kids are reacting properly when they are needed to cover a base.
For most it will take till the entire season, but we will see progress being made along the way. As they progress in learning to move without the ball and cover a base it is very satisfying as a coach. And their coach the following season will benefit tremendously.
Teaching Base Coverage Responsibilities
Before we get into learning the drill regarding this fundamental baseball concept keep in mind that we will start working only with the four infielders. Initially we will leave the pitcher standing in the middle of the field with no instructions. Later, after the kids get some understanding of the concept of infielders covering bases we will then add the pitcher to the mix. In the next year or two, as coaches, we will come to learn that the pitcher has a lot of coverage (movement) responsibilities on defense.
We will drill our kids in this concept, but time they will get the most opportunities to develop the habit of covering a base when they don’t get the ball is in our daily scrimmage.
Rules for base coverage responsibilities:
1. If an infielder does not field the ball they cover a base (“Ball or Base”).
2. The third baseman and first baseman have one base.
3a. The shortstop and second baseman have two bases; one to their left and one to their right.
3b. If the ball goes to your left and you aren’t fielding it, run to the base on your left. If the ball goes to your right and you aren’t fielding it, run to the base on your right.
It is understood that early in the year most of the kids on defense will want to attack the ball and will not recognize that some/many balls that are hit, are not 'theirs'. The 'positional movement' drills will start the kids on their way to recognizing that one infielder gets the ball and the other infielders cover a base.
We teach kids their movement responsibilities through the 'Two Players, One Base' drill.
Pitcher
The information below* is more for your information as an adult, than for teaching to the kids. Not until around age 9 are youth players able to comprehend and follow this instruction. At the Tee-Ball level, its best to let the child playing defense at the pitcher position to just hang out in the middle of the diamond. They will get plenty of balls to field. : ) As the season progresses, we will see many situations where the two infielders on one side of the field will be on the ground wrestling for the ball, leaving one of the corner bases (1st or 3rd) uncovered.
We coaches may choose to point out that often a base is not covered and instruct the pitcher that, when they see this, they run over to the base and cover it. The reality is they will recognize this too late and not get to the base ahead of the runner. That sis OK though. They will begin to grasp the fact that there are times where they are needed to cover a base (not just stand in the middle of the infield watching). Simply the experience of recognizing this, followed by running over to the base will be a great education for them. Next year (or the year after), when they have matured more and are more in tune with what is going on around them, they will take these experiences and will be able to more quickly learn to execute the pitcher's defensive movement responsibilities at game speed.
---------------------------------------------
*The pitcher follows the same rules as the shortstop and second baseman. The base to the pitcher’s left is first base, the base to their right is third base. If the ball is hit to the pitcher’s left and they don’t field it, they run to the base on their left (first base) and cover it IF it is unoccupied; otherwise they stop short of the base^.
The same rules apply for balls hit to the pitcher’s right. Ideally we only want the pitcher to go after balls they can field before it crosses the invisible line between them and first or third base. We don’t want them running back towards the infielders after the ball. This is much easier said than done, however.
^Possibly at the Coach/Machine Pitch level of play, and definitely at the Player Pitch levels, we train the pitcher, when the base is covered by a teammate we train the pitcher to continue running past the base, into foul territory, to back-up throws to the base.
Why do we want the pitcher covering a base?
Often both infielders on the side of the field the ball is hit to will go after the ball and neither will cover the corner base (first or third). The pitcher is the ‘insurance policy’ to be sure the base is covered.
As stated earlier, we will not drill the pitcher in this responsibility early on. Our time will be used to get the four infielders to develop their base coverage habits.
This does not mean we will not teach the idea, verbally, of the pitcher covering a base. We will point this out each time it comes up. The reality is that verbal instructions are not nearly as effective as the players drilling the actual actions.
Later in the season, once the four infielders are demonstrating they are getting the concept of covering the correct base we can then start investing practice time on drilling the pitcher position.
Practice Structure
“Kids don’t sign up to practice baseball, they sign up to PLAY baseball” – we want to incorporate a 50/50 practice which ensures that practice will be FUN every day and the result will be the kids wanting to go back to the park to play again.
To ensure the kids get to Play every day they come to the ball park we want to enlist a 50/50 Practice. Half of practice time is drills and skill development and half of practice is playing the game. Playing a game (scrimmage) is fun - and it is what the kids expect when they signed up to Play.
Warm-up (5 Min.)
Skills & Drills (25 Min.)
Break (5 Min.)
Scrimmage (25 Min.)
Warm-up
Base Running - this is a great group activity that also has an important socializing benefit. It is a fun way for kids to develop base running skills and become familiar with this fun aspect of the game. It also tires them out a bit, so they will pay attention to the instructions for the drills and skills segment of practice. Below are a few different base running activities. Only plan on each player having 2-3 repetitions in the warm-up base running activity each day. Over time they will develop their base running skills. When accounting for getting the kids organized before and after the warm-up, the actual activity only lasts about 3 minutes.
Run Around the Bases
Place a 2-3 kids at each base. Holler ‘go’ and the first player at each base runs. A second or two later yell for the next player to at each base to go, and so on. After they are all running, let them run around the bases 2-3 times.
Running To First Base
(see the Drills section for diagram and explanation)
Relay Race
Save this activity for later in the season. Divide the players into two evenly matched groups; one at home, one at second base. In the relay race the players run all the way around the bases, returning to tag the next player on their relay race team. After tagging their teammate that runner sits down.
Don’t be surprised if the kids want to ‘do it again!’.
Skills and Drills (50% of practice)
For this segment of practice we divide the team into groups; two groups if you have an appropriately sized team of seven players. If you have nine or more kids, make three groups.
There are three drill stations: Playing Catch, Defense and Batting. Each group spends 7-8 minutes at a station, then rotates. If your team only has two groups, one station will not be used during each stage of the rotation.
Under each station below is a list of activities. You’ll see that there are not many. These are very small children and there is a limit to how much they can learn in one season. The fact is, even at higher levels of play, practices are not real detailed (they just move faster). The key is for our kids to gain familiarity with the activities and get massive repetitions in order to gain some level of mastery of the skills.
The drills are listed in sequence; those that are introduced first, down to those introduced later in the season. Each day, one to three activities are run at a given. As we progress through the season and down the list we don’t want to forget to come back and keep running, from time to time, the activities that were introduced early on.
Note: At this age the kids do not need to ‘warm up their arms’ before participating in other activities. The group drills session at the start of practice will get them plenty ‘warm’. Point being is that a group of kids can go directly into the Batting or Defense station without playing catch first. Trying to coordinate 7, 8, 9 or more little ball players playing catch at the same time can become chaotic very quickly.
Station 1: Playing Catch
Daily Throwing and Receiving Drills - These are done daily at the start of the station session
Playing catch with a partner or parent
Underhand Toss
Catch, Tag and Throw (mini diamond, using an underhand toss) - Introduced later in the season when the kids are more familiar with their positioning at a base and have some level of mastery of the underhand toss and catching a thrown ball
Station 2: Batting
Daily Batting Drills - These are done daily at the start of the station session
Hitting of the Tee
Ideally we have two Tees available and use wiffle balls. We have two kids batting and 1-2 kids chasing the balls (they LOVE chasing the balls). When using wiffle balls two kids can hit at one time and nobody will get hurt if a flying wiffle ball hits them in the side of the head. When two kids hit at the same time, the players gets twice as many swings - more repetitions means greater skill development. Note: Make sure each batter has a helmet and the two tees are at least 15’ apart. We want to be conscious of keeping the batters’ heads safe.
If you only have one tee, hard balls can be used. Give each batter 7-8 swings while the other players field the hit balls. Have one player ‘on deck’ who can jump right in when the previous batter finishes their swings. This will keep the activity moving and get the kids more practice.
No helmet is needed when there is only one batter, but be sure the on-deck batter is standing far enough from the batter hitting off the tee, so they are safe. Also, have an adult standing between the two batters - better the adult gets hit than the child ;)
Later in the year, when the kids know the batting drills, we can go straight into the Tee work and have the on-deck batter do batting drills during the 60-90 seconds they are waiting. In this case we can increase the number of swings to 8-10 for each batter.
Have an adult at the tee(s) with a bucket of balls who places the ball(s) on the tee. It is critical that the kids fielding the balls are paying attention when the next ball(s) is being hit.
Finally, have a line that the players fielding are not allowed to cross. Often the batter(s) will not hit the ball far from the tee. We don’t want the players, who are fielding, running up close to the tee(s) to pick up a ball. This slows the activity down waiting for the fielding player(s) to run back to a safe distance from the batter(s). The line might be something already on the field, otherwise cones, hats, hoodies or some other objects can be used to indicate the line.
For wiffle balls the line should be at least 20’ from the tee(s); if hard balls are being used the line should be at least 40’ from the tee. If a stronger batter is up, move the tee back creating a greater distance between the batter and fielders.
Station 3: Defense
Drills:
20’ Ground Balls
40’ Ground Balls
Two Players, One Base Drills
Ranging Laterally for Ground Balls
Perpendicular Toss
Double Plays’
Pop Flies
Scrimmage (50% of practice)
Set up: Assuming a team with a roster of seven players; one batter, one base runner (a parent can serve as an additional base runner in order to give the defense more options for bases where they can get an out…make sure the parent runs at kid speed), four infielders and a player at the pitcher’s position. An adult plays the catcher position and also sets the ball on the tee for the batter.
The gloves of the kids batting and running the bases are placed in foul ground near third base
Rotation: There are different options...we can rotate the players after each batter hits; rotate every 3-4 batters, or simply change positions when the kids who are batting/running the bases move back into the field to play defense. If you chose an actual rotation, the following is a simple suggestion:
3b --> SS --> 2b --> 1b --> P --> Batter --> Base Runner
Larger Numbers of Players on Your Team:
8 or 9 players: add a catcher, base runner and/or on deck batter
10+ players: depending on the number of adults available it becomes possible to set up two scrimmages
Feedback:
On each play we want to give feedback to as many players as possible. First and foremost we are constantly looking for actions the players do correctly or are making an effort to do what they are being taught. When we see these things we want to point them out. Nothing motivates a player more, to keep working to improve, than acknowledging that they did something correctly or that we saw their effort to do an action correctly.
Of course there will be plenty of things to correct and teach. The key to correcting is to talk about actions not results. The kids will get their actions correct much more often than the end result. On the occasions the kids do get the desired result we still want to talk about their using the proper actions, examples:
You reached forward; that helped you catch the ball.
You moved your feet to throw; that made your throw strong and accurate.
You really turned your legs fast on that swing; that made the ball go a long way.
We want to shoot for a ratio of acknowledging things done correctly to making corrections of 3:1. If the kids hear us telling them they did something right more often than us correcting them they will learn to trust us and recognize that we are wanting them to get better. With that trust in place they will respond better when we are correcting them. They will be confident in us and know we are trying to help them.
Childhood Motor Skill Development
(from Joseph Lao, Ph.D.)
…Catching balls takes a little longer, (typically an additional 3-4 years), i.e., until 5-7 years of age. During infancy children can only catch large balls rolled directly at them. If a smaller ball is thrown directly at them they tend to close their eyes, turn their heads, and stiffly extend arms and legs. It is not until seven years of age that children develop the capacity to track flying objects, make appropriate leg and body adjustments, and prepare their arms, hands and fingers quickly enough to catch a three inch ball.
Note: This is just a sample excerpt of one article. There are many written by child development researchers that state that seven or eight is the age that kids become better able to judge and catch. Keep in mind that in this research they are likely not testing kids in a park with other kids and additional distractions. The Tee-Ball practice environment, very likely, makes catching a thrown baseball more challenging than in a research atmosphere.)
The Science: Human beings' eyes work together as part of a process called 'Binocular Vision'. When the eyes work together the brain is able to process the information resulting in depth perception and the ability to track a moving object. In the human brain, this coordinating of the two eyes to work together and transmit information does not develop until ages 7 or 8.
Foundational Concepts
Ready Position
Line your kids up in a row (or two) and instruct them to stand with their feet wider than shoulder width and with their hands (and elbows) held out in front of their body. The ideal position of the hands is 3 o’clock and 9 o’clock with the palms facing in. This stance is difficult for a young child however, because of their lack of leg and shoulder strength.
A fun and effective way to train this concept is to tell the kids to pretend they are frogs. Tell them that when you call out "Ready Position" they jump up and land with their feet wide and hands and arms extended in front of them (in a Ready Position) and holler out loudly, 'Ribbit!". Doing this along with them makes it more fun and engaging.
Move Your Feet to Catch
We remind our kids that the ball does not always come straight to them. They need to “Move Their Feet” in order to take their hands to the ball to catch it. We “Move Our Feet to Catch”; we “Catch the Ball with Our Feet". Next, we point out that by reaching forward with our hands, towards the ball, we can see the ball heading towards our glove making it easier to catch. We "Reach Forward to Catch".
Line your kids up in a row (or two) and instruct then to get in a "Ready Position". Tell them that when you say "Move Your Feet to Catch" they are to move three feet to their left to catch and imaginary ball. Then you point to your right (their left) and holler "Move Your Feet to Catch". As you point and give the command, you quickly move three feet to your right (leading them in the movement), then holler "Reach Forward to Catch" and extend your hands and arms in front of you.
Repeat by having them move to their right. Repeat back and forth 4-5 times (or more if you have time and they remain engaged...the more you repeat the actions the better trained in the action the kids become).
Move Your Feet to Throw
No ball is used in this drill. This drill trains the proper body movements of the throw. We run the kids through the drill to train their movements. (Later we put a ball in their hands, so they can test how well their body has learned the movements.)
First, explain to the kids that when they are preparing to throw they want the glove side of their body pointing at their target - NOT their chest.
Next, they want to lift their elbows up to shoulder height and point their glove elbow at their target (or, if it’s easier, have them point their glove). They are now in a "Power Position".
Now they are ready to 'throw'…
We instruct our players to 'Shuffle' towards their target (“Move Your Feet”) twice, with their head pointing at their target ('Your head is your steering wheel'). After two* shuffle steps they 'Pull' their glove elbow back and 'Snap' their throwing arm and hand down.
* Many kids will shuffle more than twice; some will shuffle many times. Not to worry. Moving their feet to throw is a new concept and action; it will take them some time and repetition to coordinate the transition from the shuffle action to the upper body (arms) action.
The teaching phrase we use is, “Shuffle, Shuffle, Pull, Snap”.
Drills
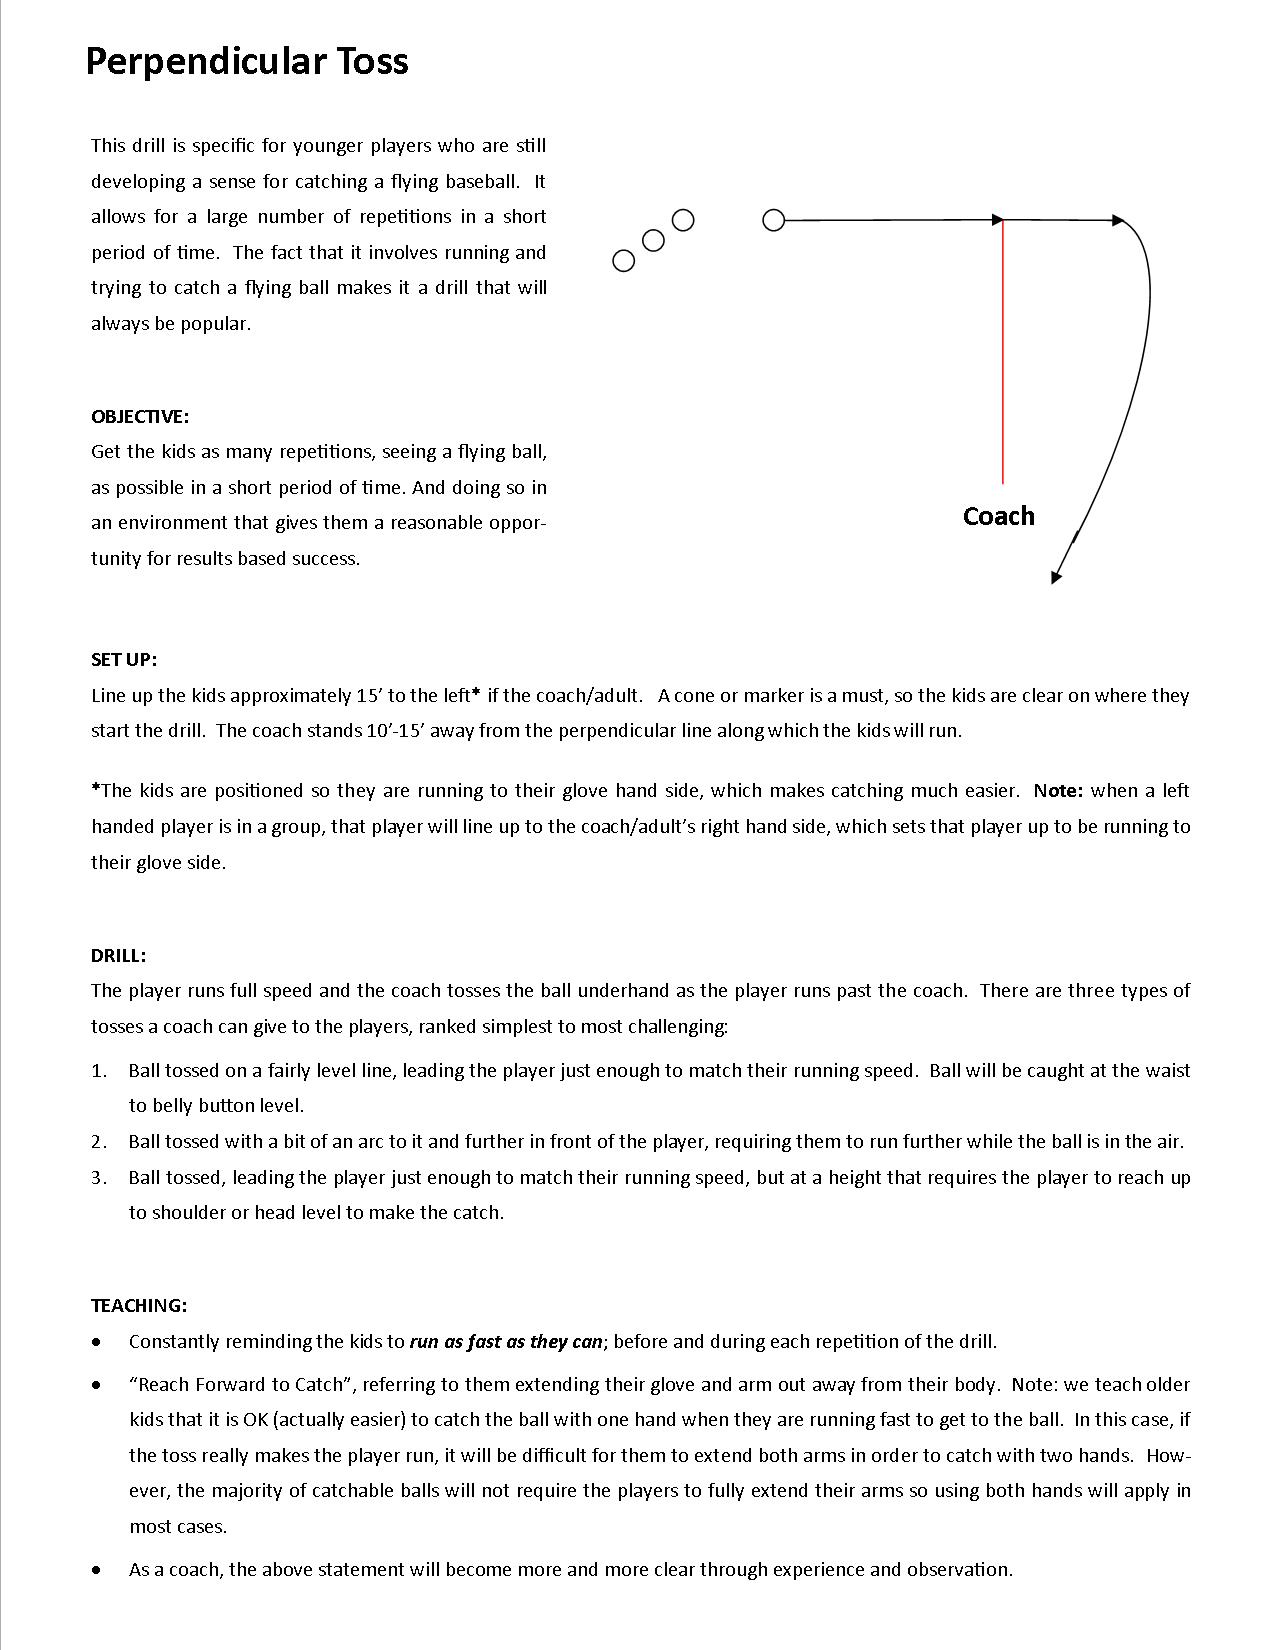
Underhand Toss
20' Ground Balls
40’ Ground Balls
Base Running - To First Base
Two Players, One Base Drill
First base: 3-4 Play
Second base: 4-6 Play
Third base: 5-6 Play
Home plate: 1-2 Play
Ranging Laterally for Ground Balls
Perpendicular Toss
Double Plays
Catch, Stomp & Throw Drill
Base Running - To First Base
Set up:
Place throw-down bases in the base line between first and second base
Place cones 20’ from three first bases
Coach stands 10’ beyond first base
Drill:
On the coaches command a base runner runs through first base; continues running past the coach, giving the coach a High Five.
Objectives:
Players learn, through doing, that they are allowed to run through first base and they will still be safe.
Players learn to focus on the base, not what is happening with the ball.
Teaching:
Run as fast as possible to the base, past the base and give the coach a ‘High Five’
Rule: Look at the base while running towards it (not allowed to look at what is happening with the ball), see foot touch the base and yell, “Touch”.
Notes:
By having the players start 20’ from first base we get more repetitions in a shorter period of time.
Three groups reduces the time the kids spend standing in line.
Rollers

Underhand Toss

Teaching:
Run/Sprint - “Move Your Feet to Throw”
Your feet throw the ball, your arm guides the ball straight and level toward your teammate
Toss the ball below your teammates chin (communicating that the ball is not tossed in a high arc)
Keep running after you toss the ball - “Follow Your Head”
Mistakes kids will make initially:
Not run fast enough (it will take some time for them to get over the idea that only their arm can power the flight of a ball)
Stop to toss the ball (running and tossing at the same time can be challenging when first learning the skill)
Swing their arm and toss the ball in an arc (it will take time for the kids to control the action of their arm and to learn that the momentum from running provides most of the power to move the ball forward)
Outcomes:
Players learn to make an underhand toss while running
They learn to keep running, straight ahead, after making the toss
Thoughts:
In all throwing actions the legs initiate and provide most of the power.
The throwing arm takes the power generated by the legs and conveys it to the ball. Young kids don’t understand this and won’t grasp it if we try to explain it beyond pointing out that the muscles in their legs are bigger. To some extent they will grasp the concept of the momentum created by using their legs to move them toward their target.
The most important part of teaching this drill is to keep the initial instruction simple and to get on with running the drill.as Massive repetition of the actions is where most learning takes place (we are training the muscles).
Subsequent instruction is primarily for the purpose of correction and keeping them on track towards executing the actions properly.
Many kids will wait too long to toss the ball; they will get within about five feet of their partner before tossing. We continue to tell them, ‘Toss the ball when you are half way’. You might also place something (a bit beyond) the half way point that indicates the time to toss the ball.
Early on some kids will struggle with the physical challenge of combining the two actions of running and tossing. These kids will run all the way to their targetand Hand the ball to you. Encourage these kids to toss the ball when they are half way between the starting point and the target, but don’t be overly concerned with coaching them more. Kids learn a lot form observing their peers. Once they see their peers tossing the ball before they get to their partner, they’ll begin tossing the ball.
20’ Ground Balls
We run a variation of this drill called 40’ Ground Balls. In this variation the coach stands further away from the player. The longer distance calls for an Overhand Throw, which requires the player to Shuffle Their Feet towards the coach to power the throw. We want to work with our players, so they understand the difference in footwork for the two types of throws. A player runs with the ball, towards their target, to power the Underhand Toss - 20’ Ground Balls. A player shuffles their feet to power the Overhand Throw - 40’ Ground Balls.
The distances: 20’ and 40’ are guidelines. The distance for 20’ Ground balls could be 25’-26’; the distance for 40’ Ground Balls could be 45’-50’. The distance will vary a bit from player to player. the distance is less of a concern. Most important is the kids learning how to utilize their feet and legs to power the throwing action.
Note: When doing the 40’ Ground Balls drill we do not need to require the players to go around the coach following their throw. However, we want to continue to emphasize ‘continuing forward movement’ for a couple of steps, towards the target, after releasing the throw.
Remember: Never deliver the ball straight to a player. We always deliver the ball 10’-12’+ to the side of the player at a pace that allows for them to ‘charge’ the ball, angling in, when approaching the ground ball. We want create as much movement in our players with they execute skills. This is especially important during ground ball work.
40’ Ground Balls
Same set up as 20’ Ground Balls, except we stretch the distance between the adult and the players...and, given the longer distance, the players shuffle and throw overhand (“Shuffle, Shuffle, Pull, Snap”). We still have the players, "Follow Your Head" (keep their momentum moving toward their target After throwing the ball) and then run around the adult they are working with.
Ball or Base Drills
(Note: This information will also be included in the Coach/Machine Pitch Section when that is added to the site (soon). The drills and content on that page will be addressed in slightly greater detail consistent with these older players' ability to digest the concepts and execute the actions.)
The four drills below are just a sample of variations of this same concept. Other than the '1-2 Play' at home, each drill could be run with the coach rolling to either player.
There is a wide variety of drills that follow the same concept that our found on the Skill Building Warm-up page under the Defensive Responsibilities heading and the Pitchers Fielding heading. Also refer to the Defensive Responsibilities page where the complete (though brief) set defensive concepts are detailed.
The drills and concepts are introduced at the Tee-Ball level, but our expectations for the kids' ability to consistently execute and full grasp the concepts must remain low. However, these actions represent how the game is played and it is important that they be exposed to these actions and drilled in them. Our primary objective is that they are introduced to the fact that on defense, all players must move once the ball is put into play and that each player has a specific responsibility.
Their given responsibility comes down to one simple phrase, "Get the ball or cover a base.
At the Tee-Ball level we will not address the pitcher's responsibilities. This are a bit to complex for this age of ballplayer. We begin addressing the movement and coverage responsibilities of the Pitcher at the Coach/Machine Pitch level.
The drills are shown below in the following order
First base: 3-4 Play
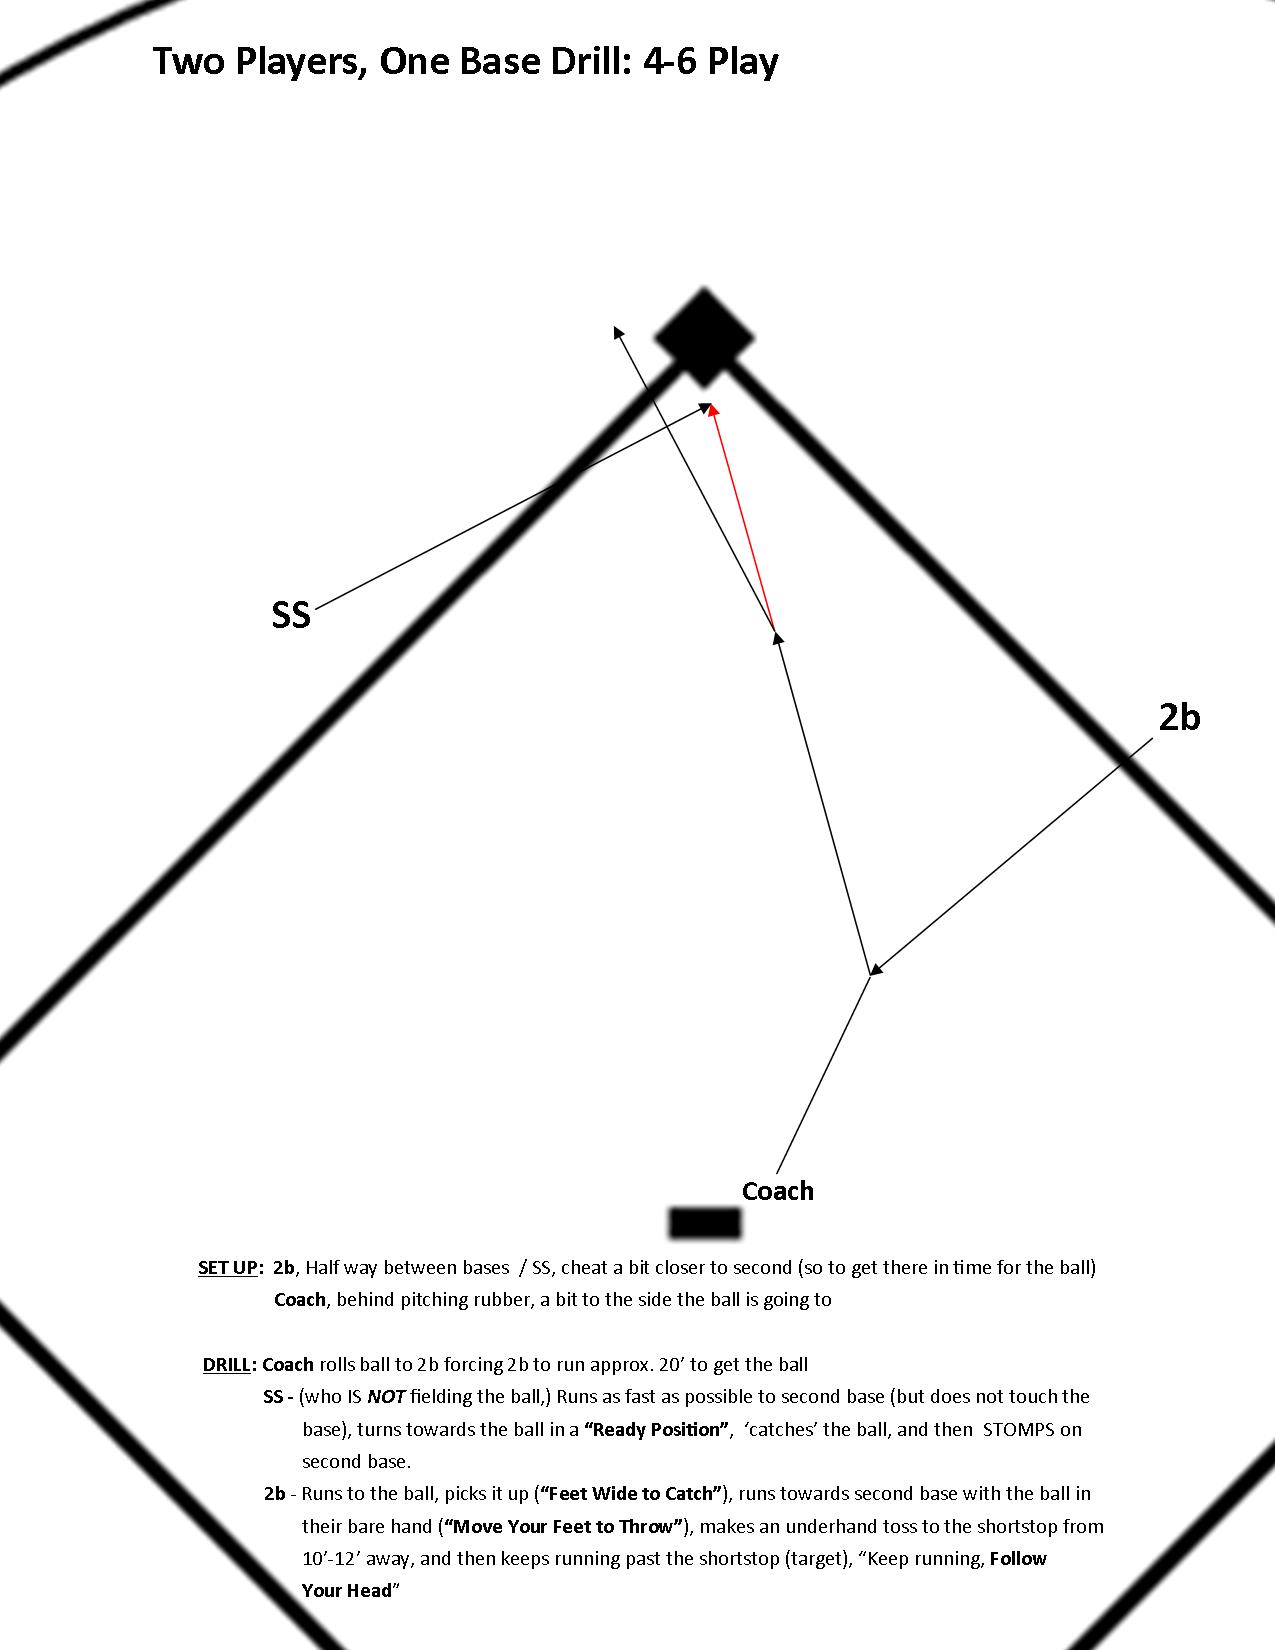
Second base: 4-6 Play
Third base: 5-6 Play
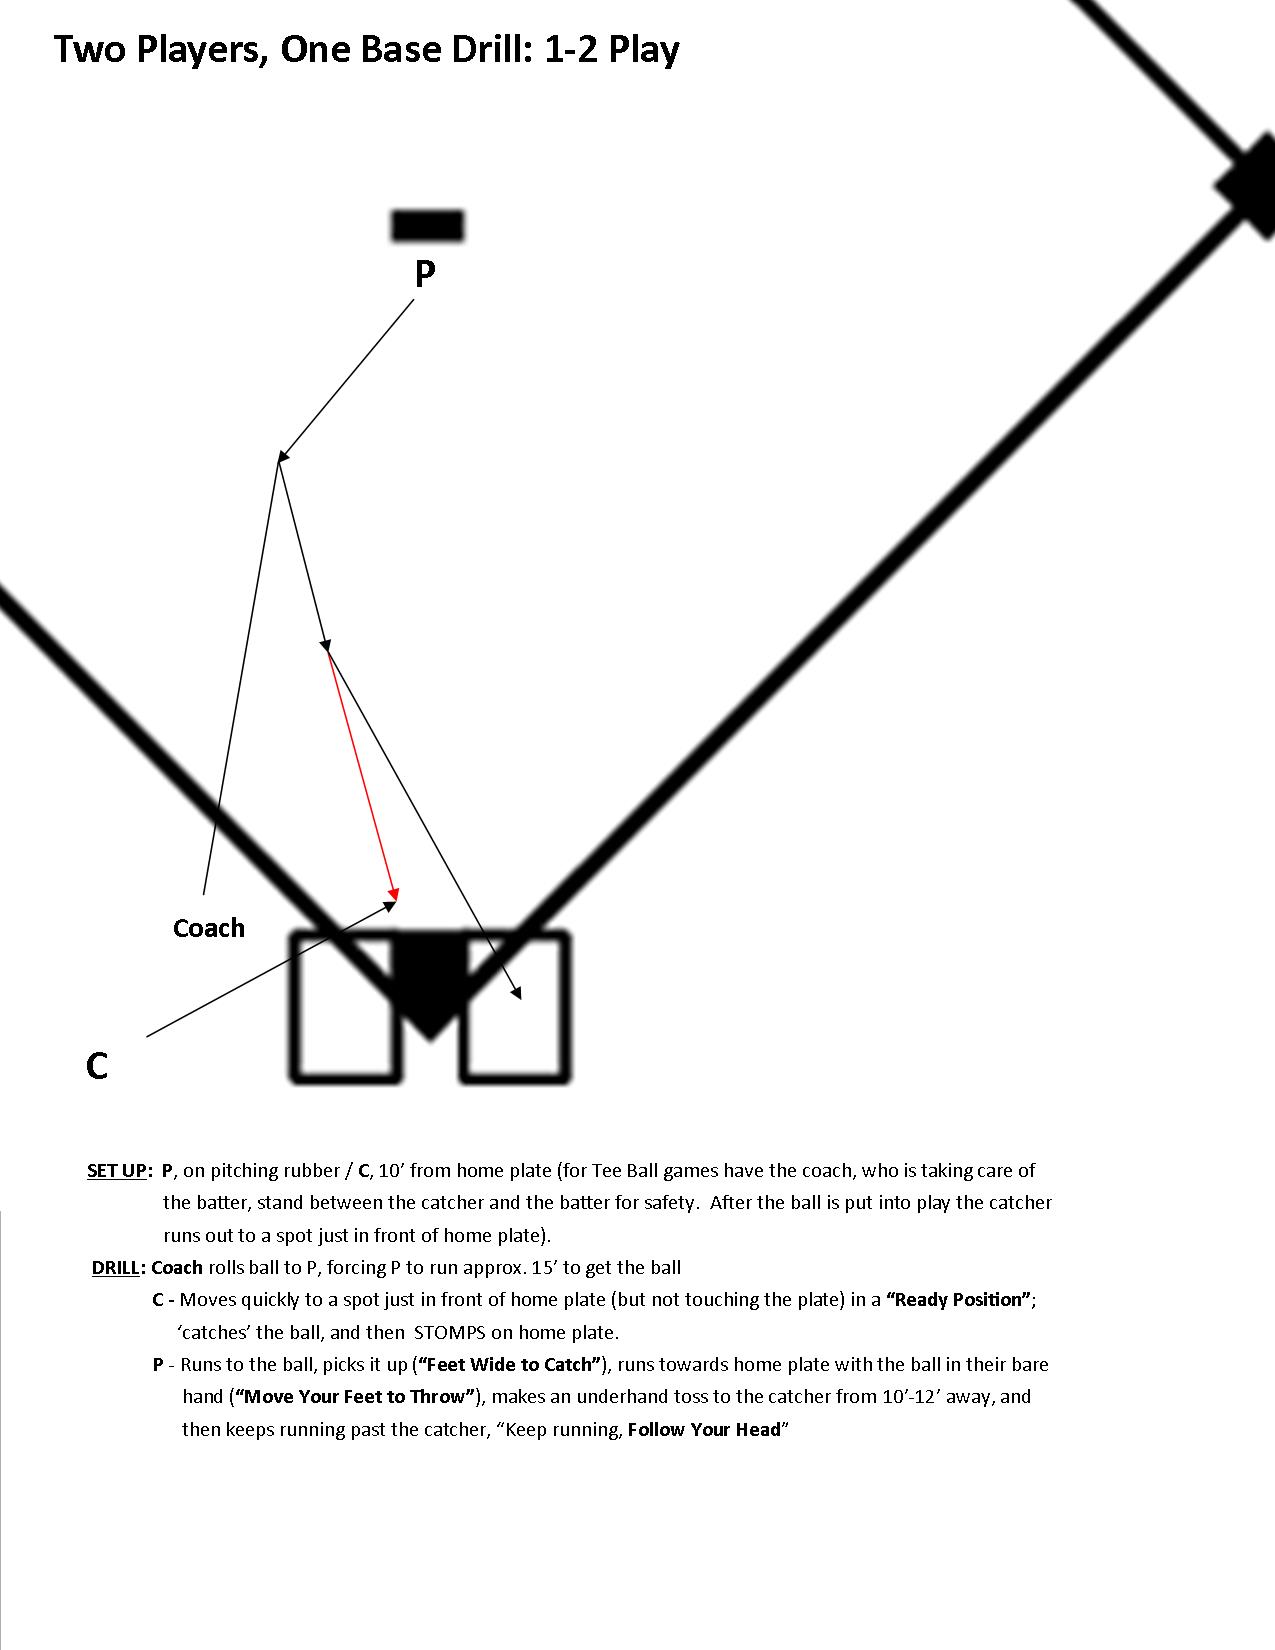
Home plate: 1-2 Play
This same drill can be run with players reversing roles of who is fielding and who is covering the base.
This same drill can be run with players reversing roles of who is fielding and who is covering the base.

This same drill can be run with players reversing roles of who is fielding and who is covering the base.
The objectives of the Two Players, One Base series of drills:
Players come to recognize that sometimes their job is to get the ball and other times it is to cover a base.
Players develop the habit of always ‘moving’ when on defense as soon as the ball is put into play and to move quickly and with urgency.
Players come to recognize that the momentum of running towards their target is what powers their throws. Their arm provides a minimal amount of the power behind the throw; the arm’s primary role is to guide the ball. They also need to learn to continue running towards the target during and following the throw which enhances the power behind the throw and improves accuracy.
It will take quite a while to get the idea of momentum (generated by their legs) to compute in their minds. Given that the ball is held in the hand and he hand is connected to the arm, kids understandably see the arm as the power source for the underhand toss.
3. Coaches understand that as simple as the drills are, it will take a number of weeks (and for many, the duration of the season) for the kids to grasp these concepts. The cool thing is they WILL ‘get it’ (to some extent) through on-going repetition. As they start getting it the movements on the field become pretty amazing to watch. (They will still miss most of the time on their throws and catches. In most cases those skills don’t start to solidify until age 8 and 9.)
Note 1: At the Tee Ball level we want to position the second baseman and shortstop halfway between the corner base and second base. These players are learning to understand that they could cover either base depending on if the ball is hit to their right or their left.
By positioning them exactly between the two bases the kids establish a perspective that each base is of equal importance. Gaining an understanding that they have a responsibility for either base when playing second base or shortstop will give them a foundation for grasping more teaching when they graduate to the Coach/Machine Pitch level of play.
Keep in mind, they will not master their movements and coverage responsibilities as Tee-Ballers, but they’ll begin to show signs of some level of understanding. At this level we are exposing them to the concept of movement. They will seem perplexed at times and make mistakes, but these experiences will pay off over time. Also, getting them moving and giving each position a purpose on each play makes the game more interesting and fun, which will increase the probability that the kids will want to come back and play the following season …which is our primary goal as adults involved at the Tee-Ball level.
Note 2: The drills at the third base bag and home plate are less about preparing the kids for recording an out in a game and more about them learning about coordinating movements of two adjacent players, recognizing that sometimes a player gets the ball and sometimes gets a base. Most importantly they are gaining an understanding that movement is required each time the ball is put into play. The drills establish the habit of moving each time the ball is put into play.
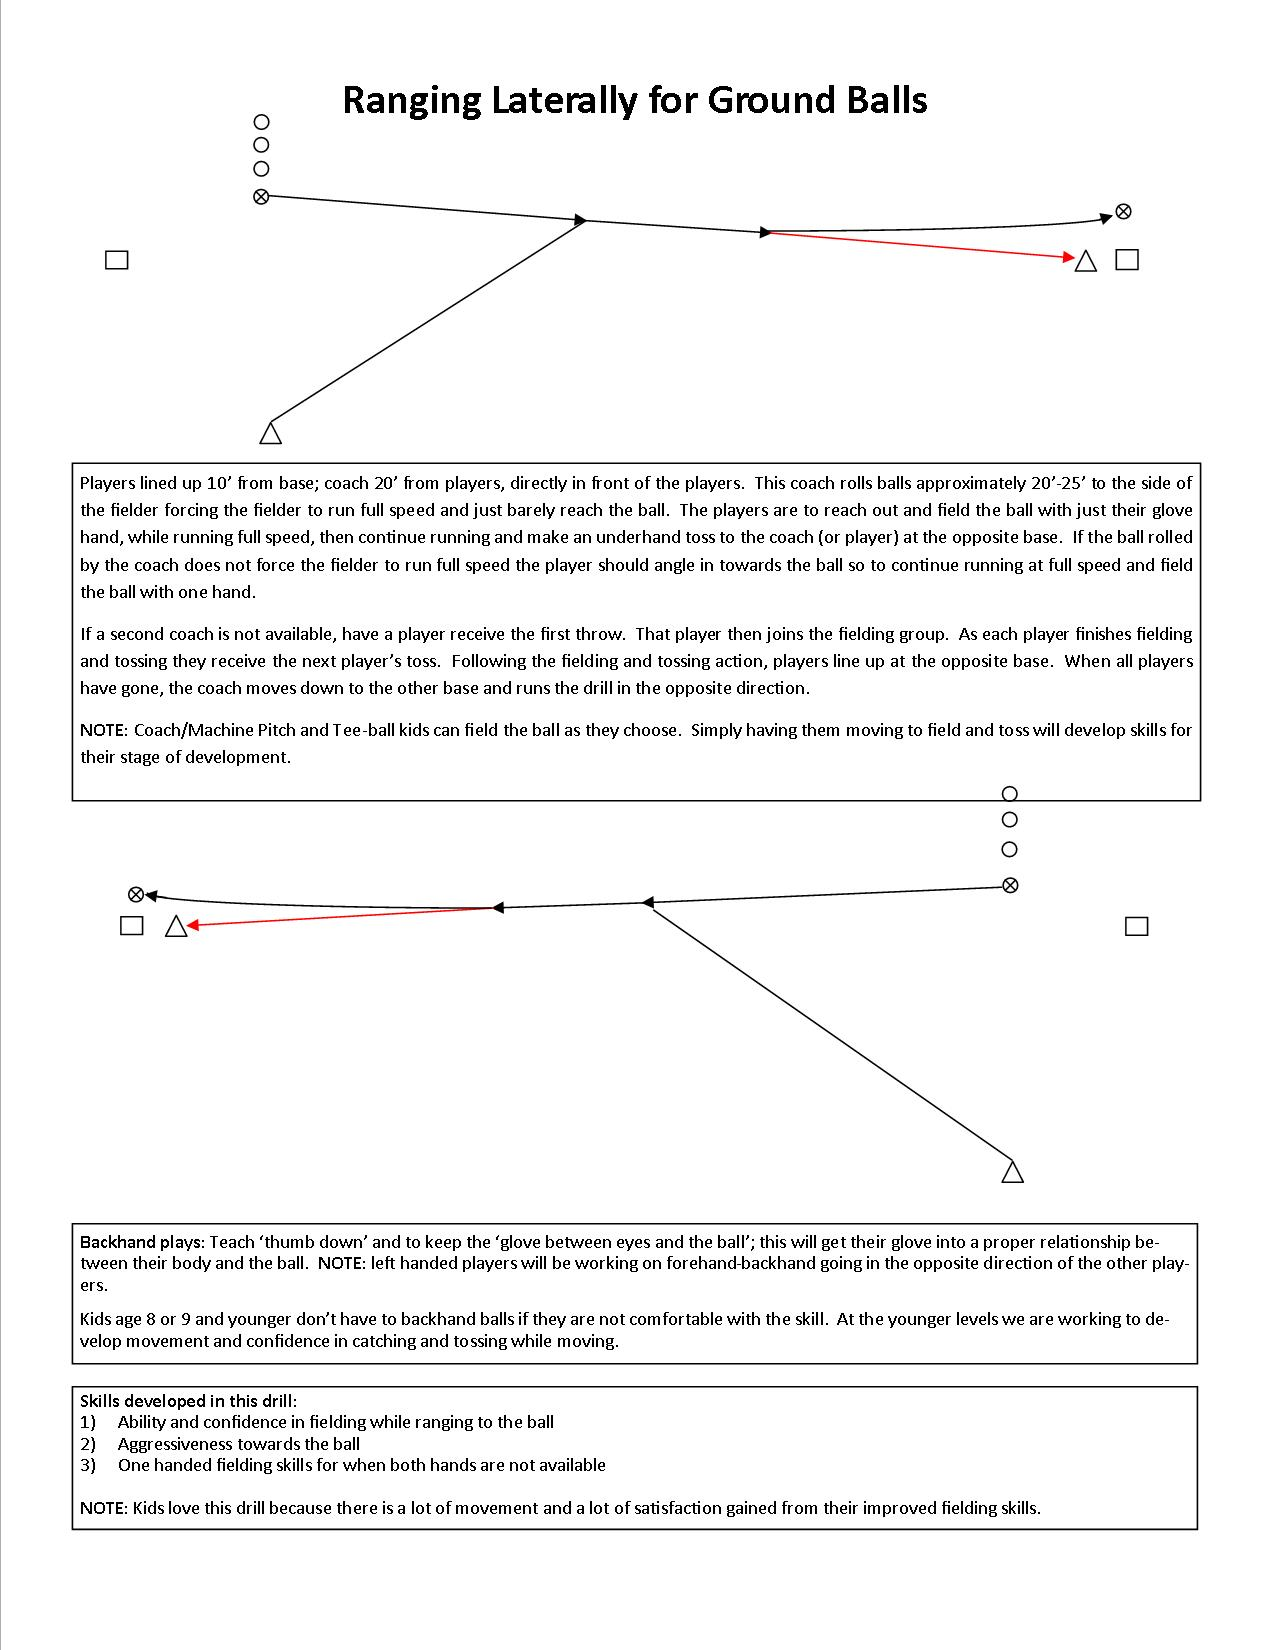
Ranging Laterally for Ground Balls
The diagram below was pulled from a section of the website for older players.
Modifications (to the description in the diagram) for Tee-Ballers:
Shorten the distance the players are working in the drill from 50’ to 35’
When delivering the ball in the drill, only make the kids move 15’ to field the ball
Deliver the ball at a pace that allows them to get to the ball and and get their ‘Feet Wide to Catch’
Experiment with a player receiving the ball and an adult. You will be able to determine when the kids are ready to receive thrown balls in this drill. Until then, have an adult receiving the throws.
“Double Plays”
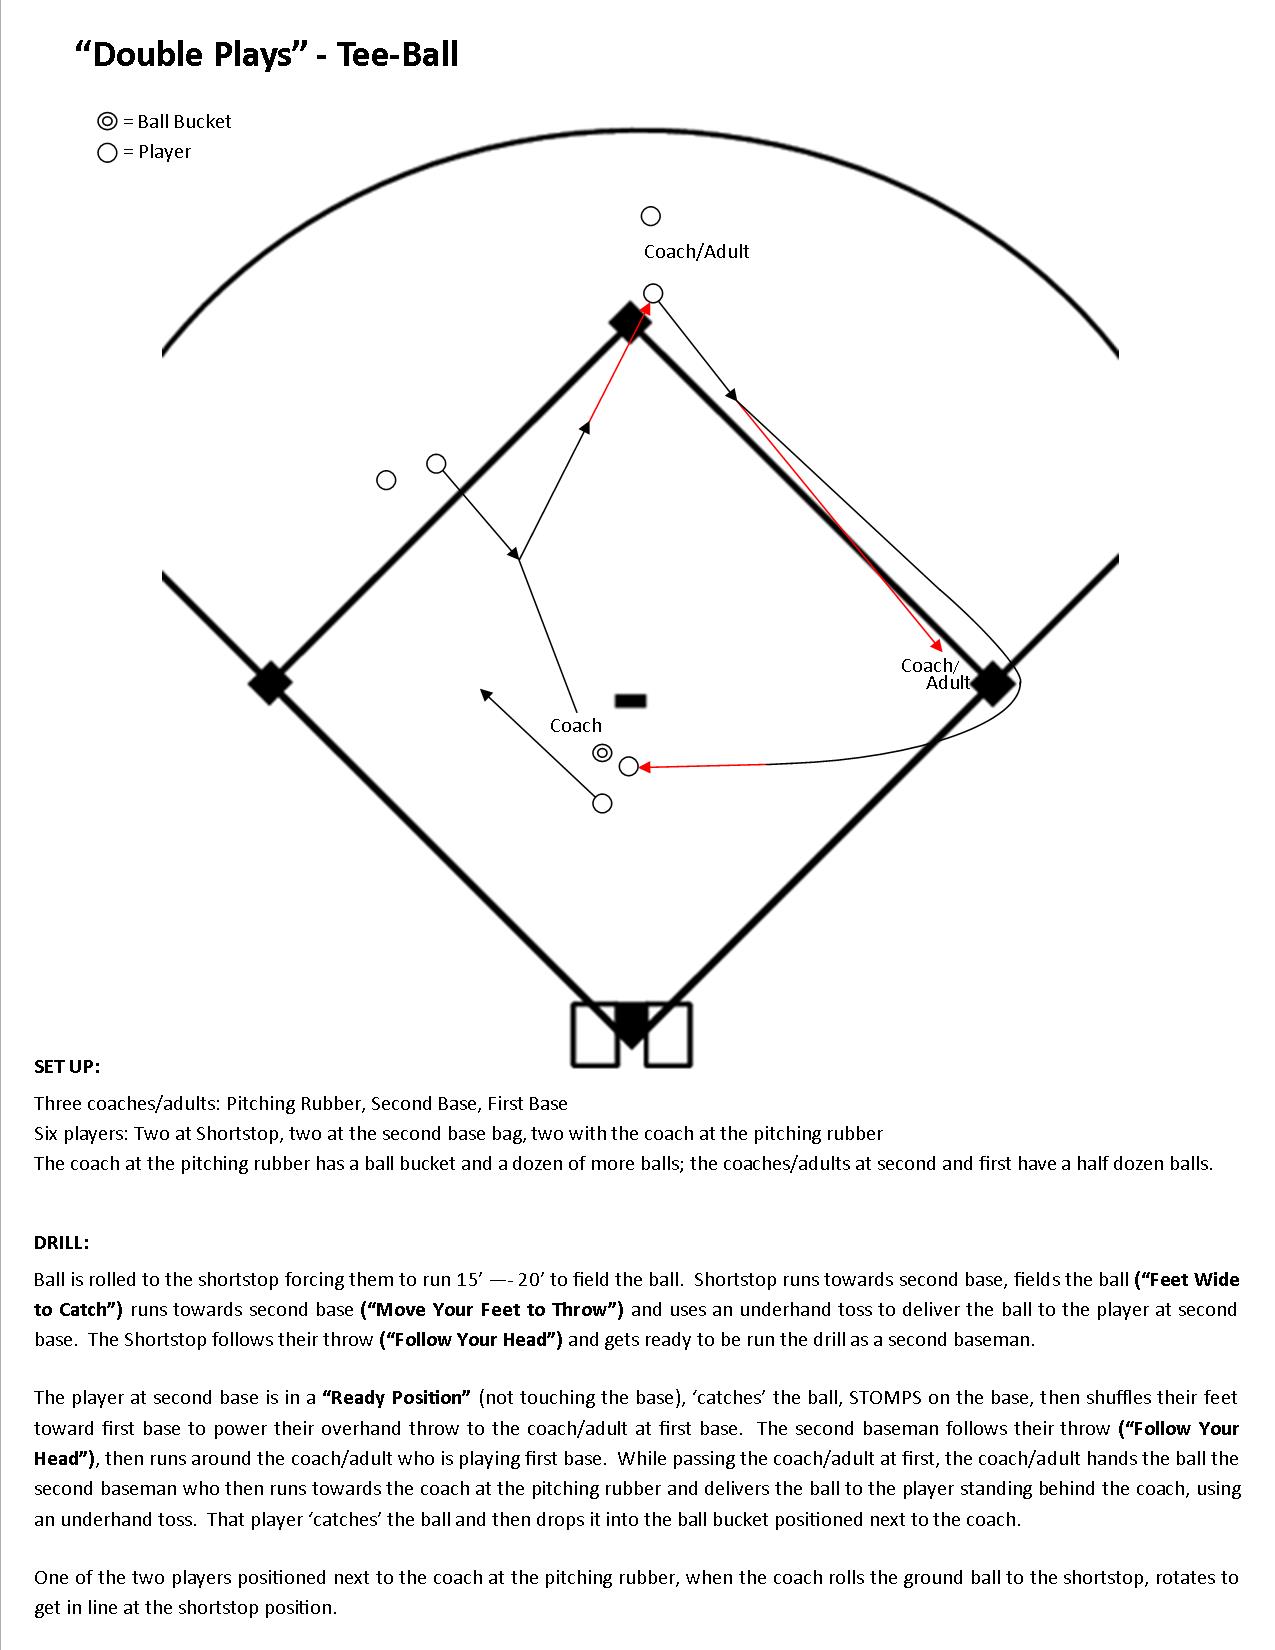
Adapting to running the drill given the mistakes the kids will make and running the drill with less than six players:
1. Kids usually want to 'line up' within a few inches of each other*.
Shortstop Position: Place two cones at shortstop, one for the player who will be fielding the next ground ball and the other cone 5'-10' away for the next player.
Second Base Position: we instruct the extra player to stand behind the assisting adult, while the player participating in the drill is positioned next to the base. After the player participating in the drill moves away from the base, the coach/adult tells the next player to get into position next to the base.
Players positioned next to the coach at the pitching rubber: just before the coach rolls the ground ball to the shortstop, the coach instructs one of the players standing next to them to rotate to the 'waiting cone' at shortstop.
2. The kids will not catch many of the throws to second base - the coach/adult at second base always keeps a ball in hand. When the player at second base misses a throw, the coach hands them a new ball in order to keep the drill going. (RULE: the players are not allowed to chase missed throws.)
3. The kids throwing the ball from second base to first base, the first couple of days the drill is run, misunderstand that their throw is supposed to be overhand; they will run to first and make and underhand toss. Simply continue to remind them that this LONG throw is overhand. After running this drill at a couple of practices this will not be much of an issue.
4. Some throws to the coach/adult at first base will not be accurate. The coach/adult at first keeps a spare ball in hand at all times to be available to hand to the player as they run by. It is also important for the coach/adult to recognize the throwing strength of the next player who will be throwing to them. When a child who does not have as much throwing strength comes up, the coach/adult at first base moves closer to second base to a distance more in line with that particular child's throwing capability. (This coach/adult will be moving a fair amount throughout the drill)
If fewer than six kids participating in the drill: If five players: eliminate the extra player at second base. If four players: eliminate the extra player next to the coach at the pitching rubber. The single player there waits to 'catch' the underhand toss from the player running around the coach/adult at first base. They drop the ball in the bucket, then runs to the 'waiting cone' at shortstop. (Note: if the tossed ball goes far past them we remind them of the RULE: 'players are not allowed to chase missed throw' and instruct them to let the ball go and rotate to the 'waiting cone' at shortstop.
* The natural survival instinct in a child drives them to stick as close as possible to the kids ahead of them in line in order to reduce the possibility of someone else getting in line ahead of them (to be the next to get food, protection, etc.) In modern society this should not be a concern, but until kids mature their basic survival instincts dominate their behavior. Given an understanding of this and other reasons behind young children's behavior makes it easier for the coaches/adults working with them to not allow these behaviors cause frustration. They can then lead the kids with greater empathy and reduce their urge to fight behaviors that are difficult to change and/or use strategies to overcome these behaviors.
Catch, Stomp & Throw Drill
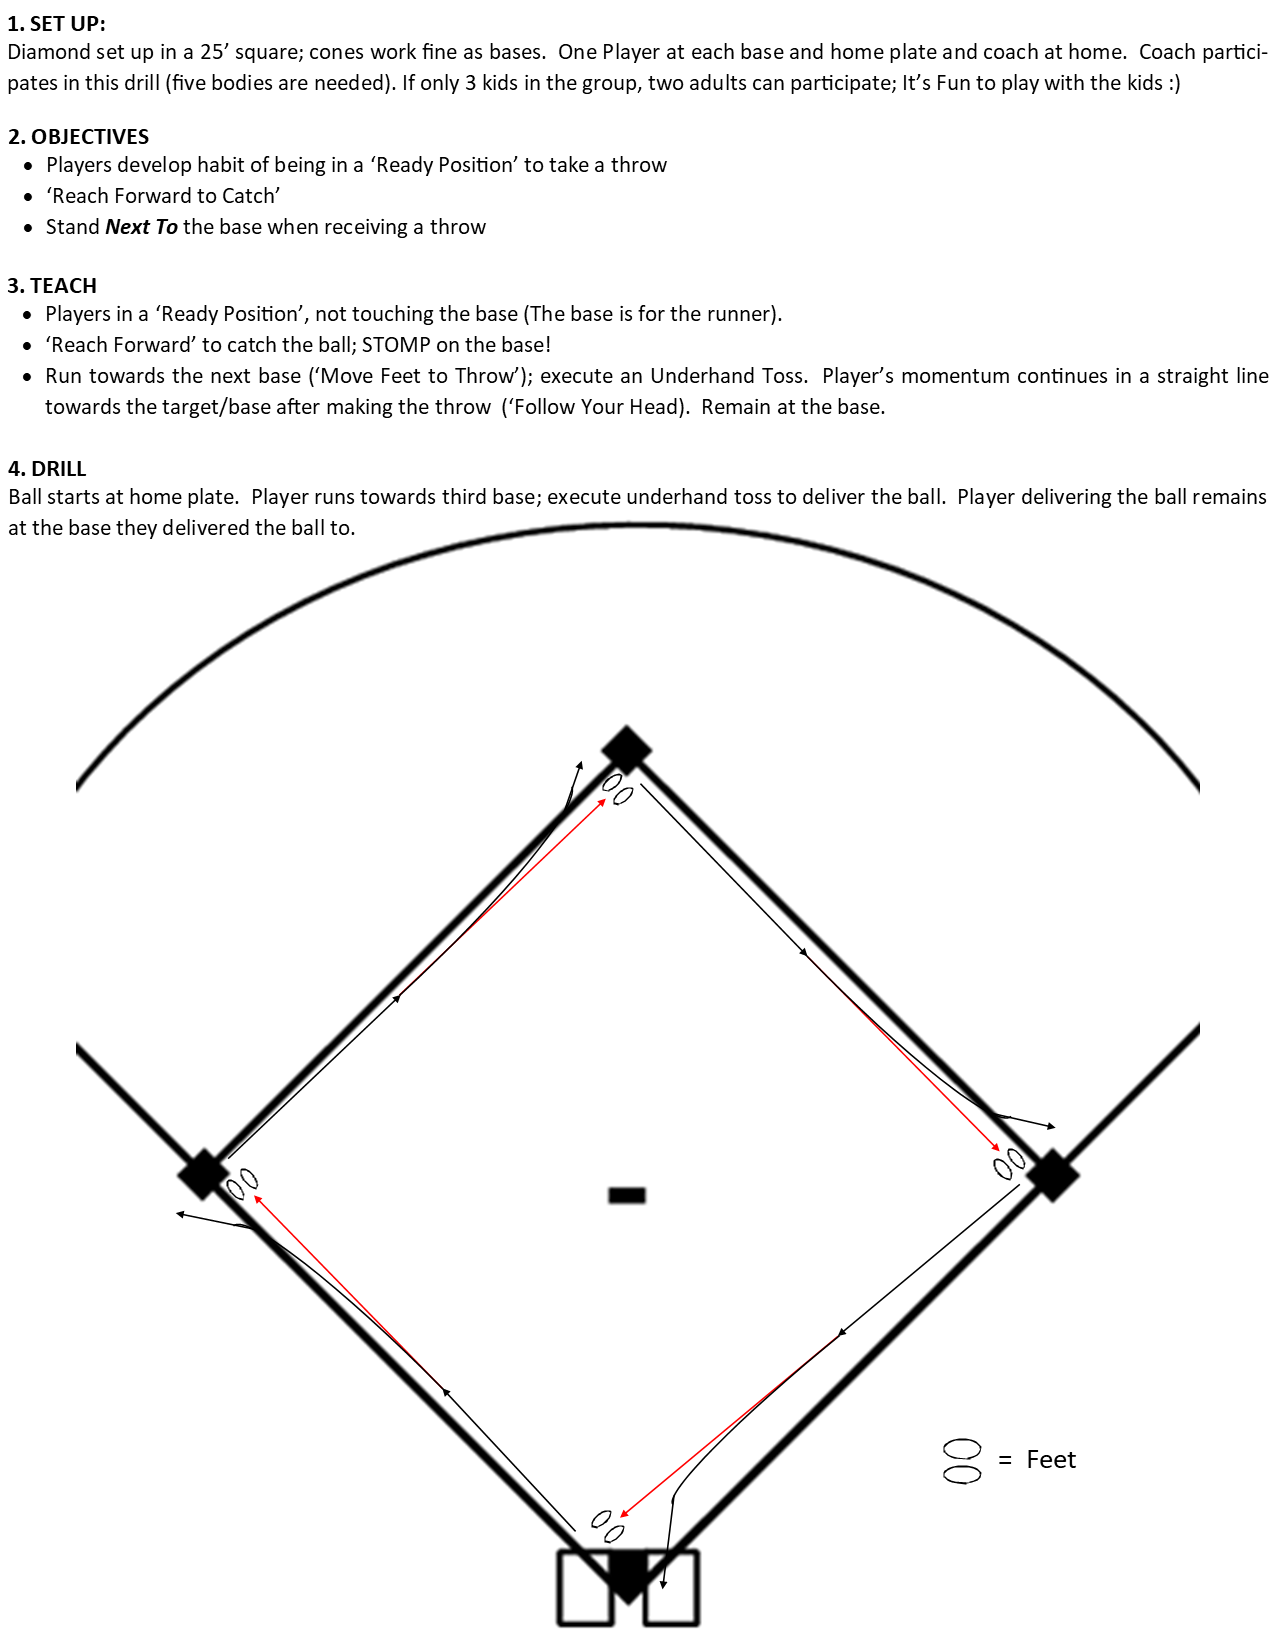
Advanced: Have the players name the base as they stomp, ie: ‘Third Base’, ‘Second Base’, etc.
Practice Plans
Practice Plan Tee Ball Day 1
Introductions (10 min)
Sit in a circle
Explain the rules for the introduction process
Only the player holding the ball is allowed to talk
Each player tells us their first name and one thing about them. - ideas:
Favorite animal .
Favorite food
School they attend .
Give the ball to one player, they introduce themselves, then pass the ball to the next player
Before each new player speaks, the coach goes around the circle and repeats the names of each player who has already spoken.
Benefits of this exercise
Kids get comfortable with each other and get to tell others about the things they like.
Players and Coaches learn each other’s names
Warm-up (5 Min)
Explain which direction players run around the bases. Point out which base is 1st, 2nd, 3rd and home.
Run around the bases .....just let 'em run...4-5 time around the bases....you'll know when they've had enough ;)
Throwing Drills (5 Min)
Teach: Power Position
Move Feet to Throw - Drills
Underhand Toss (5 Min)
Fielding Instruction (5 Min)
Fast, Slow Fast .
"Feet Wide to Catch" .
....that's the extent of Teaching Points for the season....Seriously :) .
Fielding Drills (10 Min)
20' Ground Balls .
40' Ground Balls
Receiving a Throw - Drills (10 Min)
Ready Position (‘ribbit’) / Move Feet to Catch Drill
Ready Position, 'Fingers up', 'Fingers Down'
Ready Position, 'Right Shoulder', 'Left Shoulder'
Teaching the Role of the Base (5 Min)
'The base is for the runner, the ball is for the fielders'
"Ball first, base second"
'The ball is the key to the base'
STOMP! ...when it comes to tagging the base, we teach the kids to STOMP! on the base (definition of STOMP: one feet remains on the ground and the other foot stomps). This, as much as anything, is a safety thing. A player has to pretty much come to a stop in order to Stomp. There will be many times, over the course of the season, when a defensive player, who has the ball, will be racing toward the base to tag it....while the base runner is ALSO racing towards the base. Collisions occur and tears are shed.....and sometimes a Fear or Dislike for the game is imprinted in a child's mind.
Teaching the kids to STOMP on the base to tag it requires that they slow down and Stop before tagging the base. This habit will greatly reduce collisions at bases.......aaaaaand Stomping in FUN!!!!! .
General Message We Want The Kids to Get: When covering a base we want them to stand next to the base in a 'Ready Position' to prepare for a throw - we teach the players that they DO NOT TOUCH the base until AFTER they have the ball in hand....."the base is for the runner", the defensive player has to have the ball to touch the base ....note: this is not an actual rule of the game, but its the teaching approach for young kids in order to teach them that the Ball is their first priority, the base is their second priority
Stomp Drill (5 Min)
Practice Plan Tee Ball Day 2
Warm-up - Run around the bases (5 min)
Throwing & Fielding (10 min)
Throwing Drills
20' Ground Balls ...using Underhand Toss
40' Ground Balls ...using Overhand Throw
Receiving a Throw - Drills (5 min)
Ready Position (‘ribbit’) / Move Feet to Catch - Drills
Ready Position, 'Fingers up', 'Fingers Down'
Ready Position, 'Right Shoulder', 'Left Shoulder'
Teaching the Role of the Base & Stomp Drill (10 min)
Note: this last segment does not take 10 min...the additional time is allotted because the previous series of drills may go over, by a few minutes, the time scheduled.
Two Players, One Base Drill (10 Min)
Batting (20 Min)
Batting Drills (Twist and Turn back, turn fast)
Hit off the Tees*
Use wiffle balls for batting and have three players batting at the same time. Position Tees approximately 20' apart, while also designating a line approximately 30' in front of the Tees behind which the player(s) chasing the balls are positioned. Make it clear to all players that they are not allowed to enter the space between the batters and the 30' line (for safety).
It is absolutely critical that, prior to each swing, a batter's feet are positioned in the proper relationship to the ball/tee stem.
Have each batter work at their Tee for 90 seconds - 2 minutes, then rotate other players in to bat. Ideally each player gets 2-3 times batting (the amount of times batting is determined by the number of players and the number of Tees. Beginning with Practice #4, batting will be a 'station' in the Standard Practice rotation and there will only be 3-5 players in the batting group.
* The batting tee is not used only in Tee Ball, it is a tool used throughout the playing career of a baseball player right on up through the Major League level. If you have any sense that your child will continue playing the game, give serious consideration of making the $25 investment in purchasing your own Tee. Ideally a Tee Ball team has three tees (one or two supplied by the League and 1-2 that are owned by team members), which allows three players to bat at the same time during practice.
Practice Plan Tee Ball Day 3
Warm-up - run around the bases
Receiving Throws and Fielding Drills
Adults throw to players, wide throws - players "Move Feet to Catch"
20' Ground Balls ...using Underhand Toss
40'Ground Balls ...using overhand throw
-------- we want to get through the above activities in 20 minutes...a few reps of each and keep moving on.
Two Players, One Base Drill (5 Min)
.....players only work at one base today (still three groups, a group at each base), to review the concept; don't need to rotate to different bases
Batting
Batting Drills (Twist; teach 'Switch Heels' - final version of 'Turn Back, Turn Fast')
Hit off the Tee(s)
Scrimmage (20 Min)
*** Soooooo IMPORTANT: make sure that prior to each swing the batter’s feet are in a good relationship with the ball/tee stem. Proper alignment of the feet significantly impacts that batter’s ability to hit the ball well. This very well may be more important than the quality of the swing. Keep in mind that the batter’s success (or lack of success) is not just a concern for that individual child….the kids in the field and the kids waiting for their turn to bat are all impacted by the batter’s ability to get the ball into play.
Practice Plan Tee Ball Day 4
Warm-up - Running to first base Drill (teach: don’t look at the ball) (5 Min)
Skills & Drills (7-8 minutes per station...consider time needed to rotate) (25 Min)
Playing Catch Station (choose the drills you feel are most needed)
Throwing Drills
Ready Position, 'Fingers up', 'Fingers Down'
Ready Position, 'Right Shoulder', 'Left Shoulder'
20’ ground balls
40' ground balls
Batting Station
Batting Drills (Twist, Switch Heels and Sideways Karate Chop)
Hit off the Tee(s)
Defense Station
Ranging Laterally
Two Players, One Base Drill
Break (5 Min)
Scrimmage (25 Min)
Practice Plan Tee Ball Day 5
Warm-up - Running to first base Drill (teach: don’t look at the ball) (5 Min)
Skills & Drills (7-8 minutes per station...consider time needed to rotate) (25 Min)
Playing Catch Station
Throwing Drills
Play Catch - Make 'one hop', overhand throws to each other (have ball bounce 10'-15' in front of the receiver of the throw)
20' Ground Balls - using Underhand Toss
Batting Station
Batting Drills (1. Twist, 2. Switch Heels, 3. Sideways Karate Chop)
Hit off the Tee(s)
Defense Station
Perpendicular Toss
Two Players, One Base Drill
Break (5 Min)
Scrimmage (25 Min)
Practice Plan Tee Ball Day 6
Warm-up - Run Around the Bases (5 Min)
Skills & Drills (25 Min)
Playing Catch Station
Throwing Drills
Play Catch - Make 'one hop', overhand throws to each other (have ball bounce 10'-15' in front of the receiver of the throw)
20' Ground Balls - using Underhand Toss
Batting Station
Batting Drills (1. Twist, 2. Switch Heels, 3. Sideways Karate Chop)
Hit off the Tee(s)
Defense Station
Ranging Laterally
Two Players, One Base Drill
Break (5 Min)
Scrimmage (25 Min)
Practice Plan Tee Ball Day 7
Warm-up - Run Around the Bases (5 Min)
Skills & Drills (25 Min)
Playing Catch Station
Throwing Drills
20' Ground Balls - using Underhand Toss (brief)
40' Ground Balls - Overhand Throw
Batting Station
Batting Drills
Hit off the Tee(s) ...introduce concept of "Feet in Place"
Defense Station
Perpendicular Toss
Two Players, One Base Drill
Break (5 Min)
Scrimmage (25 Min)
Practice Plan Tee Ball Day 8
Warm-up - Relay Race (10 Min)
Skills & Drills (25 Min)
Playing Catch Station
Receiving Throws and Throwing Drills
Play Catch
20' Ground Balls
Batting Station
Batting Drills
Hit off the Tee(s) ..."Feet in Place"
Defense Station
Double Plays Drill
Break (5 Min)
Scrimmage (20 Min)
Practice Plan Tee Ball Day 9
Warm-up - Run to First Base ("eyes on the base") (5 Min)
Skills & Drills (25 Min)
Playing Catch Station
Throwing Drills & Play Catch
20' Ground Balls
40' Ground Balls
Batting Station
Batting Drills
Hit off the Tee(s) ..."Feet in Place"
Defense Station
Two Players One Base Drill
Break (5 Min)
Scrimmage (25 Min)
Practice Plan Tee Ball Day 10
Warm-up - Run Around the Bases (5 Min)
Skills & Drills (25 Min)
Playing Catch Station
Throwing Drills & Play Catch
20' Ground Balls
40' Ground Balls
Batting Station
Batting Drills
Hit off the Tee(s)
Defense Station
Catch, Stomp, Throw Drill
Break (5 Min)
Scrimmage (25 Min)
Practice Plan Tee Ball Day 11
Warm-up - Run Around the Bases (5 Min)
Skills & Drills (25 Min)
Playing Catch Station
Throwing Drills & Play Catch
20' Ground Balls
40' Ground Balls
Batting Station
Batting Drills
Hit off the Tee(s)
Defense Station
Ranging Laterally
Two Players One Base Drill
Break (5 Min)
Scrimmage (25 Min)
Practice Plan Tee Ball Day 12
Warm-up - Relay Race (5 Min)
Skills & Drills (25 Min)
Playing Catch Station
Receiving Throws and throwing Drills (brief)
Play Catch (brief)
Catch, Stomp, Throw Drill
Batting Station
Batting Drills
Hit off the Tee(s)
Defense Station
Ranging Laterally
Perpendicular Toss
Break (5 Min)
Scrimmage (25 Min)
Scrimmage Teaching Points
Positioning (1b & 2b: 15' from the base; 2b & Shortstop: midway between the bases - these positions are responsible for TWO bases)
“Ready Position”
No standing on the base ("The base is for the runner, the ball is for the defense")
Throwing actions: “Move feet to throw” (underhand toss and overhand throws)
Receiving throws, teaching points
Fielding, teaching points
Base Running, teaching points
Batting, teaching points
Drills - Sequence of Introduction
Underhand Toss
20’ Ground Balls
40' Ground Balls
Two Players, One Base Drills
Base Running - To First Base
Ranging Laterally for Ground Balls
Perpendicular Toss
Catch, Stomp and Throw (mini diamond, using an underhand toss)
Double Plays
DRILLS - Batting
Twist
Switch Heels - "Turn back, turn fast‘’
Sideways Karate Chop
Teaching Progression
PROGRESSION OF SKILLS
“Ready Position” RECEIVING THROWS
“Move Feet to Catch” RECEIVING THROWS
“Reach Forward to Catch RECEIVING THROWS
Underhand Toss THROWING
“Power Position” (Goal Posts - broken goal post) THROWING
Pull with glove elbow (teach, but difficult to execute) THROWING
“Move Feet to Throw” (‘shuffle, shuffle, pull, snap’) THROWING
The bases belongs to the runners THROWS AT A BASE
Do not stand on top of the base THROWS AT A BASE
Legs power the swing, “Turn Fast” (add ‘switch heels’ on day 2 or 3) BATTING
“Head in place” BATTING
Infield Positions POSITIONING
Ball or base DEFENSIVE RESPONSIBILITIES
Run to the base DEFENSIVE RESPONSIBILITIES
Batting Stance, Front foot in relationship to ball BATTING
Batting Stance, Distance from tee BATTING
Batting Stance, Foot alignment in relation to tee and pitcher BATTING
“Head Straight” (‘steering wheel’) THROWING
“Feet wide to catch” FIELDING
“Move feet to throw” after fielding of the ball FIELDING
No ‘tacos’ RECEIVING THROWS
Fingers up to catch balls from chest up RECEIVING THROWS
“Ball first, base second” THROWS AT A BASE
Keep eyes on the ball; don’t look at the runners THROWS AT A BASE
Running to first base BASE RUNNING
Don’t look at the ball BASE RUNNING
No high arcing throws (better to throw the ball on a bounce …or two …or three) THROWING
Follow the throw in a straight line, underhand toss (in drill and game environment) THROWING
Sideways Karate Chop BATTING
Both hands used properly (pinkies together or alligator); throwing hand NOT behind glove FIELDING
Teaching Phrases
Ready Position (Goal Posts - broken goal post)
Move Feet to Catch
Reach Forward to Catch
Power Position
Move Feet to Throw
Shuffle, Shuffle, Pull, Snap
Feet Wide - batting stance, Ready Position, fielding
Turn back, Turn fast / Turn fast
Switch heels
Head in Place / Face the Ball
Feet Wide to Catch
Base is for the runner; Ball is for the defense
Ball or Base
Ball First, Base Second
Skills Check List
Process of learning, steps involved. Completing these four steps takes four practices for each given skill. Yes, it will take a month for any given skill to sink in and take hold, if we are able to cover that skill in each practice.
1 - Concept is introduced
2 - Awareness is established; execute with average competence on occasion
3 - Demonstrate an understanding; execute fairly well some of the time
4 - Gain some level of mastery; execute correctly most of the time
BASE RUNNING
Watch your foot touch the base (when running around the bases)
Running through first base is allowed
Don’t look at the ball when running to a base

BATTING
Fundamentals
Legs power the swing (“Turn Fast”)
Switch heels (¾ of players master; ¼ demonstrate an effort - after 3-4 practices)
Head in Place
Feet in Place
---> The majority of players, by the latter part of the season, can get to the point of not spinning in a circle at conclusion of swing
---> Gain awareness of head movement and some level of mastery to control (Head in Place / Face The Ball)
Stance
Front foot is even (perpendicular) with the to ball/tee stem
Stand one bat length from the tee (not a bat length and arms length)
straight line from back toes to front toes to the 'pitcher'
DEFENSIVE RESPONSIBILITIES
Ball or base
Run to the base (when not fielding the ball)
FIELDING
“Feet wide to catch”, strength will limit how many can (and how often) do this
“Move Feet to throw”, following the fielding of the ball (UH Toss or Shuffle)
Use both hands properly (pinkies together or alligator); throwing hand NOT behind glove
POSITIONING
Players get back to their positions before the next batter is ready
RECEIVING THROWS
“Ready Position” - will not be able to do this properly b/c of lack of strength
“Move Feet to Catch”
“Reach Forward to Catch” - lack of strength limits kids’ ability
No ‘tacos’
Fingers up to catch balls at chest level and above - requires parents to work with kids at home
RECEIVING THROWS AT A BASE
The bases belongs to the runners
Do not stand on top of the base
Stopping the ball is first priority over covering the base, which is priority #2
Keep eyes on the ball; don’t look at the runners
THROWING
Underhand Toss
“Power Position”
Glove elbow pull (teach, but not expected to execute, re: lack of strength at this age)
“Move Feet to Throw” (‘shuffle, shuffle, pull, snap’)
“Head Straight” (‘steering wheel’) before, during and after the throw
No throwing in a high arc
Follow the throw (underhand toss) in a straight line in drill and game environment
Not expected, but teach
Glove elbow pulls during throwing action
After the throw, follow head in a straight line toward target (overhand throw)
Herding Cats …can the tee-ball experience be improved?
We adults who work with youth baseball and youth softball players continue to make the same mistake each year. Our Tee-Ball programs are run like we have teen, college or pro players out there. The failure to recognize that, beyond the shape of the diamond and the use of a ball and bat, Tee-Ball is a far different activity from what goes on at those higher levels of play. Sports, especially baseball, are very different when played by 5-7 year olds. As much as I hate to admit it, the soccer folks have it figured out. When was the last time you saw a youth soccer game comprised of 5-7 year olds that had two sides of eleven playing against each other? Yeah, I haven’t seen it either. So why do we continue to have 5-7 year olds play baseball in a 9 v 9 situation? (And sometimes up to 12 v 12 or more.)
Why do we have outfielders in Tee-Ball? High School, College and Pro batters can hit the ball a long way, so the use of outfielders in their game is an obvious need. How many times is the ball driven to the outfield in a Tee-Ball game? What is the logic in mimicking the game played by mature teens and adults and have outfielders in Tee-Ball?& Let’s give the idea of making Tee-Ball a game of 6 v 6 a chance; played with kids at the four infield positions, pitcher and catcher. The mistake that continues year after year is having Tee-Ball rosters with 10, 12 or even more players, and playing games with four, five or more kids banished to the outfield.
These over-sized rosters create additional problems on the offensive side of the game. When we watch the game played at higher levels the players sit patiently on the bench waiting for their turn to bat. Then we take the game to the Tee-Ball level with delusional thoughts that our little tykes can do the same. Rosters of ten to twelve or more kids forces each to endure what is an agonizingly long wait for a 5-7 year old to get their chance to get up to the plate. If we gave it a moment’s thought we would recognize that asking kids this age to sit still for more than 10 seconds is truly an affront to nature.
Let’s re-evaluate our antiquated approach to how Tee-Ball is structured. Could it be that the current structure has resulted in a significant number of players leaving the game, out of boredom, long before they had an opportunity to learn what baseball is all about? Have we been losing the opportunity to fill more rosters at the higher levels within our leagues as a result of how the Tee-Ball level is currently operated? This is the first in a series of posts focused on improving the Tee-Ball Experience. This first post discusses the question of what the optimal number of players is to have on a Tee-Ball team. Also, tips are shared that will significantly increase the number of balls that are batted beyond the pitcher (and infield), and accomplish this with fewer swings, making the games more dynamic and faster paced.
Cut Back the Number of Kids on a Team
Tee-Ball should be played with six kids on a side. Period. Teams can be organized with seven on a roster, figuring that on many days we will lose one player to the sniffles, etc. On days where all seven show up, the extra player can be placed in center field (which is about 10 feet behind second base). The extra player, in this scenario, would only get stuck in the outfield one time per game, assuming we rotate defensive positions each inning. We are all doing this, right?
The concept of no outfielders might be starting to make some sense, but what about the rare occasion when a ball does find its way to the outfield? C’mon we are talking about 5-7 year olds. The infielders are more than eager to run after the ball. These little bundles of energy are dying to run around. Chasing the ball into the outfield is a major bonus for them. There is no need to have outfielders, unless our goal is to bore our kids to death and drive them from the game – sarcasm intended.
With fewer kids on the field, each player has a legitimate opportunity to participate in each PLAY. It also makes it easier for each to learn, understand and execute their defensive responsibilities, unencumbered by a mass of bodies. Having a bunch of kids spread out in ultra-shallow outfield depth waiting to accost the infielders each time the ball is put into play is not an environment for learning… OK, I admit I am exaggerating; it’s only the outfielders who are not busy searching out four leaf clovers that end up mixing with the infielders.
Can we really teach 5-7 year olds to execute basic defensive responsibilities such as covering a base, backing up a base and throwing to the correct base? The answer is a definitive, YES! I have run summer camps for six years with this age group playing 6 v 6. After 3-4 days we have the kids playing the game in an organized manner. This is not the result of a lifetime baseball hack orchestrating these groups of players. Most of my camp instructors are high school and college kids with limited training and they consistently succeed in producing organized play with this age group week after week during the summer.
More Reps and Limited ‘Dugout’ Chaos
When we make the change to 6 v 6 Tee-Ball the kids will learn more, have more fun and a higher percentage will return to play again next year. The league administrators I have talked to over the years name increased retention as a top priority, if not their #1 goal. Let’s look at a few ideas that can improve the Tee-Ball experience for the players (and the adults too).
1 --- Start each inning with runners on first and second base. Why not? This is not pro baseball; it’s not high school baseball; in fact it doesn’t closely resemble the game our 11-12 year olds play. With two kids on base and a third player batting we are left with only three little monsters to manage in the ‘dugout’. Each game one parent is designated as dugout monitor; a job that is a Day at the Beach compared to the days of chasing after ten or eleven little bundles of energy futilely trying to convince them to ‘be patient’. In addition to limiting the number of kids in the dugout, by starting each inning with two players on base we are getting more kids involved in the game. Those on the bases are gaining valuable game experience.
2 --- Kids love to hit the ball and run. By cutting in half the number of kids on a team we double the number of times each player gets to bat each game. More chances to bat means more fun, excitement and anticipation to PLAY on the part of the players. When we double the batting opportunities over the course of the season we increase skill development. Fun plus increased skill development leads to a greater number of kids having a great experience and a strong desire to return to PLAY the following year.
3 --- Fewer kids on defense allows each player to handle the ball more often. We also eliminate the confusion of having unneeded bodies running around creating chaos. In this new environment the opportunity for the kids to gain a better understanding of the game increases exponentially.
The Batter
A common circumstance at the Tee-Ball level is the game being played by three kids: The batter, the pitcher and the first baseman. This is a result of many players’ inability to hit the ball past the pitcher. Below are a few simple strategies that will result in more kids getting involved on each PLAY and everyone having more fun
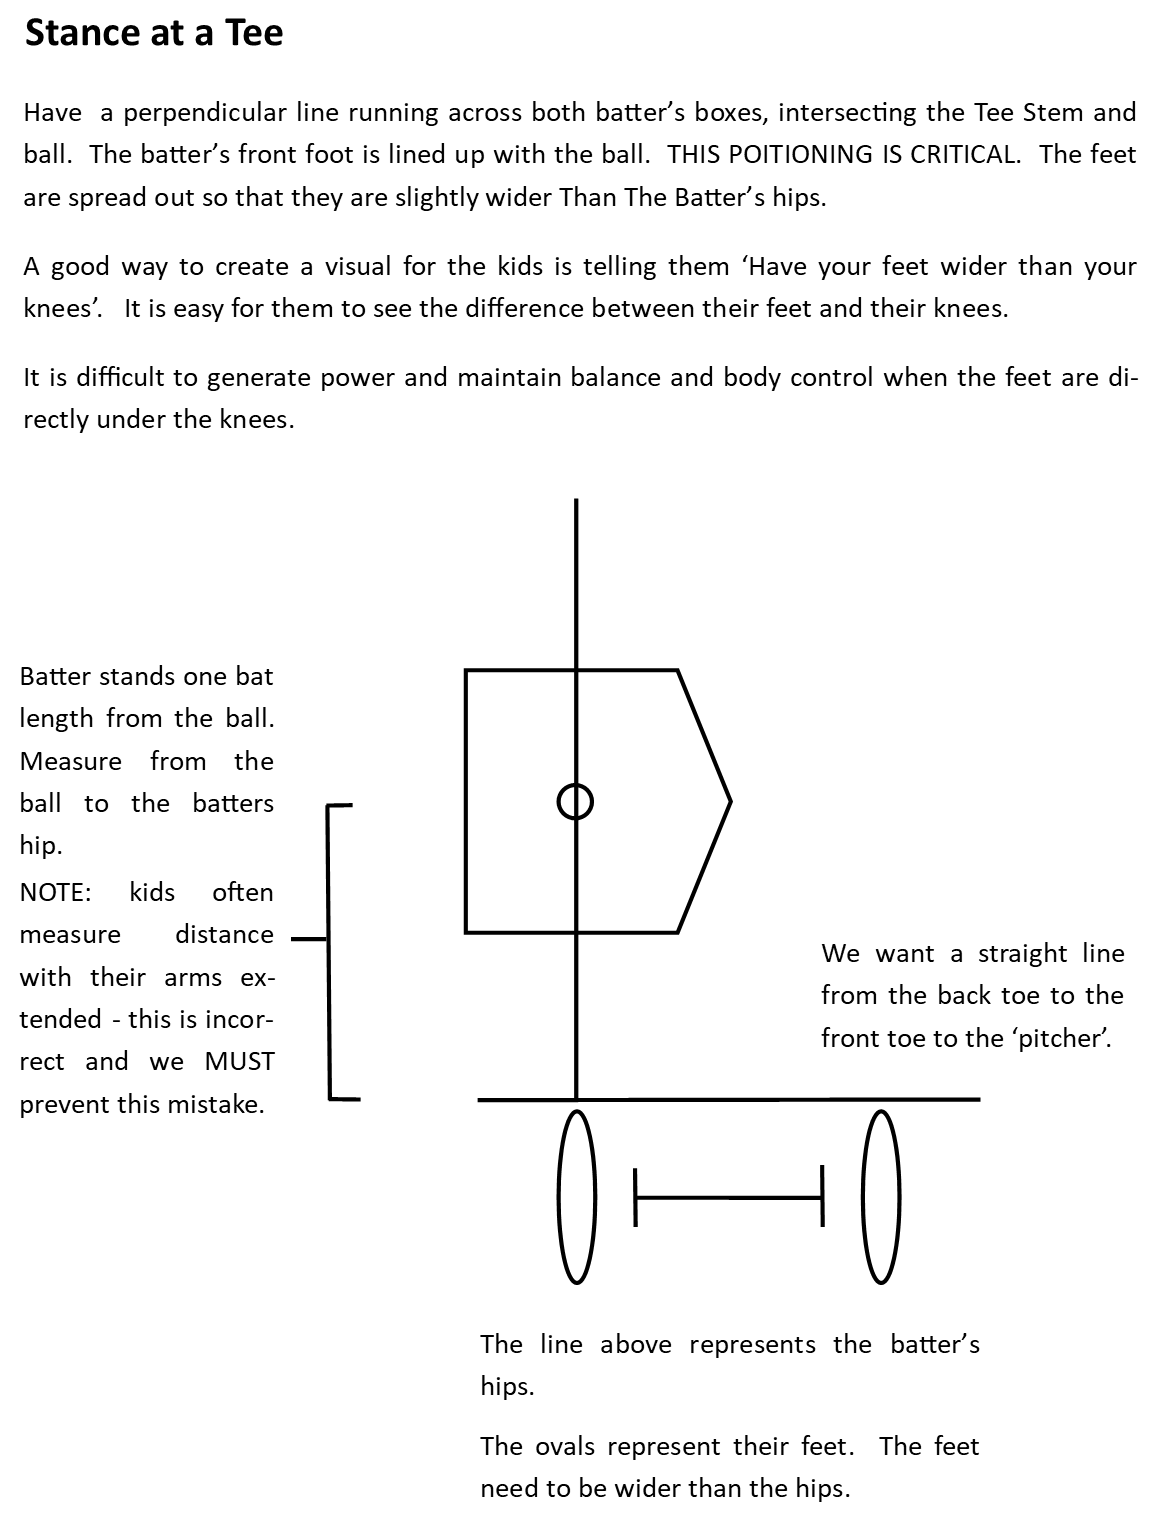
Distance the Batter Stands from the Ball on the Tee
We want the batter to stand one bat length away from the tee stem. Extend a bat from the tee stem to the batter’s body (while they stand straight and tall). You and the batter make a visual note of how far their toes are from the tee. After ‘measuring’ a few times in a practice setting the kids (and adults) will become familiar with the correct distance to stand from the tee. In most cases the players will develop a solid sense of their relationship to the tee by the first or second game. Note: batters often measure how far to stand from the ball/tee stem by extending their arms and the bat to the ball. This is incorrect.
Batter’s Box Design
Make a perpendicular line on the ground across the batter’s boxes. Use grass paint, line chalk, or anything you can come up with to make this line. Set the batting tee so the stem is lined up directly over the top of the line. Each batter places their front foot on the line when getting into their stance. This creates the ideal relationship between their body and the ball at contact. Note: take a look at pictures of baseball and softball players at the moment they are contacting the ball and you will find that contact is generally made when the ball is even with the front foot, give or take a few inches.
Incorporate (I will suggest mandate) the practice of utilizing this line across the batter’s box in all practices and games across your Tee-Ball program.This simple practice will make a greater impact on the quality of PLAY in your at the Tee-Ball level than any other single factor.
Positioning and Alignment of the Feet
The batter’s feet, at this stage of development, should be parallel with home plate. Help the batter position their feet properly. Point out to them that we want to be able to draw a straight line from the toes of their back foot to the toes of their front foot and have that line go straight out to the pitcher. The feet need to be slightly outside than the width of the shoulders (not just ‘shoulder width apart’).
Tell your Tee-Ball players to stand with their feet ‘wider than your knees’. When they look down at their knees they should not see their feet directly below their knees. Note: you will notice that most every child will prefer to stand with their feet close together. This is because, at this stage of physical development, the legs don’t have the strength to comfortably stand with the feet wider apart. The kids can develop a level of comfort standing this way, but it will require you to remind them (literally) over and over every day throughout the season. It is important to stick to this constant instruction. When the feet are wider apart, a batter is more balanced and is better able to utilize their leg strength, which is a critical factor in an effective swing.
.